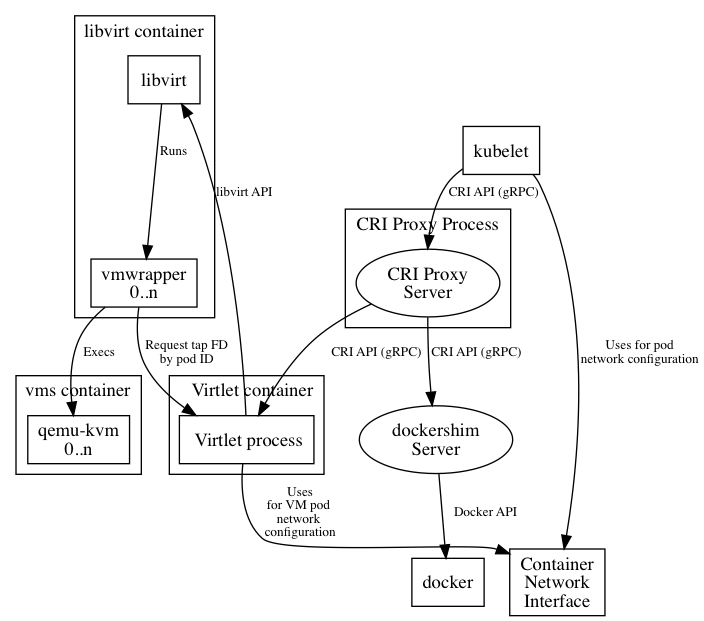
Virtlet is a Kubernetes CRI (Container Runtime Interface) implementation for running VM-based pods on Kubernetes clusters. (CRI is what enables Kubernetes to run non-Docker flavors of containers, such as Rkt.) For the sake of simplicity of deployment, Virtlet itself runs as a DaemonSet, essentially acting as a hypervisor and making the CRI proxy (Provides the possibility of mixing docker-shim and VM based workloads on the same k8s node) available to run the actual VMs This way, it’s possible to have both Docker and non-Docker pods run on the same node.
A VM pod is created in Kubernetes cluster.
Virtlet is used to create a virtual machine to support some necessary features needed by ICN. In ICN use case we need IpSec to finish some functions. So using QAT devices to speed up the connections is important. But after tests, I found that virtlet doesn't recognize the qat vf device.
To solve these problems, we should first have a clear knowledge of device plugin. A related concept for device plugin is Kubernetes extended-resources. In conclusion, By sending a patch node request to the Kubernetes apiserver, a custom resource type is added to the node, which is used for the quota statistics of the resource and the corresponding QoS configuration.
To send a patch node request conveniently, start a proxy, so that you can easily send requests to the Kubernetes API server, we first execute kube proxy command to start it temporarily, then add six intel.com/devices resource to a node (~1 in the commands will automatically transform into /):
|
|---|
Now we extend 6 intel.com/devices resources for your node, then we can see
|
|---|
Now we can use these resources in our pod by adding intel.com/devices: "1" to spec.containers.resources.requests/limits and the pod will be scheduled with statistics.
To clean up the extended resources, execute the following commands:
|
|---|
Kubernetes provides to vendors a mechanism called device plugins to finish the following three tasks, device plugins are simple gRPC servers that may run in a container deployed through the pod mechanism or in bare metal mode.
service DevicePlugin { // returns a stream of []Device rpc ListAndWatch(Empty) returns (stream ListAndWatchResponse) {} rpc Allocate(AllocateRequest) returns (AllocateResponse) {} } |
|---|

In Kubernetes, Kubelet will offer a register gRPC server which allows the device plugin to register itself to Kubelet. When starting, the device plugin will make a (client) gRPC call to the Register function that Kubelet exposes. The device plugins sends a RegisterRequest to Kubelet to notify Kubelet of the following informations, and Kubelet answers to the RegisterRequest with a RegisterResponse containing any error Kubelet might have encountered (api version not supported, resource name already register), then the device plugin start its gRPC server if it did not receive an error.
After successful registration, Kubelet will call the ListAndWatch function from the device plugin. A ListAndWatch function is for the Kubelet to Discover the devices and their properties as well as notify of any status change (devices become unhealthy). The list of devices is returned as an array of all devices description information (ID, health status) of the resource. Kubelet records this resource and its corresponding number of devices to node.status.capacity/allocable and updates it to apiserver. This function will always loop check, once the device is abnormal or unplugged from the machine, it will update and return the latest device list to Kubelet.
In this way, when creating a pod, fields such as intel.com/qat can be added to spec.containers.resource.limits/requests: "1" to inform Kubernetes to schedule the pod to nodes with more than one intel.com/qat resource allowance. When the pod is to run, Kubelet will call device plugin allocate function. Device plugin may do some initialization operations, such as QAT configuration or QRNG initialization. If initialization is successful, this function will return how to config the device assigned to the pod when the container is created, and this configuration will be passed to the container runtime as a parameter used to run the container.
To use the extended resource, we add intel.com/qat to spec.containers.resource.limits/requests, we expect the request to have limits == requests.
When receiving a pod which requests devices, Kubelet is in charge of:
The Kubernetes scheduler is in charge of filtering the nodes which cannot satisfy the resource requests.
When testing the QAT sr-iov support condition with the officer virtlet image, together with QAT device plugin. We take thie simple straightforward method that adds the resource name qat.intel.com/generic advertised by the QAT device plugin to fields spec.containers.resource.limits and spec.containers.resource.requests with value "1". It works correctly in plain kubernetes pods. But in a virtlet vm pod, we encountered the conflict caused by the configuration transformed between virtual machine and pod by virtlet. The issues is that when allocating a QAT vf device to virtlet vm pod, Kubelet will add the extended device to kubeapi.PodSandboxConfig.Devices (k8s.io/kubernetes/pkg/kubelet/apis/cri/runtime/v1alpha2 - v1.14). Then virtlet will incorrectly transform all these devices to its volume devices and considers them as block disk with disk drivers bound to them later.
for _, dev := range in.Config.Devices { |
|---|
It causes the errors that too many disks, disks' reading issues, denied permission and so on after a vm pod starts. And regardless of this, I want to assign QAT vf to the virtlet pod by pci-passthrough. So I want to add corresponding fields into the libvirt instance domain xml created by virtlet. After code analysis, virtlet is a cri implement and in its createDomain(config *types.VMConfig) *libvirtxml.Domain (pkg/libvirttools/virtualization.go) I detect the xml file creation and find it is using the libvirtxml "github.com/libvirt/libvirt-go-xml" go module. So the whole workflow is clear now and I can fix it then.
domain := &libvirtxml.Domain{ ... |
|---|
Because Virtlet creates a VM by libvirt instance. So we config QAT devices to its domain file to finish the QAT device assignment. Virtlet can get the QAT device id from the environment variables which are advertised by QAT device plugin and passed by Kubelet. Then we can easily assign a QAT vf device into a Virtlet VM by PCI-passthrough supported by libvirt hostdev api.
<hostdev mode='subsystem' type='pci' managed='yes'> |
|---|
And for further code information, you can get from the my fork version of Virtlet in https://github.com/leyao-daily/virtlet
I have uploaded the QAT enabled image into docker hub and you can download it by 'docker pull integratedcloudnative/virtlet-qat:test'. After the Virtlet Pod runs, you can set up a VM with QAT vf device. Add the orange line with the number of QAT vf you want to assign into spec.containers.resource.limits/requests of your Virtlet VM yaml file like below.
... resources: ... |
|---|