KubeVirt is a Kubernetes CRD(Custom Resource Definitions) implement. It is a virtual machine management add-on for Kubernetes. The aim is to provide a common ground for virtualization solutions on top of Kubernetes.
In details, KubeVirt technology addresses the needs of development teams that have adopted or want to adopt Kubernetes but possess existing Virtual Machine-based workloads that cannot be easily containerized. So KubeVirt extends Kubernetes by adding additional virtualization resource types (especially the VM/VMI type) through Kubernetes's Custom Resource Definitions API. By using this mechanism, the Kubernetes API can be used to manage these VM resources alongside all other resources Kubernetes provides. The resources themselves in Kubernetes are not enough to launch virtual machines. For this to happen, the functionality and business logic needs to be added to the cluster. Scheduling, networking, and storage are all delegated to Kubernetes, while KubeVirt provides the virtualization functionality. The functionality is not added to Kubernetes itself, but rather added to a Kubernetes cluster by running additional controllers and agents on an existing cluster. And these necessary controllers and agents are all provided by KubeVirt.
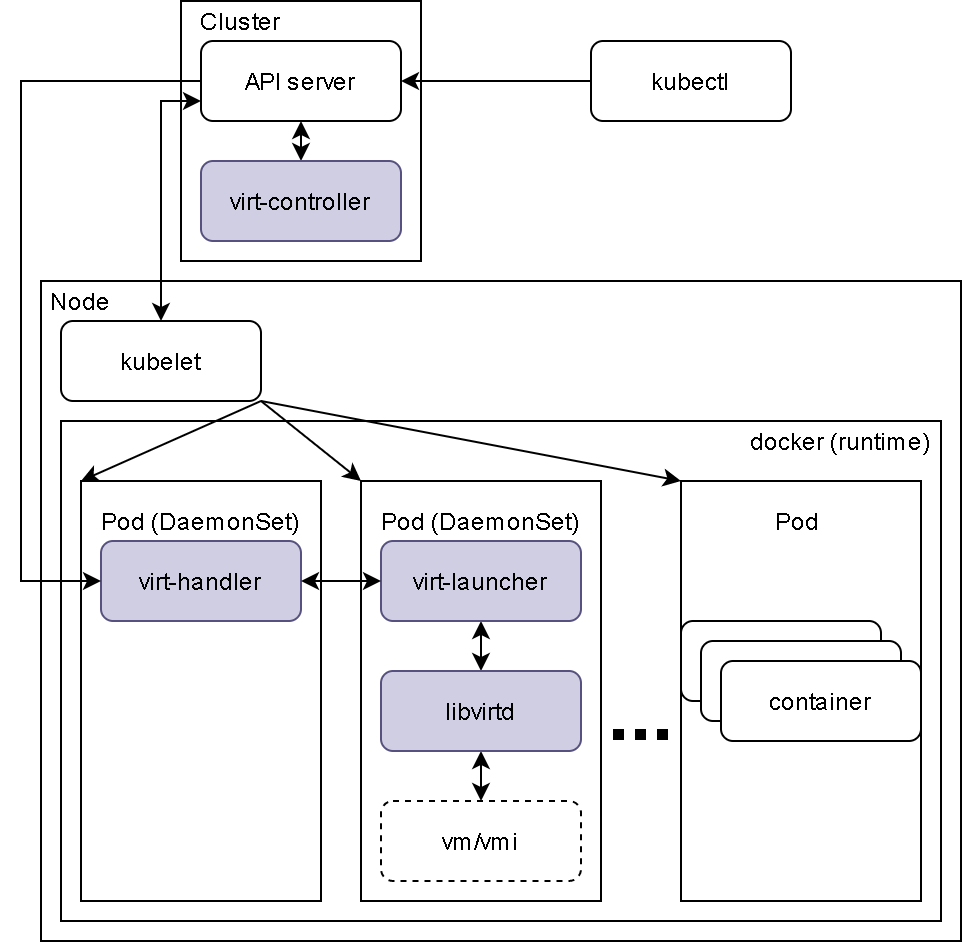
KubeVirt delivers three things to provide the new functionality:
Once all three steps have been completed, you are able to create new objects (VM/VMI) in Kubernetes and the new controllers take care to get the VMIs scheduled on some host, and a daemon - the virt-handler is taking care of a host alongside the kubelet to launch the VMI and configure it until it matches the required state.
More specifically, the technology provides a unified development platform where developers can build, modify, and deploy applications residing in both Application Containers as well as Virtual Machines in a common, shared environment. Teams with a reliance on existing virtual machine-based workloads are empowered to rapidly containerize applications. With virtualized workloads placed directly in development workflows, teams can decompose them over time while still leveraging remaining virtualized components as is comfortably desired.
Intel QuickAssist Technology is developed by Intel and runs on the Intel Architecture to provide security and compression acceleration capabilities to improve performance and efficiency. It will offload the workloads like cryptography and compression from the CPU to hardware. Server, networking, big data, and storage applications use Intel QuickAssist to offload compute-intensive operations, such as:
It has made great benefits in many areas, such as Hadoop Acceleration, OpenSSL Integration, SDN and NFV Solutions Boost and so on.
–4G LTE and 5G encryption algorithm offload for mobile gateways and infrastructure.
–VPN traffic acceleration, with up to 50 Gbps crypto throughput and support for IPsec and SSL acceleration.
–Compression/decompression up to 24 Gbps throughput.
–I/O virtualization using PCI-SIG Single-Root I/O Virtualization (SR-IOV).
With above support, QAT makes it easier for developers to integrate the accelerators in their designs and thus decrease the development time. And it can increase business flexibility by offering solutions that best fit the changing business requirements. It also frees up the valuable cycles on processors and allows it to perform value-added functionality.
What's more, QAT provides a uniform means of communication between accelerators, applications, and acceleration technologies. Due to this, the resources are managed more productively. Then It can boost application throughput, by reducing the demand on the platform and maximizing the CPU utilization.
First of all, in a Kubernetes cluster, if we need utilize the QAT card and assign its vf to a container, we will compile the QAT driver on the host and deploy the QAT device plugin. After the QAT device plugin register successfully, a ListAndWatch function is for the Kubelet to Discover the devices and their properties as well as notify of any status change (devices become unhealthy). The list of devices is returned as an array of all devices description information (ID, health status) of the resource. Kubelet records this resource and its corresponding number of devices to node.status.capacity/allocable and updates it to apiserver.
In this way, when creating a plain pod, fields such as intel.com/qat can be added to spec.containers.resource.limits/requests: "1" to inform Kubernetes to schedule the pod to nodes with more than one intel.com/qat resource allowance. When the pod is to run, Kubelet will call device plugin allocate function. Device plugin may do some initialization operations, such as QAT configuration or QRNG initialization. If initialization is successful, this function will return how to config the device assigned to the pod when the container is created, and this configuration will be passed to the container runtime as a parameter used to run container.
This workflow runs well in Kubernetes, but Kubevirt doesn't support for it. Because Kubevirt is a CRD implenment and it fails to process the pod-type configuration in its yaml file. It has its own api server and controller to verify the CRD definition and create a corresponding pod. Thie means we can not assign a QAT vf to the Kubevirt VM by adding spec.containers.resource.limits/requests: "1" with QAT resource name to the VMI configuration file. So the gaps in Kubevirt to enable QAT may be following items:
Kubevirt use the feature of Kubernetes name Dynamic Admission Control and create Kubevirt API through a ValidatingAdmissionWebhook. This feature allows KubeVirt to dynamically register an HTTPS webhook with Kubernetes at KubeVirt install time. After registering the custom webhook, all requests related to KubeVirt API objects are forwarded from the Kubernetes API server to our HTTPS endpoint for validation. If our endpoint rejects a request for any reason, the object will not be persisted into etcd and the client receives our response outlining the reason for the rejection.
So to enable QAT in Kubevirt, it is necessray to create related segments to the validation service and add the QAT feature Gate verified method.
... "qats": { ... "v1.QAT": { |
|---|
... if spec.Domain.Devices.QATs != nil && !config.QATPassthroughEnabled() { ... |
|---|
...
To meet the Kubernetes and Kubevirt community specifications, the pod should be non-privileged. So we should mount the assigned QAT pci device to the VM through the interfaces Kubevirt provided.
| if util.IsQATVMI(vmi) { for _, qat := range vmi.Spec.Domain.Devices.QATs { requestResource(&resources, qat.DeviceName) } } |
|---|
This will call the Kubevirt to mount necessary resources for QAT into the VM, such as /sys/devices/.
Fundamentally, Kubevirt create a Kubernetes CRD to hold some resource configurations that fit a libvrit instance. So actually to assign a QAT vf into a VM is to create a libvirt and insert the specific device into hostdev block. (In libvirt, hostdev label means a plain host device assignment with all its limitations)
| <hostdev mode='subsystem' type='pci' managed='yes'> <driver name='vfio'/> <source> <address domain='0x0000' bus='0x3d' slot='0x02' function='0x2'/> </source> <alias name='hostdev0'/> <address type='pci' domain='0x0000' bus='0x00' slot='0x04' function='0x0'/> </hostdev> |
|---|
So when a QAT vf resource is required, I call the Kubevirt method to get the device id of the assigned QAT and integrate it into libvirt domain.
// Append HostDev to libvirt DomXML if QAT is required qatPCIAddresses := append([]string{}, c.QATDevices...) ... |
|---|
Based on the Kubevirt official example VMI file, to make use of my QAT version, after building its docker images and uploading to docker, we should open the QAT feature gate through configmap.
| apiVersion: v1 kind: ConfigMap metadata: name: kubevirt-config namespace: kubevirt labels: kubevirt.io: "" data: feature-gates: "QAT" |
|---|
And the key point of QAT VMI:
... spec: ... |
|---|
The patch now has not been merged into the Kubevirt Project and is in review now. (PR: https://github.com/kubevirt/kubevirt/pull/2980)