...
Bare Metal Deployment Guide
Install Bare Metal Jump Host : N/A
Creating a Node Inventory File: N/A
Creating the Settings Files: N/A
Running: N/A
Virtual Deployment Guide
- Install Ubuntu18.04.1 OS on arm Server
...
Operating system iso download link: http://old-releases.ubuntu.com/releases/18.04.1/ubuntu-18.04.1-server-arm64.iso
About how to install Ubuntu 18.04.1 on kunpeng arm server: https://support.huawei.com/enterprise/zh/doc/EDOC1100100619
-
- Local tool requirements
- 1. Install remote tools such as MobaXterm. MobaXterm is recommended.
- 2. Install VNC Viewer. Download link: https://www.realvnc.com/en/connect/download/viewer/.
-
- Pre-condition requirements
1.The Ubuntu 18.04.x operating system has been installed.
2.The network connection is normal and can communicate with the external network.
3.The download source has been configured. If not configured, please configure as follows.- Configure download source
1. Log in to the server via SSH and enter the command line execution entry.
2. Modify the file "/etc/apt/sources.list" to remove all # symbols in front of the # deb-src line.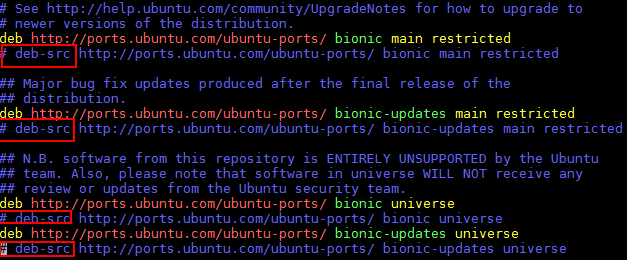
- Configure download source
- Pre-condition requirements
Execute command modification.
sed -i "s/# deb-src/ deb-src/g" /etc/apt/sources.list
After modification as follows:
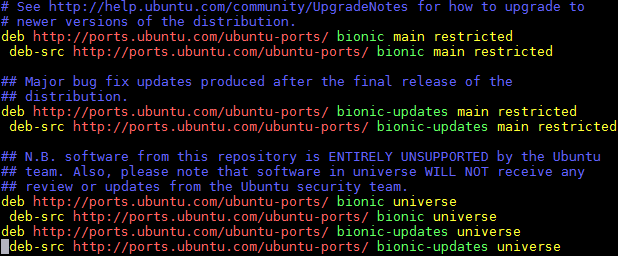
3. Update source.
apt-get update
-
- Install dependent libraries and basic components
1. Remove the comment of deb-src in /etc/apt/source.list.
sed -i "s/# deb-src/ deb-src/g" /etc/apt/sources.list apt update
2. Install the basic system dependency library.
Notice:
If there is a failure to obtain the deb package during the installation process, please download and install manually according to the URL in the prompt, and then reinstall the unsuccessful package.
apt install dpkg libncurses5-dev libncursesw5-dev libssl-dev cmake cmake-data debhelper dbus google-mock libboost-dev libboost-filesystem-dev libboost-log-dev libboost-iostreams-dev libboost-program-options-dev libboost-system- dev libboost-test-dev libboost-thread-dev libcap-dev libdbus-1-dev libegl1-mesa-dev libgles2-mesa-dev libglib2.0-dev libglm-dev libgtest-dev liblxc1 libproperties-cpp-dev libprotobuf-dev libsdl2 -dev libsdl2-image-dev lxc-dev pkg-config protobuf-compiler libboost-filesystem1.62.0 libboost-system1.62.0 docker.io dkms libboost-iostreams1.62.0 apt install build-essential apt install mesa-common-dev
3. Download location https://launchpad.net/ubuntu/zesty/arm64/libprocess-cpp3/3.0.1-0ubuntu5.
dpkg -i libprocess-cpp3_3.0.1-0ubuntu5_arm64.deb
4. The missing libdbus-cpp5_5.0.0+16.10.20160809-0ubuntu2_arm64.deb dependent library is downloaded from https://launchpad.net/ubuntu/zesty/arm64/libdbus-cpp5/5.0.0+16.10.20160809-0ubuntu2.
dpkg -i libdbus-cpp5_5.0.0+16.10.20160809-0ubuntu2_arm64.deb
5. The missing libdbus-cpp-dev_5.0.0+16.10.20160809-0ubuntu2_arm64.deb dependent library from https://launchpad.net/ubuntu/bionic/arm64/libdbus-cpp-dev/5.0.0+16.10.20160809- 0ubuntu2 official download.
dpkg -i libdbus-cpp-dev_5.0.0+16.10.20160809-0ubuntu2_arm64.deb
...
-
- Replace docker storage driver
Open a new window and perform the following operations.
1. Log in to the server via SSH and enter the command line execution entry.
2. View docker information.docker info
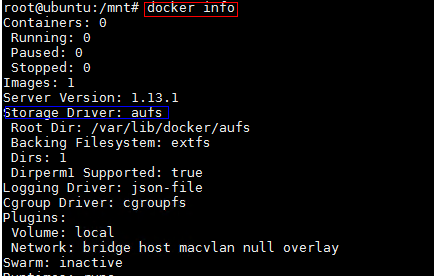
- 3. Modify the version of the storage driver.
- If the "storage driver" version is "overlay", no adjustment is required.
If the version of "storage driver" is "aufs", you need to change "storage driver" from "aufs" to "overlay".1) Open the "/etc/default/docker" file.
vim /etc/default/docker
2) Add the following script.
DOCKER_OPTS= -s overlay
3)It will take effect after restarting docker or reboot./etc/init.d/docker restart
-
- Install Remote Desktop
Step 1 Install remote desktop.
apt install xfce4 xfce4-* xrdp
Step 2 The situation of the environment without hardware GPU configuration is as follows.
cd /home/ubuntu
vi .xsession //Add the following in the text:xfce4-session
Step 3 Confirm after saving.
cat .xsession
xfce4-session
Step 4 Restart the xrdp remote desktop.
/etc/init.d/xrdp restart
After that, you can access the graphical desktop of the server where the Huawei Kunpeng 920 processor is located through the Windows remote desktop, and log in with the root account.
Incorporate exagear transcoding patch
1. Create a directory.
mkdir -p /home/compiler2. Download the three source files of linux_4.15.0.orig.tar.gz, linux_4.15.0-65.74.diff.gz, linux_4.15.0-65.74.dsc, and put them into the "/home/compiler/" directory.
The physical machine kernel source code download address: https://launchpad.net/ubuntu/+source/linux/4.15.0-65.743. Enter the "/home/compiler/" directory.
cd /home/compiler/- ls
linux_4.15.0-65.74.diff.gz linux_4.15.0-65.74.dsc linux_4.15.0.orig.tar.gz
4. The source code directory linux-4.15.0 will be generated in the current directory.
dpkg-source -x linux_4.15.0-65.74.dsc
5. Please extract exagear-a32a64-docker.tar.gz to the /home/ directory, and rename the decompressed folder to exagear.
cd /home/tar zxvf exagear-a32a64-docker.tar.gz
mv "ExaGear ARM32-ARM64 for Android Docker" exagear //Rename the purpose: to facilitate subsequent use
cd /home/exagear
ls
android //安卓源码转码补丁
translator //物理机上用于转码的二进制可执行文件
kernel //物理机内核的转码补丁
6. Copy the transcoded patch to the kernel source directory.
cp /home/exagear/kernel/ubuntu-4.15.0-65.74.patch /home/compiler/linux-4.15.0/cd /home/compiler/linux-4.15.0/
patch -p1 <ubuntu-4.15.0-65.74.patch
- Compile and install the kernel
1. Save and exit directly, and generate the configuration file .config vim .config.
make menuconfig
2. Confirm the following configuration items, if none or inconsistent, please manually change or add.
CONFIG_EXAGEAR_BT=y
CONFIG_CHECKPOINT_RESTORE=y
CONFIG_PROC_CHILDREN=y
CONFIG_VFAT_FS=y
CONFIG_INPUT_UINPUT=y
3. Compile and install.
make -j64 //compile
make modules_install //Install modules
make install // install the kernel
cd /boot/grub
sudo update-grub2 //Update startup items
4. Restart.
reboot
-
- Transcode registration after the new kernel is enabled
1. After the physical machine restarts, the transcoding registration is enabled.
2. Mount the binfmt_misc file system, which is mounted by default. If it is not mounted, please execute it manually.
mount -t binfmt_misc none /proc/sys/fs/binfmt_misc3. Register exagear transcoding rules, pay attention to the following multiple places to store and use the "/opt/exagear/ubt_a32a64" path information of the ubt_a32a64 transcoding binary to be consistent.
mkdir -p /opt/exagearcp /home/exagear/translator/ubt_a32a64 /opt/exagear/
cd /opt/exagear //The directory for storing transcoded binary files. When registering echo, please pay attention to /opt/exagear/ubt_a32a64
chmod +x ubt_a32a64 //Avoid registration permission denied
- 4. Check whether the exagear rules are successfully registered, and ensure that the "/opt/exagear/ubt_a32a64" path information is consistent.
cat /proc/sys/fs/binfmt_misc/ubt_a32a64
- 4. Check whether the exagear rules are successfully registered, and ensure that the "/opt/exagear/ubt_a32a64" path information is consistent.
-
- Compile and install binder.ko and ashmem.ko modules
-
- nstall Anbox
-
- Install Anbox
Anbox is a free and open-source compatibility layer that aims to allow mobile applications and mobile games developed for Android to run on GNU/Linux distributions.
Upstream Deployment Guide
- Upstream Deployment Key Features :N/A
- Special Requirements for Upstream Deployments :N/A
- Scenarios and Deploy Settings for Upstream Deployments :N/A
- Including Upstream Patches with Deployment:N/A
- Running: N/A
- Interacting with Containerized Overcloud: N/A
...
- Reporting a Bug
N/A
Uninstall Guide
The following method only uses snap to install Anbox. If you want to delete Anbox from the system, you must first delete snap.
Attention:Remove all data stored in the snapshot from the system:
$ snap remove anbox
After deleting the snapshot, you must also delete the installed kernel modules (if installed):
$ sudo apt install ppa-purge
$ sudo ppa-purge ppa:morphis/anbox-support
Upon completion, Anbox will be removed from your system.N/A
Troubleshooting
- If kernels modules successfully loaded, service is running fine, and yet Anbox won't launch with
Application manager service is not running yet. Check for the messageNo space left on device - Failed to enter cgroupin/var/lib/anbox/logs/container.log, you may be running into see this issue: https://github.com/lxc/lxd/issues/6257 - If container started failed
...