...
Upon successful login, the Akraino Portal home page will appear.
...
Deploy an Edge Site Based on a Rover Blueprint
From the Portal home page:
- Select an Edge Site MTN1 ( or MTN2 (these are the two default lab sites hosted in middle town NJ) by clicking on the radio button provided in the GUI table displayed in the Home page. These are the two default sites available in the Seed code.first column of the table.
- For the selected Edge siteSite, select a Rover Blueprint (Rover or Unicycle) from the drop-down menu.
- Click on Upload button (in the Blueprint Sites column), this will open a pop-up dialog
- Provide the edge site-specific details such as:
- Host IP address
Host
userusername
Host password.
Click on Browse button, select the input file for Blueprint - Rover (Single-Node Cluster).
The input file is a property file that stores information inkey-valueformat. Sample input file used for ‘Rover’ deploy:Info Copy and paste the below contents in to a file, and save it as rover.txt. Use this file for uploading as mentioned in step 4.d above.
Verify the configuration details as applicable to your environment. For more details refer to Appendix - Edge Site Configuration
Code Block language text title rover.txt # Copyright 2018 AT&T Intellectual Property.
#All other rights reserved. # # Licensed under the Apache License, Version 2.0 (the "License"); # you may not use this file except in compliance with the License. # You may obtain a copy of the License at #
#
http://www.apache.org/licenses/LICENSE-2.0
#
# Unless required by applicable law or agreed to in writing, software
# distributed under the License is distributed on an "AS IS" BASIS,
# WITHOUT WARRANTIES OR CONDITIONS OF ANY KIND, either express or implied.
# See the License for the specific language governing permissions and
# limitations under the License.
host name#
server SRV_NAME=aknode42Add proxy settings if required for your
out of band interface information for server (idracenvironment # export http_proxy=http://your.proxy.com:8080/ #
42export https_proxy=http://your.proxy.com:8080/ # # host name for server SRV_NAME=aknode44 # server oem - Dell or HPE (case sensitive) SRV_OEM=Dell # out of band interface information for server (idrac/ilo/etc) SRV_OOB_IP=192.168.41.
# server oem - Dell or HPE (case sensitive) SRV_OEM=Dell # name of network interface used during build when "ipxe efi" file is booted and when OS is booted # ipxe numbers interfaces from 0-n in pci bus order. # the netX value will depend on how many nics are in the server # and which pci device number is assigned to the slot SRV_IPXE_INF=net4 SRV_BLD_INF=enp94s0f0 SRV_BOOT_DEVICE=sdg44 SRV_OOB_USR=root SRV_OOB_PWD=calvin
# mac address of server to be used during the build - not required for Dell servers
# SRV_MAC=3c:fd:fe:b8:10:60
# name of network interface used during build when ipxe.efi is booted and when os is booted
# ipxe numbers ports from 0-n in pci bus order.
# the netx value will depend on how many nics are in the server
# and which pci device number is assigned to the slot
SRV_IPXE_INF=net8
# the build interface is the nic used by the Ubuntu installed to load the OS
SRV_BLD_INF=enp135s0f0
# the boot device is the device name on which the OS will be loaded
SRV_BOOT_DEVICE=sdg
# ipxe script to use - based on the os version and kernel to install
# valid options are script-hwe-16.04.5-amd64.ipxe or script-16.04.5-amd64.ipxe
SRV_BLD_SCRIPT=script-hwe-16.04.5-amd64.ipxe
# template xml file to set bios and raid configuration settings
SRV_BIOS_TEMPLATE=dell_r740_g14_uefi_base.xml.template
SRV_BOOT_TEMPLATE=dell_r740_g14_uefi_httpboot.xml.template
SRV_HTTP_BOOT_DEV=NIC.Slot.7-1-1
template# tempalte to run to configure OS after first boot # current options are: firstboot.sh.template, firstboot-genesis.sh.
-airship-iabtempate or firstboot-airship-iab.sh.template SRV_FIRSTBOOT_TEMPLATE=firstboot
.sh.template# VLAN to use during build and for final network configuration SRV_VLAN=41
42# basic network information for dhcp config and final server network settings SRV_MTU=9000 SRV_IP=192.168.2.44 SRV_SUBNET=192.168.2.0 SRV_NETMASK=255.255.255.0 SRV_GATEWAY=192.168.2.200 SRV_DNS=192.168.2.85 SRV_DOMAIN=lab.akraino.org SRV_DNSSEARCH=lab.akraino.org SRV_NTP=ntp.ubuntu.org
# root password for server being built
SRV_PWD=akraino,d
enp94s0f0# network bond information SRV_BOND=bond0 SRV_SLAVE1=
enp94s0f1enp135s0f0 SRV_SLAVE2=
enp135s0f1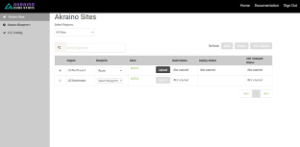
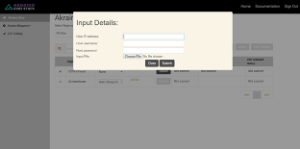
5. Click on Submit. This will upload the input file and the site details into the portal.
...
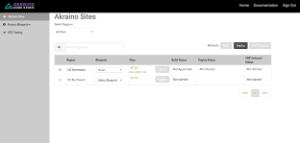
a. Click on Deploy to begin the deploy process.
b. This process takes about an hour.
c. User can click on Refresh (link) to update the status of the deploy on the portal.
d. The deploy status changes from ‘Not started’ to ‘In progress’ to ‘Complete’
7. User can additionally check the log files to track the progress of edge site installation, by logging into the regional_node_ip via ssh, and running this command: tail -f /var/log/scriptexecutor.log
Tempest Tests
Prerequisites
...