| Table of Contents |
|---|
Introduction
IEC Type3 mainly focus on Android Application running on edge ARM Cloud architecture with GPU/ vGPU Management. Also, ARM cloud games need to have the basic features of "cloud”, such as flexibility , availability everywhere. Based on cloud infrastructure optimized for android application, providing ARM application services.
How to use this document
This document describes the
...
construction,
...
compilation and use of
...
robox Android container environment.
...
Introduce environment configuration, code download, build and compile, and how to use it.
How to use this document
This document provides a general deployment about about the contruction of Android container environment, including pre-installation requirements, installation step, uninstall and troubleshootingThis document is mainly suitable for users who build and compile robox container Android emulation.
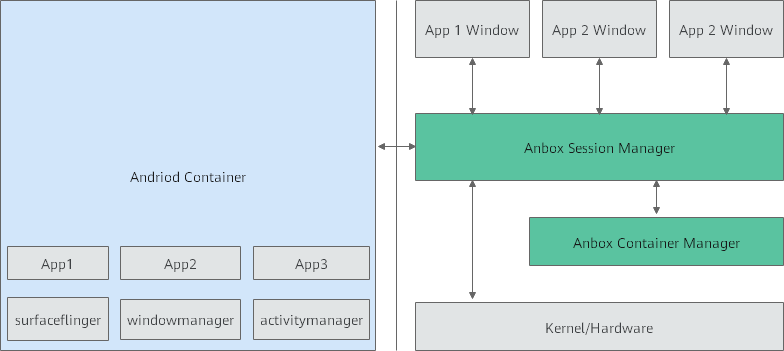
Deployment Architecture
Pre-Installation Requirements
Hardware Requirements
1*x86 server: The remaining memory is greater than 100G, and JAVA1.8.X is pre-installed.
1*arm server:
Processor model | 21*Kunpeng 920 processor |
RAM | 16*DDR4-2933 |
Storage | 10*2.5 inch SAS/SATA/SSD or 8*2.5 inch NVMe SSD |
Network | 1 onboard network card, each card supports 4*GE port or 4*10GE port or 4*25GE port |
Power Supply | Power 100~240V AC,240V DC |
Scale | 447 mm x 490 mm x 86.1 mm |
ARM Server satisfies the Arm Server Ready certified.
Software Perequisites
...
item | method | |
|---|---|---|
robox | robox is an Android container. | 1. Log in to the server via SSH and enter the command line execution entry. 3. Download the robox source code package and switch to the release-phase2.3 branch. git clone https://github.com/lag-linaro/robox.git -b release-phase2.3 The robox source code directory is: /home/ubuntu/robox
If the source code download fails, use the following command to skip verification: export GIT_SSL_NO_VERIFY=1 ) |
robox Compile and run dependent packages | Dependent packages are packages that support robox compilation and operation. Before robox compilation, all dependent packages need to be installed. |
apt-get install build-essential cmake cmake-data debhelper dbus google-mock libboost-dev libboost-filesystem-dev libboost-log-dev libboost-iostreams-dev libboost-program-options-dev libboost-system-dev libboost-test-dev libboost-thread-dev libcap-dev libdbus-1-dev libdbus-cpp-dev libegl1-mesa-dev libgles2-mesa-dev libglib2.0-dev libglm-dev libgtest-dev liblxc1 libproperties-cpp-dev libprotobuf-dev libsdl2-dev libsdl2-image-dev lxc-dev pkg-config protobuf-compiler |
docker run dependent packages | The installation is complete before configuring docker. |
apt-get install docker.io |
Database Perequisites
schema scripts: N/A
Other Installation Requirements
- Jump Host Requirements:N/A
- Network Requirements: N/A The network connection is normal and can communicate with the external network.
- Bare Metal Node Requirements :N/A
- Execution Requirements (Bare Metal Only) :N/A
Installation High-Level Overview
Bare Metal Deployment Guide
Install Bare Metal Jump Host : N/A
Creating a Node Inventory File: N/A
Creating the Settings Files: N/A
Running: N/A
Virtual Deployment Guide
- Install Debian 10 OS on Server
- Install kubectl on Linux
- Download the latest release with the command:
To download a specific version, replace thecurl -LO https://storage.googleapis.com/kubernetes-release/release/`curl -s https://storage.googleapis.com/kubernetes-release/release/stable.txt`/bin/linux/arm64/kubectl$(curl -s https://storage.googleapis.com/kubernetes-release/release/stable.txt)portion of the command with the specific version.For example, to download version v1.18.0 on Linux, type:curl -LO https://storage.googleapis.com/kubernetes-release/release/v1.18.0/bin/linux/amd64/kubectl - Make the kubectl binary executable.
chmod +x ./kubectl - Move the binary in to your PATH.
sudo mv ./kubectl /usr/local/bin/kubectlTest to ensure the version you installed is up-to-date:kubectl version --client Install Anbox
- Install necessary kernel modules
- Install the Anbox snap
Get Os Image from https://cdimage.debian.org/debian-cd/current/arm64/iso-cd/
Install kubectl binary with curl on Linux
Anbox is a free and open-source compatibility layer that aims to allow mobile applications and mobile games developed for Android to run on GNU/Linux distributions.
To install Anbox your system need to support snaps. We do not officially support any other distribution method of Anbox at the moment but there are community made packages for various distributions (e.g. Arch Linux). However please keep in mind that the Anbox project can give not support them and its solely in the responsibility of the community packager to keep up with upstream development and update the packaging to any new changes. Please feel free to report still any bugs you encounter as they may not be related to the packaging.If you don’t know about snaps yet head over to snapcraft.io to get an introduction of what snaps are, how to install support for them on your distribution and how to use them.The installation of Anbox consists of two steps.
1、Install kernel modules
To install the necessary kernel modules, please read Install Kernel Modules.
After correct installation you should have two new nodes in your systems /dev directory:
$ ls -1 /dev/{ashmem,binder}
/dev/ashmem
/dev/binder
2、Install the Anbox snap
The second step will install the Anbox snap from the store and will give you everything you need to run the full Anbox experience.
Installing the Anbox snap is very simple:
$ snap install --devmode --beta anbox
If you didn’t logged into the Ubuntu Store yet, the snap command will ask you to use sudo snap … in order to install the snap:
$ sudo snap install --devmode --beta anbox
At the moment we require the use of –devmode as the Anbox snap is not yet fully confined. Work has started with the upstream snapd project to get support for full confinement.
As a side effect of using –devmode the snap will not automatically update. In order to update to a newer version you can run:
$ snap refresh --beta --devmode anbox
Information about the currently available versions of the snap is available via:
$ snap info anbox
- Install Ubuntu18.04.1 OS on arm Server
Operating system iso download link: http://old-releases.ubuntu.com/releases/18.04.1/ubuntu-18.04.1-server-arm64.iso
About how to install Ubuntu 18.04.1 on kunpeng arm server: https://support.huawei.com/enterprise/zh/doc/EDOC1100100619
-
- Local tool requirements
- 1. Install remote tools such as MobaXterm. MobaXterm is recommended.
- 2. Install VNC Viewer. Download link: https://www.realvnc.com/en/connect/download/viewer/.
-
- Pre-condition requirements
1.The Ubuntu 18.04.x operating system has been installed.
2.The network connection is normal and can communicate with the external network.
3.The download source has been configured. If not configured, please configure as follows.- Configure download source
1. Log in to the server via SSH and enter the command line execution entry.
2. Modify the file "/etc/apt/sources.list" to remove all # symbols in front of the # deb-src line.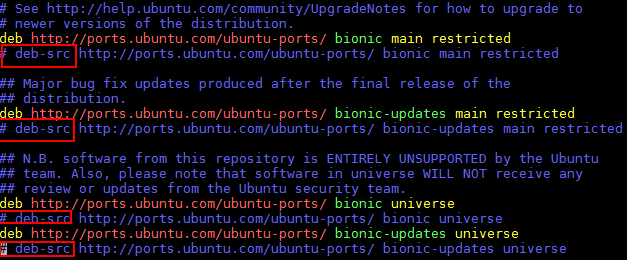
- Configure download source
- Pre-condition requirements
Execute command modification.
sed -i "s/# deb-src/ deb-src/g" /etc/apt/sources.list
After modification as follows:
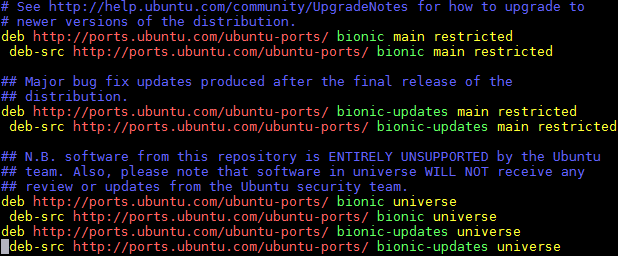
3. Update source.
apt-get update
-
- Install dependent libraries and basic components
1. Remove the comment of deb-src in /etc/apt/source.list.
sed -i "s/# deb-src/ deb-src/g" /etc/apt/sources.list apt update
2. Install the basic system dependency library.
Notice:
If there is a failure to obtain the deb package during the installation process, please download and install manually according to the URL in the prompt, and then reinstall the unsuccessful package.
apt install dpkg libncurses5-dev libncursesw5-dev libssl-dev cmake cmake-data debhelper dbus google-mock libboost-dev libboost-filesystem-dev libboost-log-dev libboost-iostreams-dev libboost-program-options-dev libboost-system- dev libboost-test-dev libboost-thread-dev libcap-dev libdbus-1-dev libegl1-mesa-dev libgles2-mesa-dev libglib2.0-dev libglm-dev libgtest-dev liblxc1 libproperties-cpp-dev libprotobuf-dev libsdl2 -dev libsdl2-image-dev lxc-dev pkg-config protobuf-compiler libboost-filesystem1.62.0 libboost-system1.62.0 docker.io dkms libboost-iostreams1.62.0 apt install build-essential apt install mesa-common-dev
3. Download location https://launchpad.net/ubuntu/zesty/arm64/libprocess-cpp3/3.0.1-0ubuntu5.
dpkg -i libprocess-cpp3_3.0.1-0ubuntu5_arm64.deb
4. The missing libdbus-cpp5_5.0.0+16.10.20160809-0ubuntu2_arm64.deb dependent library is downloaded from https://launchpad.net/ubuntu/zesty/arm64/libdbus-cpp5/5.0.0+16.10.20160809-0ubuntu2.
dpkg -i libdbus-cpp5_5.0.0+16.10.20160809-0ubuntu2_arm64.deb
5. The missing libdbus-cpp-dev_5.0.0+16.10.20160809-0ubuntu2_arm64.deb dependent library from https://launchpad.net/ubuntu/bionic/arm64/libdbus-cpp-dev/5.0.0+16.10.20160809- 0ubuntu2 official download.
dpkg -i libdbus-cpp-dev_5.0.0+16.10.20160809-0ubuntu2_arm64.deb
-
- Replace docker storage driver
Open a new window and perform the following operations.
1. Log in to the server via SSH and enter the command line execution entry.
2. View docker information.docker info
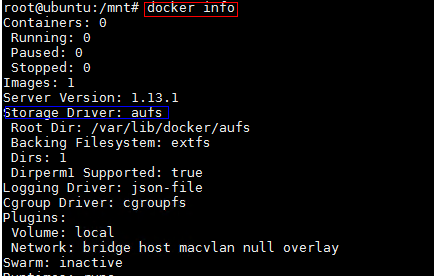
- 3. Modify the version of the storage driver.
- If the "storage driver" version is "overlay", no adjustment is required.
If the version of "storage driver" is "aufs", you need to change "storage driver" from "aufs" to "overlay".1) Open the "/etc/default/docker" file.
vim /etc/default/docker
2) Add the following script.
DOCKER_OPTS= -s overlay
3)It will take effect after restarting docker or reboot.
/etc/init.d/docker restart
-
- Install Remote Desktop
Step 1 Install remote desktop.
apt install xfce4 xfce4-* xrdp
Step 2 The situation of the environment without hardware GPU configuration is as follows.
cd /home/ubuntu
vi .xsession //Add the following in the text:xfce4-session
Step 3 Confirm after saving.
cat .xsession
xfce4-session
Step 4 Restart the xrdp remote desktop.
/etc/init.d/xrdp restart
After that, you can access the graphical desktop of the server where the Huawei Kunpeng 920 processor is located through the Windows remote desktop, and log in with the root account.
Incorporate Exagear transcoding patch
- Exagear module instruction translation software supports AArch32 feature of Kunpeng cloud mobile phone scene, and ensures 100% compatibility of AArch32 instruction application.
1. Create a directory.
mkdir -p /home/compiler2. Download the three source files of linux_4.15.0.orig.tar.gz, linux_4.15.0-65.74.diff.gz, linux_4.15.0-65.74.dsc, and put them into the "/home/compiler/" directory.
The physical machine kernel source code download address: https://launchpad.net/ubuntu/+source/linux/4.15.0-65.743. Enter the "/home/compiler/" directory.
cd /home/compiler/- ls
linux_4.15.0-65.74.diff.gz linux_4.15.0-65.74.dsc linux_4.15.0.orig.tar.gz
4. The source code directory linux-4.15.0 will be generated in the current directory.
dpkg-source -x linux_4.15.0-65.74.dsc
5. Please extract exagear-a32a64-docker.tar.gz to the /home/ directory, and rename the decompressed folder to exagear.
cd /home/tar zxvf exagear-a32a64-docker.tar.gz
mv "ExaGear ARM32-ARM64 for Android Docker" exagear //Rename the purpose: to facilitate subsequent use
cd /home/exagear
ls
android //安卓源码转码补丁
translator //物理机上用于转码的二进制可执行文件
kernel //物理机内核的转码补丁
6. Copy the transcoded patch to the kernel source directory.
cp /home/exagear/kernel/ubuntu-4.15.0-65.74.patch /home/compiler/linux-4.15.0/cd /home/compiler/linux-4.15.0/
patch -p1 <ubuntu-4.15.0-65.74.patch
- Compile and install the kernel
1. Save and exit directly, and generate the configuration file .config vim .config.
make menuconfig
2. Confirm the following configuration items, if none or inconsistent, please manually change or add.
CONFIG_EXAGEAR_BT=y
CONFIG_CHECKPOINT_RESTORE=y
CONFIG_PROC_CHILDREN=y
CONFIG_VFAT_FS=y
CONFIG_INPUT_UINPUT=y
3. Compile and install.
make -j64 //compile
make modules_install //Install modules
make install // install the kernel
cd /boot/grub
sudo update-grub2 //Update startup items
4. Restart.
reboot
-
- Transcode registration after the new kernel is enabled
1. After the physical machine restarts, the transcoding registration is enabled.
2. Mount the binfmt_misc file system, which is mounted by default. If it is not mounted, please execute it manually.
mount -t binfmt_misc none /proc/sys/fs/binfmt_misc3. Register exagear transcoding rules, pay attention to the following multiple places to store and use the "/opt/exagear/ubt_a32a64" path information of the ubt_a32a64 transcoding binary to be consistent.
mkdir -p /opt/exagearcp /home/exagear/translator/ubt_a32a64 /opt/exagear/
cd /opt/exagear //The directory for storing transcoded binary files. When registering echo, please pay attention to /opt/exagear/ubt_a32a64
chmod +x ubt_a32a64 //Avoid registration permission denied
- 4. Check whether the exagear rules are successfully registered, and ensure that the "/opt/exagear/ubt_a32a64" path information is consistent.
cat /proc/sys/fs/binfmt_misc/ubt_a32a64
-
- Compile and install binder.ko and ashmem.ko modules
1. Download the kernel source code for the kernel module to compile.
apt search linux-source apt install linux-source-4.15.0
2. Download the code and roll back to the specified version. Community link https://github.com/anbox/anbox-modules.
cd /home git clone https://github.com/anbox/anbox-modules.git
cd anbox-modules/ git reset --hard 816dd4d6e702cf77a44cfe208659af6c39e02b57
3. update ashmem and binder.
cd /home/anbox-modules
cp anbox.conf /etc/modules-load.d/
cp 99-anbox.rules /lib/udev/rules.d/
cp -rT ashmem /usr/src/anbox-ashmem-1
cp -rT binder /usr/src/anbox-binder-1
4. Compile and install using dkms.
dkms install anbox-ashmem/1
dkms install anbox-binder/1
5. Install the ko module to the kernel, and the binder_linux module needs to take parameters.
modprobe ashmem_linux
modprobe binder_linux num_devices=254
lsmod | grep -e ashmem_linux -e binder_linux
6. if the attribute permissions of ashmem and binder are not displayed by the following commands, please add the permissions with chmod.
ls -alh /dev/binder* /dev/ashmem
- Compile and install binder.ko and ashmem.ko modules
-
- Package it through android.img and store it in docker
1. Log in to the server by SSH and enter the command line execution portal.
2. Mount the android image to the "/mnt" directory.
cd /home mount /home/android.img /mnt
3. CD /mnt
4. image register
tar --numeric-owner -cf- . | docker import - android:robox_with_exagear
5. inquire android container
docker images
- Compile Robox source code
1. create compile directory
cd /home/robox-master
mkdir build
cd build
2. Compile the configuration and execute the command in the "/home/robox-master/build" directory.
cmake ..
3. Add the following in the "/usr/include/glm/gtx/transform.hpp" file.
vim /usr/include/glm/gtx/transform.hpp
Add the following definition at line 21:
#define GLM_ENABLE_EXPERIMENTAL
4. compile and install
make j64
- make install
-
- Start robox Android system
1.Copy the startup script robox in the binaryFiles directory in the downloaded robox-master source code to /home/robox-master
2. Execute the modified robox script and start the robox Android container
a. Set environment variables and assign containers to GPU cards to run.
export DISPLAY=:0
start the first continer instance
./robox -v start 1
start the second continer instance
./robox -v start 2
3.Check the docker instance process.
docker ps
4.Check the host session process, mainly check whether the two sessions corresponding to instance1 and instance2 are running normally.
ps -aux | grep session
5.Log in to the Android container and confirm whether the robox instance started successfully.
docker exec -it instance1 sh
77b2c041315f:/ # getprop | grep sys.boot.completed
[sys.boot_completed]: [1]
//sys.boot.completed shows 1 which means start successfully
Upstream Deployment Guide
- Upstream Deployment Key Features :N/A
- Special Requirements for Upstream Deployments :N/A
- Scenarios and Deploy Settings for Upstream Deployments :N/A
- Including Upstream Patches with Deployment:N/A
- Running: N/A
- Interacting with Containerized Overcloud: N/A
Verifying the Setup as defined the Akraino validation feature project plus any additional testing specific to the blue print
Developer Guide and Troubleshooting
- Utilization of Images
N/A
- Post-deployment Configuration
...
- Debugging Failures
N/A
- Reporting a Bug
N/A
Uninstall Guide
The following method only uses snap to install Anbox. If you want to delete Anbox from the system, you must first delete snap.
Attention:Remove all data stored in the snapshot from the system:
$ snap remove anbox
After deleting the snapshot, you must also delete the installed kernel modules (if installed):
$ sudo apt install ppa-purge
$ sudo ppa-purge ppa:morphis/anbox-support
Upon completion, Anbox will be removed from your system.N/A
Troubleshooting
- If kernels modules successfully loaded, service is running fine, and yet Anbox won't launch with
Application manager service is not running yet. Check for the messageNo space left on device - Failed to enter cgroupin/var/lib/anbox/logs/container.log, you may be running into see this issue: https://github.com/lxc/lxd/issues/6257 - If container started failed
...
To build the Anbox runtime itself there is nothing special to know. but when we use cmake as build system. A few build dependencies need to be present on your host system:
* libdbus
* google-mock
* google-test
* libboost
* libboost-filesystem
* libboost-log
* libboost-iostreams
* libboost-program-options
* libboost-system
* libboost-test
* libboost-thread
* libcap
* libsystemd
* mesa (libegl1, libgles2)
* libglm
* libsdl2
* libprotobuf
* protobuf-compiler
* python2
* lxc (>= 3.0)
Maintenance
Blue Print Package Maintenance
- Software maintenance: N/A
- Hardware maintenance:N/A
Blue Print Deployment Maintenance (N/A)
Frequently Asked Questions
N/A
License
N/A
References
N/A
Definitions, acronyms and abbreviations
N/A