Table of Contents
Introduction
BlueField2 SmartNIC solutions combine Arm® processing power with advanced network offloads to accelerate a multitude of security, networking and storage applications.
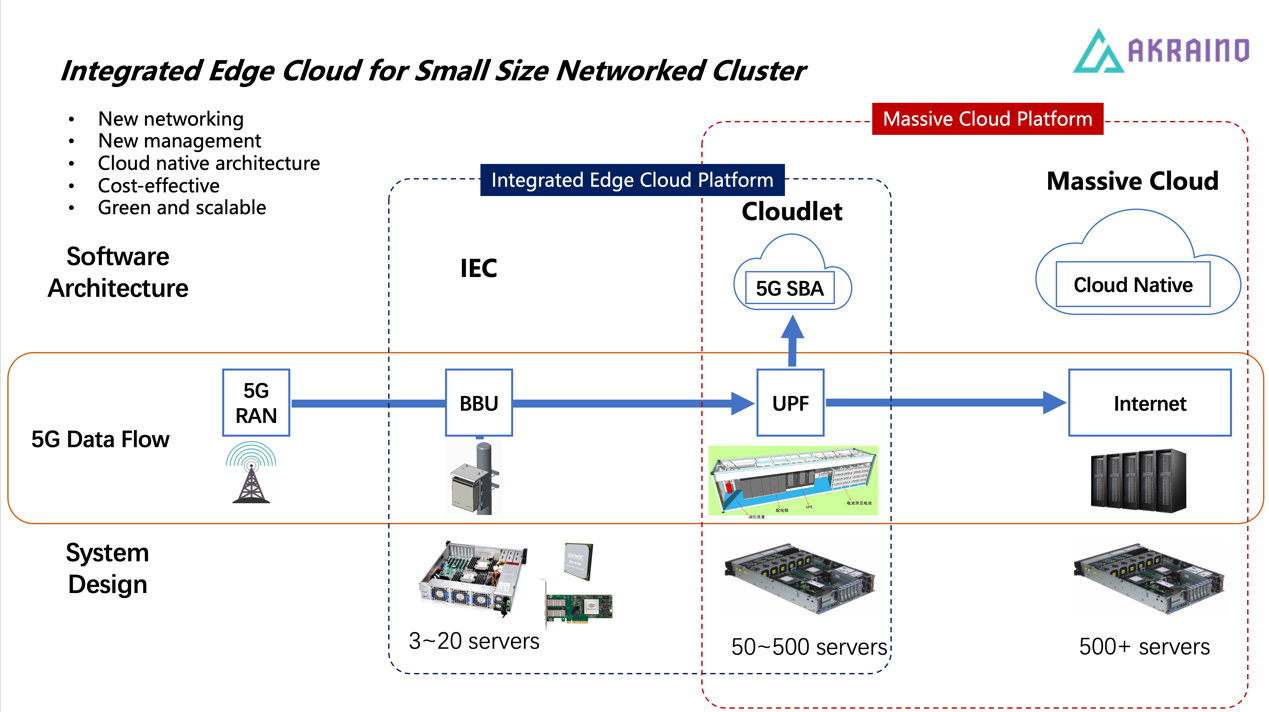
Based on the BlueField2 system-on-chip (SoC) programmable network engine, BlueField2 SmartNICs integrate Mellanox ConnectX®-6 Dx network controller with Arm multicore processors and cryptology options to deliver an innovative and high-performance programmable platform. Through this article, you will be able to quickly set up a simple test lab which will allow you to experiment and explore BlueField2 SmartNIC capabilities. The setup includes a bare metal server hosting BlueField2 25GbE SmartNIC connected back-to-back to another bare metal server with ConnectX-6 Dx NIC.Since DPU is PCIe-compatible device, we can further combine DPU and PCIe Networking together. In R6, we introduce a hardware layer or physical link/fabric layer between the DPU and the CPUs as below. With this layer, we extend the DPU cluster size and also use the DPU management features as well.
License
N/A
How to use this document
this document is used to guide how to install the OVS-DPDK into SmartNIC and integrate it necessary software with the server.
Deployment Architecture
The following diagram shows the physical configuration between the BlueField2 SmartNIC and the ConnectX-6 Dx NIC.
Pre-Installation Requirements
1. Hardware Requirements
...
Hardware Requirements
...
Intel(R) Xeon(R) Gold 6248 CPU @ 2.50GHz/ 40 cores / 2 numa / 320G memory
Intel(R) Xeon(R) Gold 6248 CPU @ 2.50GHz/ 40 cores/ 2 numa / 320G memory
...
- CentOS 7.6 over Arm architecture
- MLNX_OFED_LINUX-5.2-1.0.4
- DPDK libraries version 20.11
- Pre-configured network settings for easy SmartNIC management
3xarm64 server:
Arch | AARCH64 |
Processor model | 1 x processor, each 24 x A53 cores |
RAM | 32GB DDR4-2400 ECC |
Storage | 10*2.5 inch SAS/SATA/SSD or 8*2.5 inch NVMe SSD |
| XPU Fabric | 1x16GbE(20GT/s) PCIe Net |
Network | 2x1GbE port (RJ45) |
Power Supply | 15watts (100~240V AC,240V DC) |
Scale | 420 mm x 240 mm x 86.1 mm |
ARM Server satisfies the Arm Server Ready certified.
2.
- Insert ConnectX-6 Dx NIC into Server A
- Insert BlueField2 SmartNIC into Server B
- Connect the SmartNIC UART cable from SmartNIC to its hosting Server B USB port #1
- Connect Mini USB cable from SmartNIC to its hosting Server B USB port #2
- Insert QSA28 Adapter Module into Server B 25GB port
- Connect one of the SmartNIC ports to the ConnectX-6 Dx using 25GB cable
- Connect both servers to a management LAN
Recommended Hardware Requirements
N/A
3. Software Prerequisites
...
item |
Note
- Use automatic FM update during MLNX_OFED installation ONLY if the current BlueField2 FW version is 24.29.1016 or above. In case its older, manually burn the FW after MLNX_OFED installation.
- In case you plan to run DPDK on the host itself, install MLNX_OFED with "--dpdk --upstream-libs" flags
OVS-DPDK
- In R3, We've open-sourced a fork of DPDK based Open vSwitch, which supports the VXLAN decap/encap full offload: https://github.com/bytedance/ovs-dpdk, and In R4, we used the Mellanox version which is in the process of open source
- The code is fully compatible with upstream Open vSwitch, you can follow the same procedures to build them from the source. See the link: http://docs.openvswitch.org/en/latest/intro/install/
- Or you can use the ansible scripts in the Akaino Gerrit to install both BlueField2 Card and OVS-DPDK. Currently, the scripts are not available, as the scripts work by relying on many company's internal services. We are refactoring the code that you can use it in your own SmartNIC setups.
| comments | method | |
os | centos7 | N/A |
docker | N/A | apt-get install docker.io |
swarm | N/A | docker pull swarm |
portainer | N/A | docker pull portainer |
4. Database Prerequisites
N/A
5. Schema scripts
N/A
6. Other Installation Requirements
N/A
7. Jump Host Requirements
N/A
8. Network Requirements
N/A
9. Bare Metal Node Requirements
N/A
10 Execution Requirements (Bare Metal Only)
N/A
Installation High-Level Overview
SmartNIC Server Preparations
- Install useful packages:
...
yum install -y screen minicom net-tools tcpdump usbutils net-utils sshpass iptables-services fio epel-release iperf wget git unzip perl pciutils lsof tcl libxml2-python tk unbound gtk2 atk cairo gcc-gfortran tcsh nvme-cli
- Install MLNX_OFED with the mentioned flags below.
...
tar -xzvf MLNX_OFED_LINUX-5.2-1.0.4.0-rhel7.6-x86_64.tgzcd MLNX_OFED_LINUX-5.2-1.0.4.0-rhel7.6-x86_64./mlnxofedinstall --add-kernel-support
Note
- Use an automatic FM update during MLNX_OFED installation ONLY if the current BlueField2 FW version is 24.29.1016 or above. In case its older, manually burn the FW after MLNX_OFED installation.
- In case you plan to run DPDK on the host itself, install MLNX_OFED with "--dpdk --upstream-libs" flags
- Enable SR-IOV on FW (Optional):
...
mlxconfig -y -d /dev/mst/mt41686_pciconf0 s SRIOV_EN=1mlxconfig -y -d /dev/mst/mt41686_pciconf0 s NUM_OF_VFS=8
- Download and install RShim driver to communicate with BlueField2 SmartNIC, including packages required.
...
yum install pciutils-devel libusbx-devel fuse-devel
rpm -Uvh rshim-<version-number>.x86_64.rpm -force
Note: Before start the driver, guarantee that old version of kernel modules are unloaded if there has.
...
rmmod rshim_net
rmmod rshim_pcie
rmmod rshim_usb
rmmod rshim
systemctl start rshim
- Create a file named ifcfg-tmfifo_net0 under /etc/sysconfig/network-scripts/ directory, with the following content:
...
NAME="tmfifo_net0"HWADDR="00:1a:ca:ff:ff:02"ONBOOT=yesNETBOOT=yesIPV6INIT=yesBOOTPROTO=staticTYPE=EthernetIPADDR=192.168.100.1NETMASK=255.255.255.0
- ifcfg-tmfifo_net0 is the network interface used for IP communication between the x86 host and the SmartNIC with rshim driver.
- The oob_net0 interface on BlueField2 ARM can be used for management interface and a connection to outside. The configuration for it can be as below:
...
NAME="oob_net0"
DEVICE="oob_net0"
NM_CONTROLLED="yes"
PEERDNS="yes"
ONBOOT="yes"
BOOTPROTO="dhcp"
TYPE=Ethernet
- Disable Firewall and Network Manager services
...
systemctl disable firewalld.servicesystemctl disable NetworkManager
- Reboot the server. Once the server is up again, run some configuration sanity tests:
- To verify BlueField2 FW version:
...
mlxfwmanager --query
- To verify RShim driver is working:
...
systemctl status rshim
- To identify the backend active RShim driver:
...
cat /dev/rshim0/misc
- To verify the NAT rule for SmartNIC communication with the outer world:
...
iptables -L -n -t nat
- Download the BlueField2 Quick Start bfb image: http://www.mellanox.com/downloads/BlueField/BlueField-3.5.0.11563/BlueField-3.5.0.11563_install.bfb
- Place the bfb image on the host and load it on the BlueField2 SmartNIC using the following command:
...
cat /home/CentOS7.6-5.4.60-mlnx.51.ge913ebd-MLNX_OFED-5.2-1.0.4.0-1-aarch64.bfb > /dev/rshim0/boot
Note: CentOS based bfb is not officially supported.
Use one of the console access methods described in the "SmartNIC Management Methods" section below to follow the image installation process.
When bfb image installation process is completed, connect to the SmartNIC with the console or SSH, as described below, and test connectivity from the SmarNIC OS to the outer world.
- SmartNIC Management Methods
To manage the SmartNIC from the hosting server, use one of the following methods
Access Credentials: root\centos
Console over USB-Serial / Serial Port properties: Rate 115200, HW Flow Control OFF.
...
minicom -D /dev/ttyUSB0
Console over USB (rshim_usb) / Serial Port properties: Rate 115200, HW Flow Control OFF
...
minicom -D /dev/rshim0/consoleSSH (rshim_net)
...
ssh root@192.168.100.2
Note: SmartNIC OS is configured to obtain internet access via its hosting server.
Basic SmartNIC Management Operations
How-to soft reset the SmartNIC via host server:
Issue the following command on the server:
...
echo "SW_RESET 1" > /dev/rshim0/misc
Follow the boot process using console access:
...
minicom -D /dev/ttyUSB0
Note: This is not a power cycle of the SmartNIC.
How-to load BlueField2 SmartNIC OS image from the hosting server:
Place bfb image on the server
Issue the following command on the server:
...
cat <image>.bfb > /dev/rshim0/boot
Follow the installation and boot process using the console access:
...
minicom -D /dev/ttyUSB0
SmartNIC Modes
BlueField2 SmartNIC can operate in two modes:
SEPERATED_HOST (default mode)
In this mode, both the x86 hosting server and the SmartNIC Arm OS act as separated entities; Both can use and communicate with each other or the network via the ConnectX-6 Dx module of the SmartNIC.
EMBEDDED
In this mode, the x86 hosting server communicates with the outer world only through the SmartNIC Arm.
Note
In order to identify the SmartNIC current mode, issue the following commands on the x86 hosting server:
...
x86_host#mst startx86_host#mlxconfig -d /dev/mst/mt41686_pciconf0 q | grep -i model
Switching to EMBEDDED Mode from SEPERATED_HOST Mode
On the x86 host:
Enable EMBEDDED mode:
...
x86_host #mst startx86_host #mlxconfig -d /dev/mst/mt41686_pciconf0 s INTERNAL_CPU_MODEL=1
Reboot.
Verify:
...
x86_host#mst startx86_host#mlxconfig -d /dev/mst/mt41686_pciconf0 q | grep -i model
On the Arm:
Issue the following commands to enable ECPF parameters (applied per port):
Note: The ECPF parameters will be available for setting only after completing the previous steps.
...
Snic#mst startSnic#mst status -vSnic#mlxconfig -d /dev/mst/mt41686_pciconf0 s ECPF_ESWITCH_MANAGER=1 ECPF_PAGE_SUPPLIER=1Snic#mlxconfig -d /dev/mst/mt41686_pciconf0.1 s ECPF_ESWITCH_MANAGER=1 ECPF_PAGE_SUPPLIER=1
Reboot the x86 host.
Verify configuration:
Once the procedure is completed, issue the following command on both the x86 host and the Arm:
...
/opt/mellanox/iproute2/sbin/rdma link
On x86 host: the output should list two network devices.
...
link mlx5_0/1: state ACTIVE physical_state LINK_UP netdev ens1f0link mlx5_1/1: state DOWN physical_state DISABLED netdev ens1f1
On Arm: following devices should be listed:
...
link mlx5_0/1 state ACTIVE physical_state LINK_UP netdev pf0hpf
link mlx5_0/2 state ACTIVE physical_state LINK_UP netdev pf0sf0
link mlx5_0/19 state ACTIVE physical_state LINK_UP netdev p0
link mlx5_1/1 state ACTIVE physical_state LINK_UP netdev pf1hpf
link mlx5_1/2 state ACTIVE physical_state LINK_UP netdev pf1sf0
link mlx5_1/19 state DOWN physical_state DISABLED netdev p1
link mlx5_2/1 state ACTIVE physical_state LINK_UP netdev p0m0
link mlx5_3/1 state ACTIVE physical_state LINK_UP netdev p1m0
...
mst startmst status -v
PCI devices:------------DEVICE_TYPE MST PCI RDMA NET NUMABlueField2(rev:0) NA 03:00.1 mlx5_1 net-p1 -1BlueField2(rev:0) NA 03:00.0 mlx5_0 net-p0 -1
Note: The pf0hpf / pf1hpf are the PF representors facing the x86 host.
Switching to SEPERATED_HOST Mode from EMBEDDED Mode
On the x86 host:
Enable SEPERATED_HOST mode:
...
x86_host #mst startx86_host #mlxconfig -d /dev/mst/mt41686_pciconf0 s INTERNAL_CPU_MODEL=0
Reboot.
Verify:
...
x86_host#mst startx86_host#mlxconfig -d /dev/mst/mt41686_pciconf0 q | grep -i model
Testing Traffic in EMBEDDED Mode
In Embedded mode, traffic from the x86 server hosting the SmartNIC to the remote x86 server hosting the ConnectX-6 Dx is going via the SmartNIC Arm.
Follow the configuration steps below to test it.
On the Arm
Stop OVS:
...
systemctl stop openvswitch
Verify hugetlbfs is mounted:
...
mount | grep -i hugetlbfs
if not, mount it:
...
mount -t hugetlbfs nodev /dev/hugepages
Set Hugepages:
...
echo 4 > /sys/kernel/mm/hugepages/hugepages-1048576kB/nr_hugepages
Verify hugepages were allocated (look for HugePages_Total and Free):
...
cat /proc/meminfo | grep -i huge
Identify the SmartNIC PCI device ID:
...
lspci | grep -i mellanox
Configure OVS-DPDK:
...
ovs-vsctl --no-wait set Open_vSwitch . other_config:dpdk-init=true
ovs-vsctl --no-wait set Open_vSwitch . other_config:dpdk-socket-mem=4096
ovs-vsctl --no-wait set Open_vSwitch . other_config:dpdk-extra="-w 03:00.0,representor=[0,65535]"
ovs-vsctl add-br dpdkbr0 -- set bridge dpdkbr0 datapath_type=netdev
-- set bridge dpdkbr0 fail-mode=standalone
ovs-vsctl add-port dpdkbr0 p0 -- set Interface p0 type=dpdk options:dpdk-devargs=0000:03:00.0
ovs-vsctl add-port dpdkbr0 pf0hpf -- set Interface pf0hpf type=dpdk options:dpdk-devargs="0000:03:00.0,representor=[65535]"
systemctl restart openvswitch
Set IPs on both x86 host and ConnectX-6 Dx host and test connectivity with ping (it will be forwarded by the Arm DPDK)
On the ConnectX-6 Dx external host start iperf server:
...
iperf -s
...
...
iperf -c 172.16.0.2 -P12
Bare Metal Deployment Guide
1. Install Bare Metal Jump Host
N/A
2. Creating a Node Inventory File
N/A
3. Creating the Settings Files
N/A
4. Running
N/A
5. Virtual Deployment Guide
N/A
6. Standard Deployment Overview
N/A
7. Snapshot Deployment Overview
N/A
8. Special Requirements for Virtual Deployments
N/A
9. Install Jump Host
N/A
10. Verifying the Setup - VMs
N/A
11. Upstream Deployment Guide
N/A
12. Upstream Deployment Key Features
N/A
13. Special Requirements for Upstream Deployments
N/A
14. Scenarios and Deploy Settings for Upstream Deployments
N/A
15. Including Upstream Patches with Deployment
N/A
16. Running
N/A
17. Interacting with Containerized Overcloud
N/A
18. Verifying the Setup as defined the Akraino validation feature project plus any additional testing specific to the blue print
N/A
Developer Guide and Troubleshooting
1. Utilization of Images
N/A
2. Post-deployment Configuration
N/A
3. Debugging Failures
N/A
4. Reporting a Bug
N/A
5. Uninstall Guide
not applicable
...
Error Message Guide
Server Unable to Find the SmartNIC
- Ensure that the SmartNIC is placed correctly
- Make sure the SmartNIC slot and the SmartNIC are compatible
- Install the SmartNIC in a different PCI Express slot
- Use the drivers that came with the SmartNIC or download the latest
- Make sure your motherboard has the latest BIOS
- Try to reboot the server
The SmartNIC no Longer Works
- Reseat the SmartNIC in its slot or a different slot, if necessary
- Try using another cable
- Reinstall the drivers for the network driver files may be damaged or deleted
- Reboot the server
SmartNIC Stopped Working After Installing Another
- Try removing and re-installing all SmartNICs
- Check that cables are connected properly
- Make sure your motherboard has the latest BIOS
Link Indicator Light is Off
- Try another port on the switch
- Make sure the cable is securely attached
- Check you are using the proper cables that do not exceed the recommended lengths
- Verify that your switch and SmartNIC port are compatible
Link Light is On but No Communication is Established
- Check that the latest driver is loaded
- Check that both the SmartNIC and its link are set to the same speed and duplex settings
Maintenance
Maintenance
1. BluePrint Package Maintenance
Software maintenance
N/A
Hardware maintenance
N/A
2. Blueprint Deployment Maintenance
N/A
3. Frequently Asked Questions
N/A
4. License
N/A
5. References
N/A
Definitions, acronyms and abbreviations
OVS : Open Virtual-Switch
DPDK: Data Plane Development Kit