...
Note: EALTEdge Blueprint Deployment has been tested on Cloud VM and is not tested on Bare-Metal Environment. Though, theoretically deployment should work in bare metal, provided hardware and software prerequisites are met. Kindly refer R5 R6 - Test Documentation of Enterprise Applications on Lightweight 5G Telco Edge (EALTEdge) to get details on the tested deployment.
...
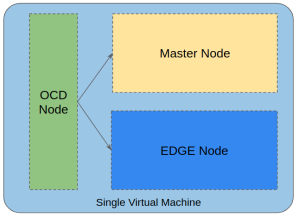
EALTEdge supports 2 Mode of installation: Multi Node and All-In-One (AIO) Node deployment.
AIO(All in One) mode:
In this mode, all 3 nodes (OCD which is deployment node, Center node and Edge node) are deployed on single VM.
The logical deployment topology can be seen here.
MUNO(Multi Node) Mode:
In this mode, all 3 nodes (OCD which is deployment node, Center node and Edge node) can be deployed on multiple VM.
...
2. Setup password-less login from ocd to center and ocd to edge.
...
-
- If you get authentication issue you can change the permission
# Open file: vi /etc/ssh/sshd_config
...
- sudo systemctl restart ssh.service # sshpass
For EdgeGallery AIO mode:
Login from ocd to center and ocd to edge in a single node.
- sshpass -p <password> ssh-copy-id -p <ssh-port> -o StrictHostKeyChecking=no root@<node_
...
- ip>
For EdgeGallery Muno mode:
Login from ocd to center in a controller node
- sshpass -p <password> ssh-copy-id -p <ssh-port> -o StrictHostKeyChecking=no root@<controller-node_ip>
- sshpass -p <password> ssh-copy-id -p <ssh-port> -o StrictHostKeyChecking=no root@<edge-node_ip>
Login from ocd to edge in a edge node
- sshpass -p <password> ssh-copy-id -p <ssh-port> -o StrictHostKeyChecking=no root@<controller-node_ip>
- sshpass -p <password> ssh-copy-id -p <ssh-port> -o StrictHostKeyChecking=no root@<edge-node_ip>
3. These command are require in both AIO and MUNO(Controller and Edge Node ) mode.
cp -p /etc/passwd /etc/passwd.bkp
cp -p /etc/group /etc/group.bkp
id ubuntu
groupmod -g 600 ubuntu
id ubuntu
4. Review and Change Parameters
For EdgeGallery AIO Mode:
ealt
...
3. cp -p /etc/passwd /etc/passwd.bkp
cp -p /etc/group /etc/group.bkp
id ubuntu
groupmod -g 600 ubuntu
id ubuntu
4. Review and Change Parameters
For EdgeGallery MUNO Mode
ealt-edge/ocd/infra/playbooks/muno-config/controller/hosts-muno-controller
ealt-edge/ocd/infra/playbooks/muno-config/controller/var.yml
ealt-edge/ocd/infra/playbooks/muno-config/edge/hosts-muno-edge
ealt-edge/ocd/infra/playbooks/muno-config/edge/var.yml
ealt-edge/ocd/infra/playbooks/password-var.yml
For EdgeGallery AIO Mode:
ealt-edge/ocd/infra/playbooks/hosts-aio
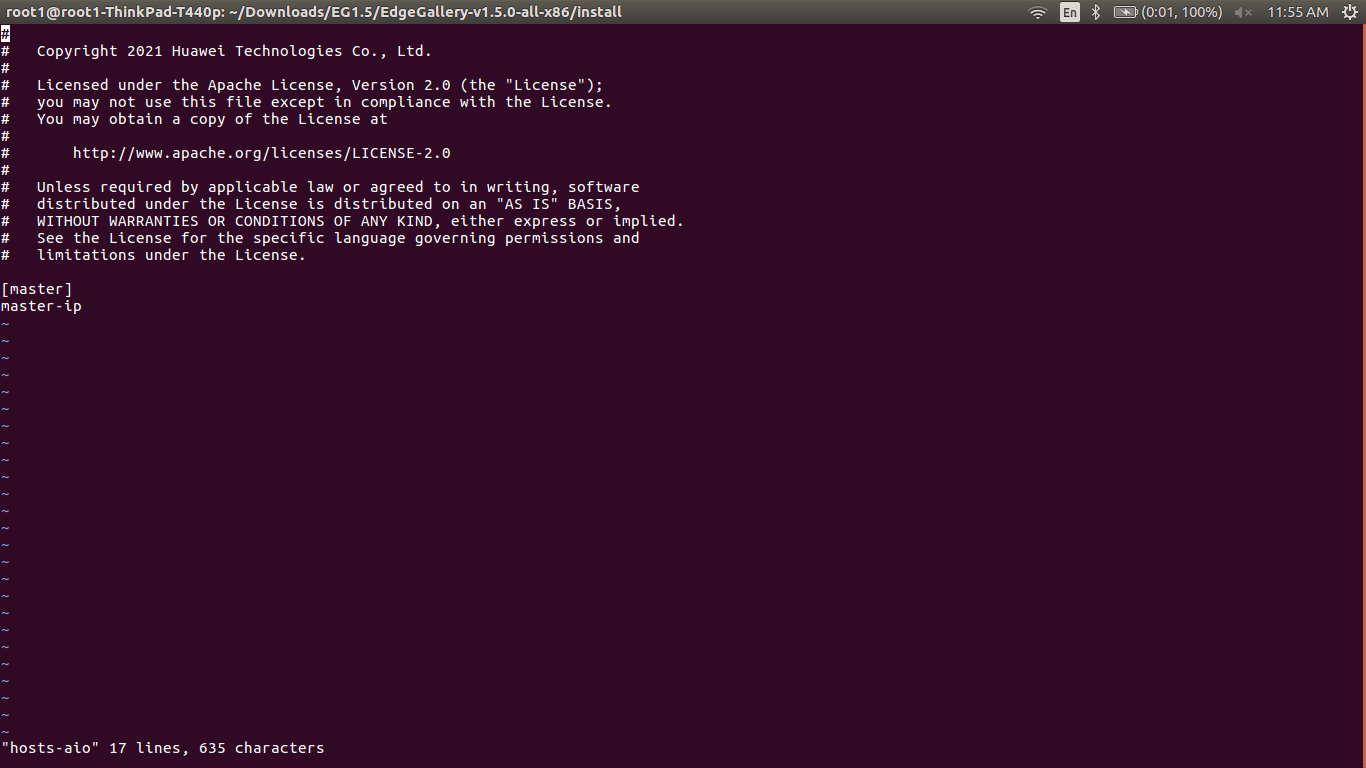
ealt-edge/ocd/infra/playbooks/var.ymlhosts-aio
- Here user can use the private IP of a node
ealt ealt-edge/ocd/infra/playbooks/password-var.yml
For EALT-EDGE stack:
...
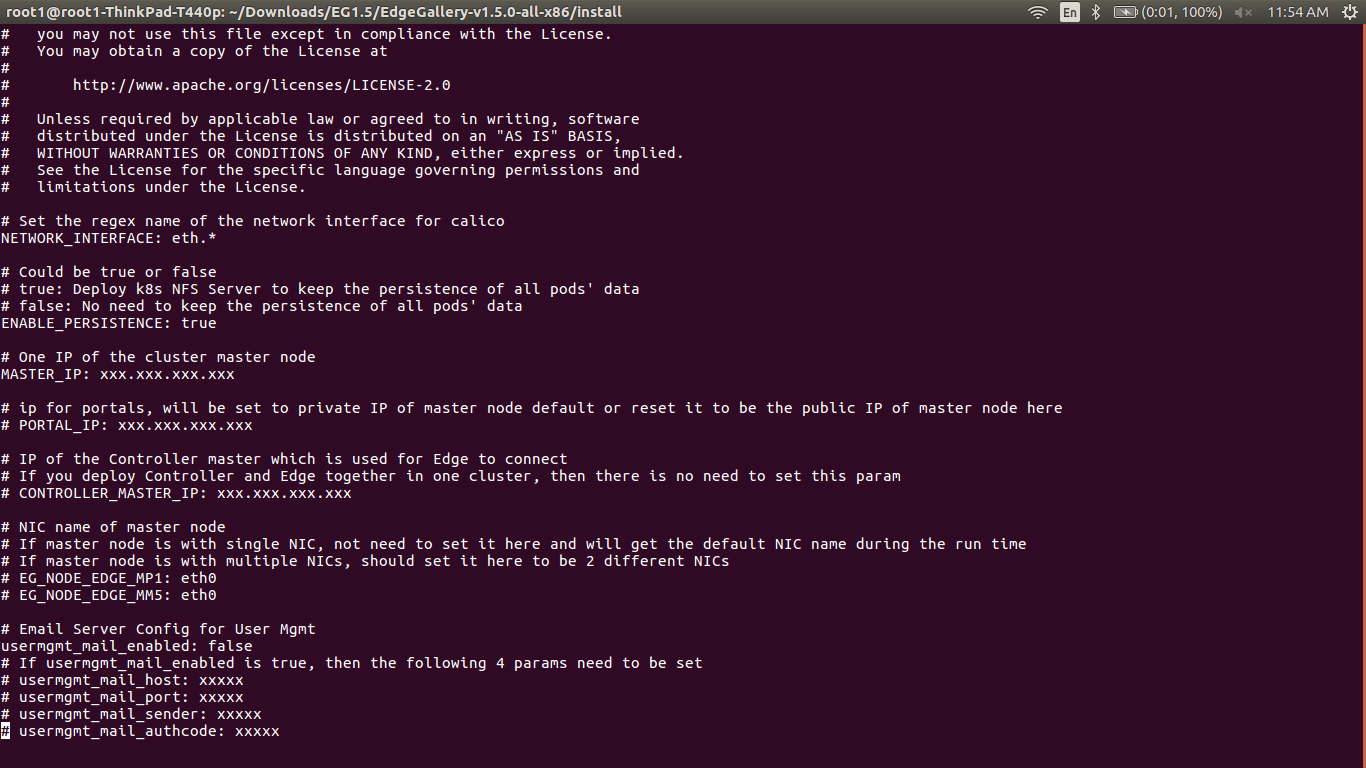
- NETWORK_INTERFACE: regex for network interface on the VM. (user can be check ineterrface name by ifconfig and provide inerface name accordingly for example like eth.* )
- MASTER_IP: Here user can use the private IP of a node
- PORTAL_IP: If portal need to be access over internet then uncomment the PORTAL_IP and use public IP as a PORTAL_IP otherwise portal will be accessible only on private IP default.
Installing Mode : EALTEdge using Ansible-Playbooks
1. git clone the ealt-edge repo, to download the software to install the EALTEdge Environment.
root@akraino-mec-0001:~# git clone "https://gerrit.akraino.org/r/ealt-edge"
2. go to the below directory
root@akraino-mec-0001:~# cd ealt-edge/ocd/infra/playbooks
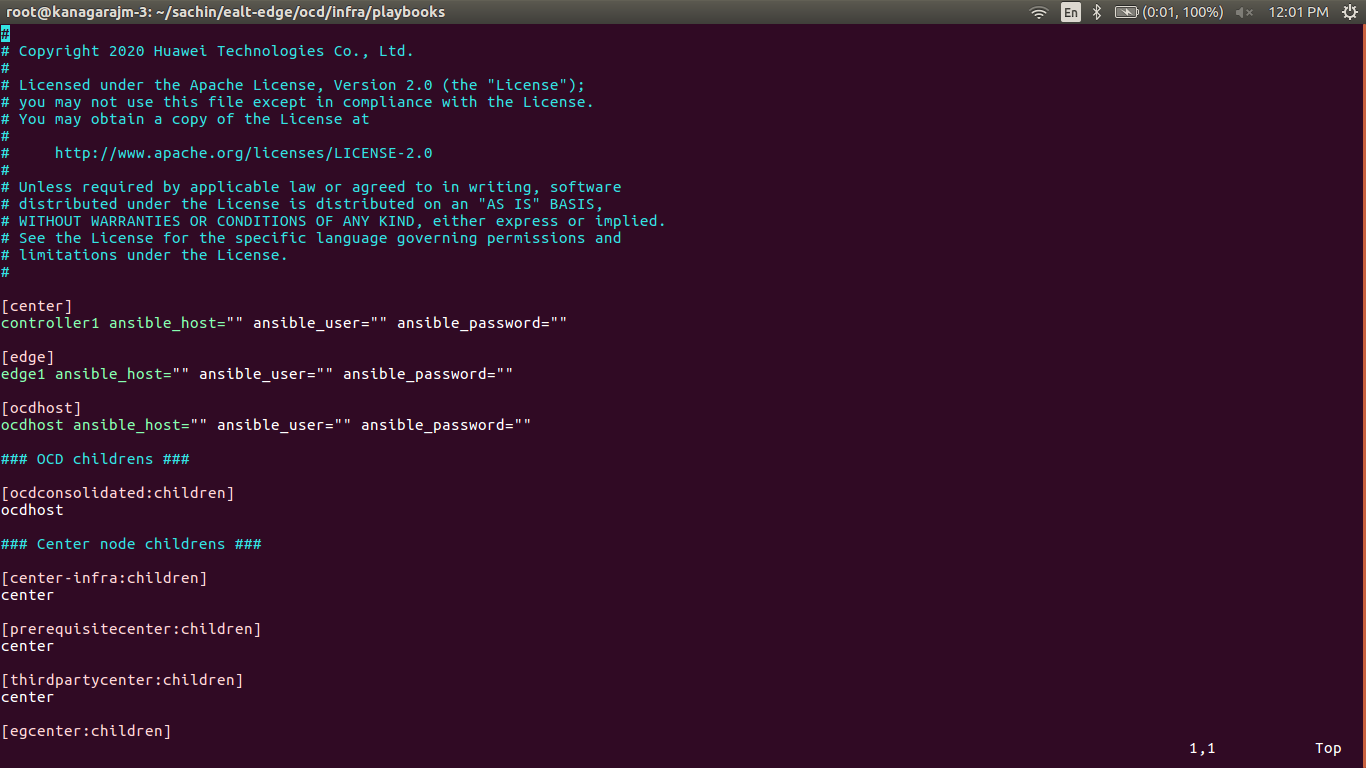
3. Modify the Configuration File :
ealt-inventory.ini with the details of CENTER and EDGE Nodes.
For Edge Gallery installation:
MUNO-Mode:
Execute the below command:
ealt-edge/ocd/infra/playbooks/password-var.yml
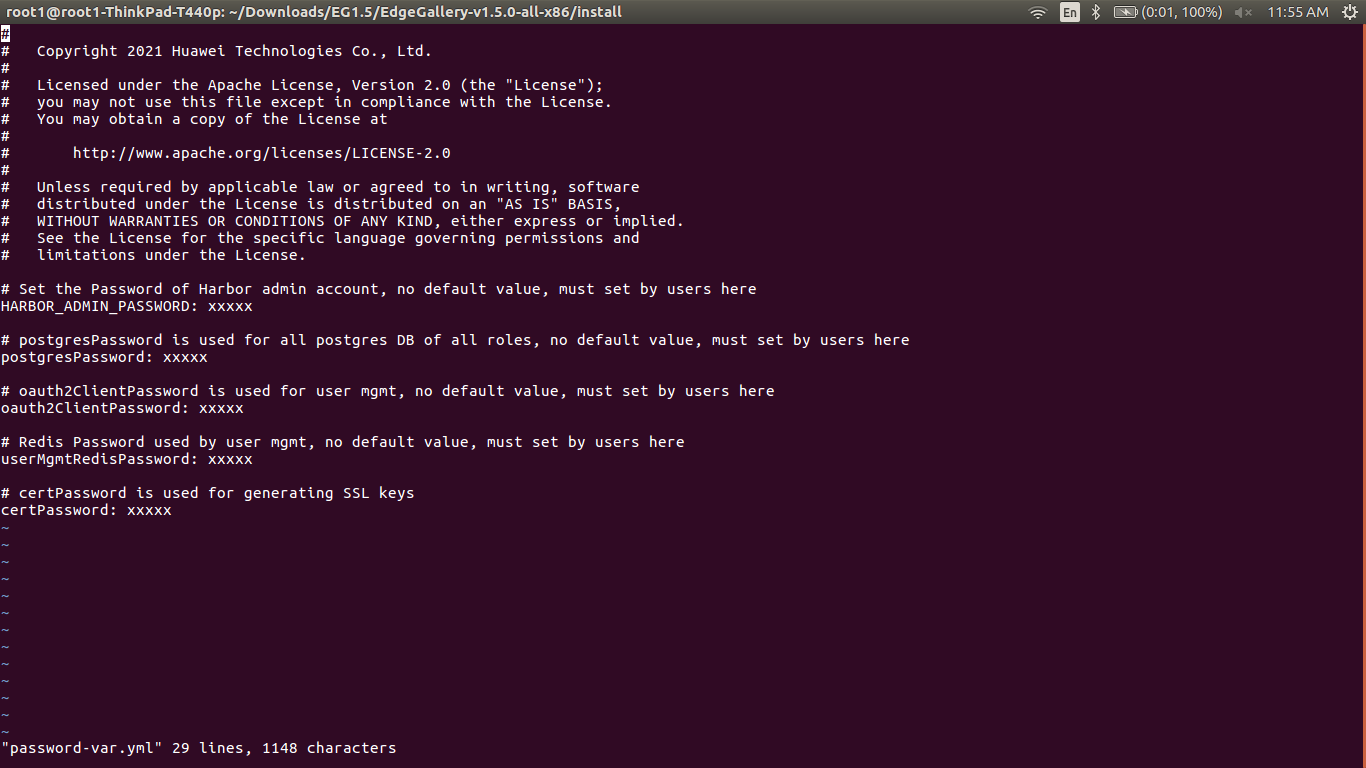
- All passwords must include capital letters, lowercase letters, numbers and special characters and whose length must be no less than 8 characters. Also there should be no special characters
&in it. Otherwise, the deployment will failed because of these simple passwords. - A sample password could be "Harbor@12345"
For EdgeGallery MUNO Mode:
ealtcd ealt-edge/ocd/infra/playbooksansible-playbook -i /muno-config/controller/hosts-muno-controller ealt-eg-muno-controller.yml --extra-vars "operation=install" -e "ansible_user=root"
ansible-playbook -i muno-config/edge/hosts-muno-edge ealt-eg-muno-edge.yml --extra-vars "operation=install" -e "ansible_user=root"
For AIO mode:
Execute the below command
cd ealt-edge/ocd/infra/playbooks
ansible-playbook ealt-eg-aio-latest.yml -i hosts-aio --extra-vars "operation=install" -e "ansible_user=root"
Installation of ealt-edge stack:
ansible-playbook ealt-all.yml -i ealt-inventory.ini --extra-vars "operation=install"
Once the execution is completed in console will see prompt "EALTEdge Environment Installed , Components Install CENTER and EDGE Nodes Successfully"
Snapshot Deployment Overview
N/A
Special Requirements for Virtual Deployments
N/A
Install Jump Host
N/A
Verifying the Setup - VM's
N/A
Upstream Deployment Guide
Upstream Deployment Key Features
N/A
Special Requirements for Upstream Deployments
N/A
Scenarios and Deploy Settings for Upstream Deployments
N/A
Including Upstream Patches with Deployment
N/A
Running
N/A
Interacting with Containerized Overcloud
N/A
Verifying the Setup
Verifying EALTEdge Deployment
Currently the verification is manually done.
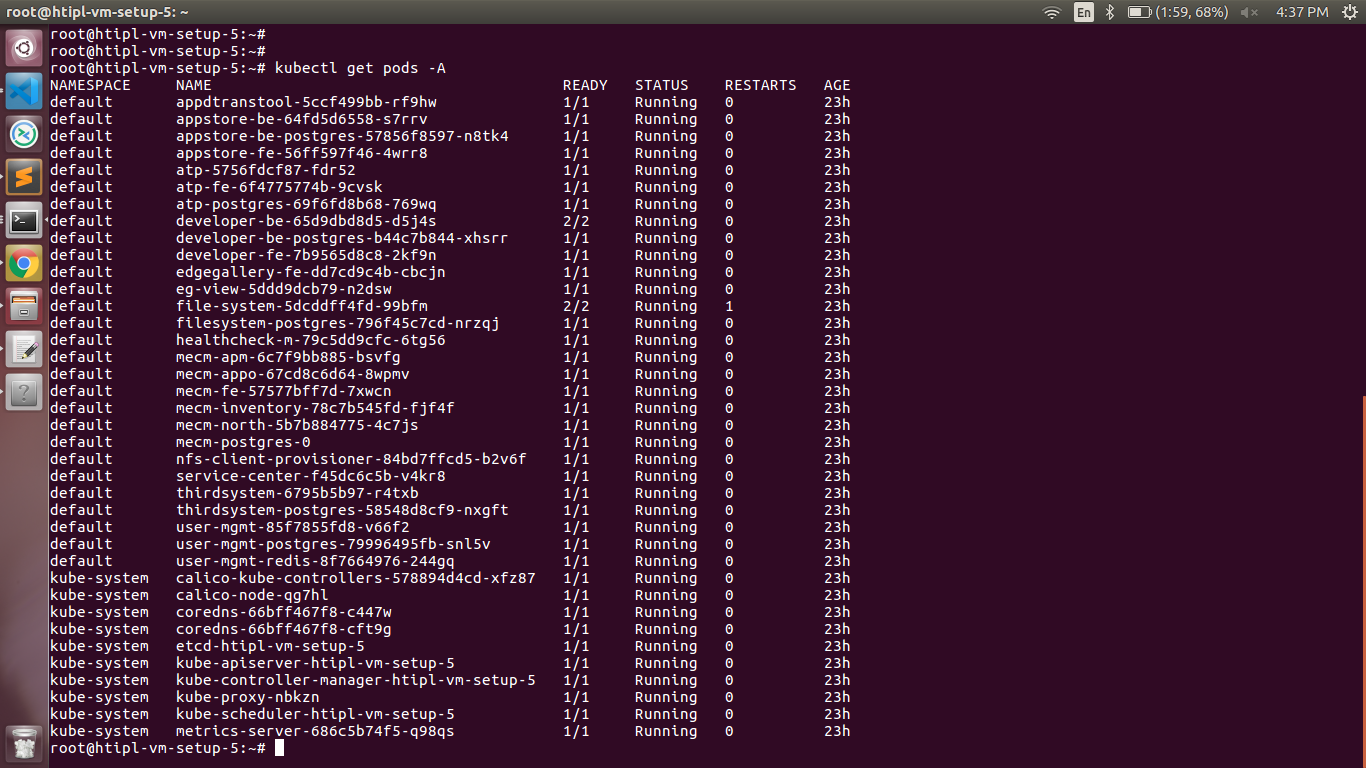
- Login to the Center Node and check whether K8S cluster is installed.
Components and Services running in CENTER Node


Components and Services running EDGE Node


2- Login to the Center Node and check whether K8S cluster is installed in muno mode.

Components and Services running EDGE Node

Deploy Application in EALTEdge
- Login to MECM Portal https://ip:30093
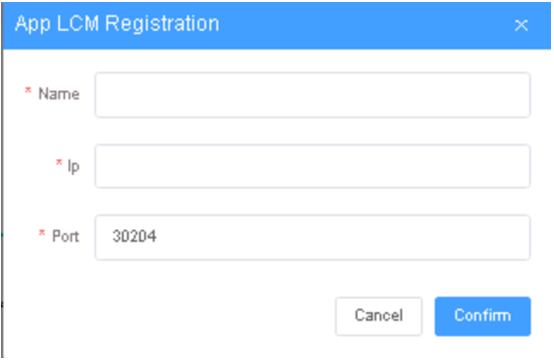
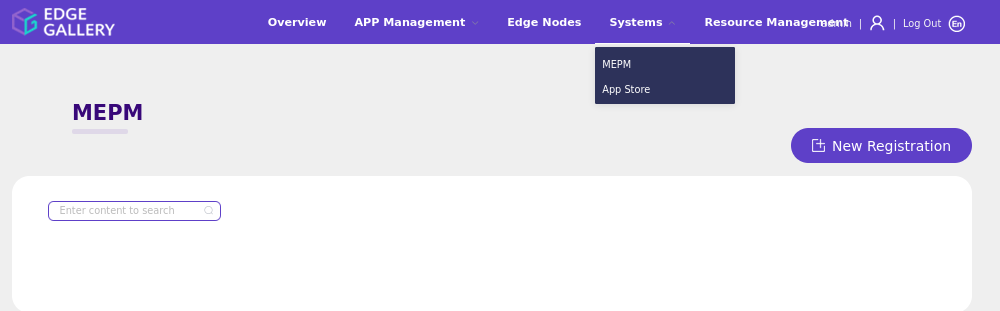
1.1 click on Systems ->App LCM ->New Registration
Name: Applcm(any general name)
IP: applcm"public ip"
Port: 30204

1.2. click on Systems ->App Rule -> New Registration
Name: Apprule(any general name)
IP: applcm"public ip"
Port: 30206


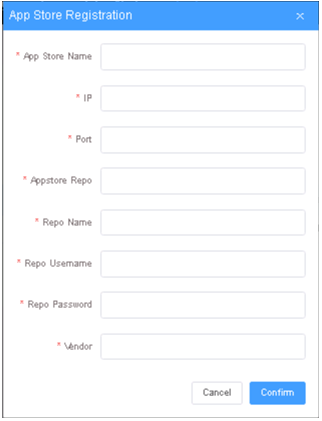
1.3. click on Systems ->App Store ->New Registration
App Store Name: appstore(any general name)
IP: Appstore public ip
Port: 30099
Appstore Repo: {HarborIP:443}(192.168.1.1:443)
Repo Name: appstore(any general name)
Repo Username: admin(harbor user name)
Repo Password: Harbor@edge(harbor password)
Vendor: vendor(any general name)

...
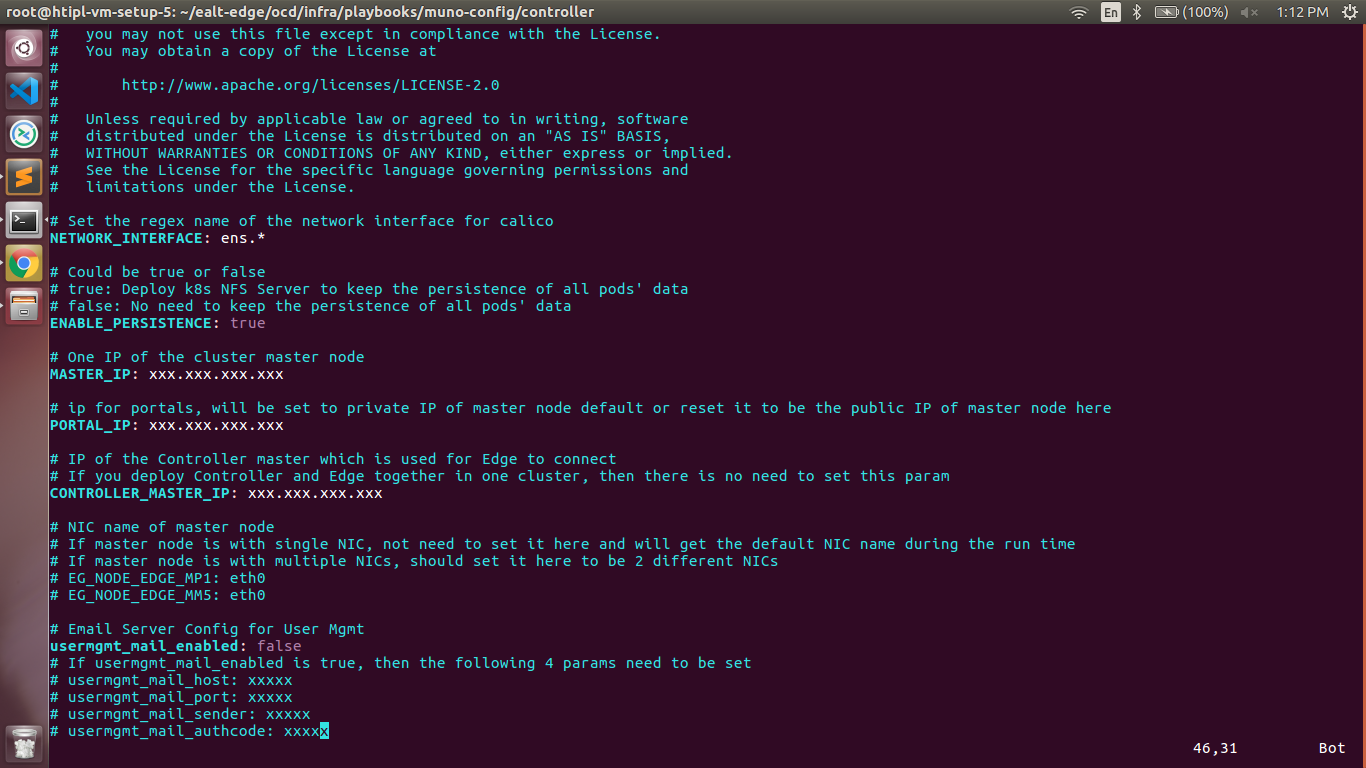
- Here user can use the private IP as a master IP of a Controller node
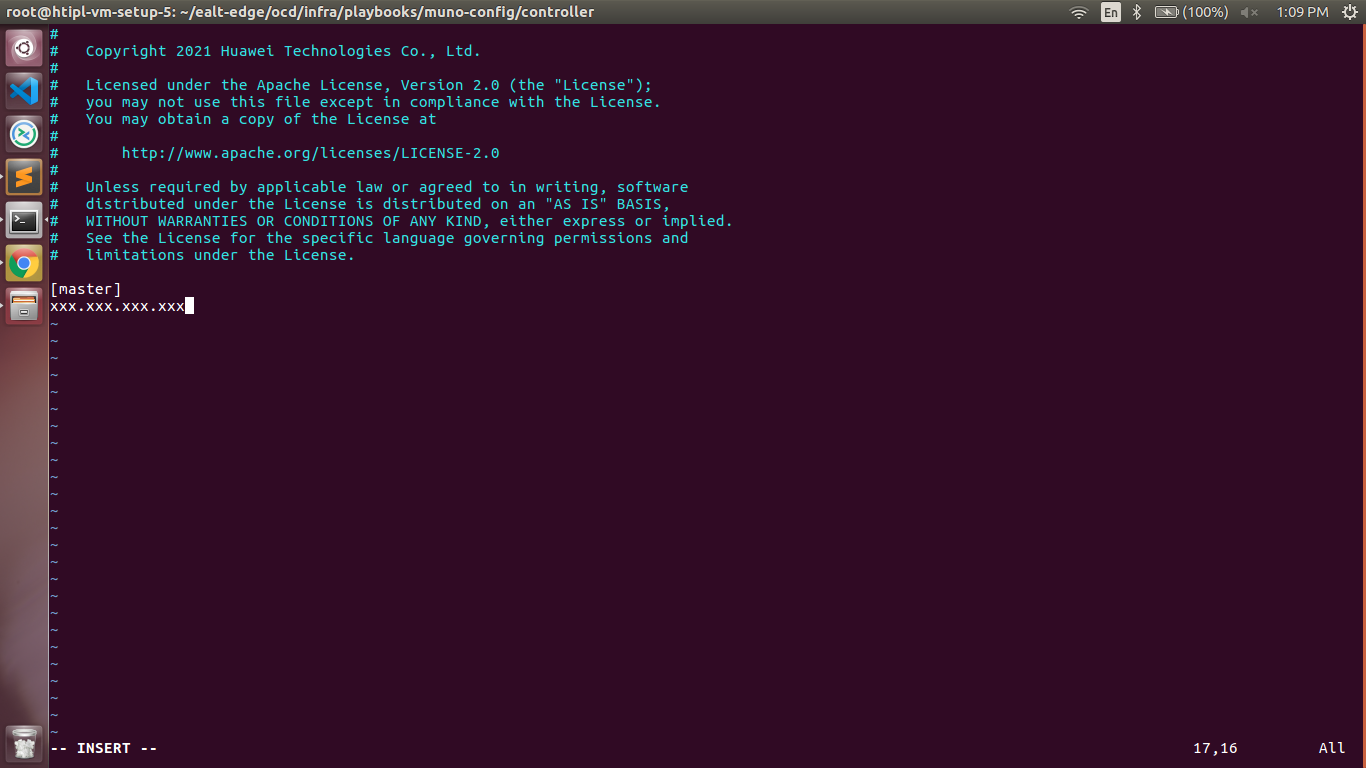
ealt-edge/ocd/infra/playbooks/muno-config/controller/var.yml
- NETWORK_INTERFACE: regex for network interface on the VM. (user can be check ineterrface name by ifconfig and provide inerface name accordingly for example like eth.* )
- MASTER_IP: Here user can use the private IP of a controller node
- PORTAL_IP: If portal need to be access over internet then uncomment the PORTAL_IP and use public IP of a controller node as a PORTAL_IP otherwise portal will be accessible only on private IP default.
CONTROLLER_MASTER_IP: Private IP of the Controller node.
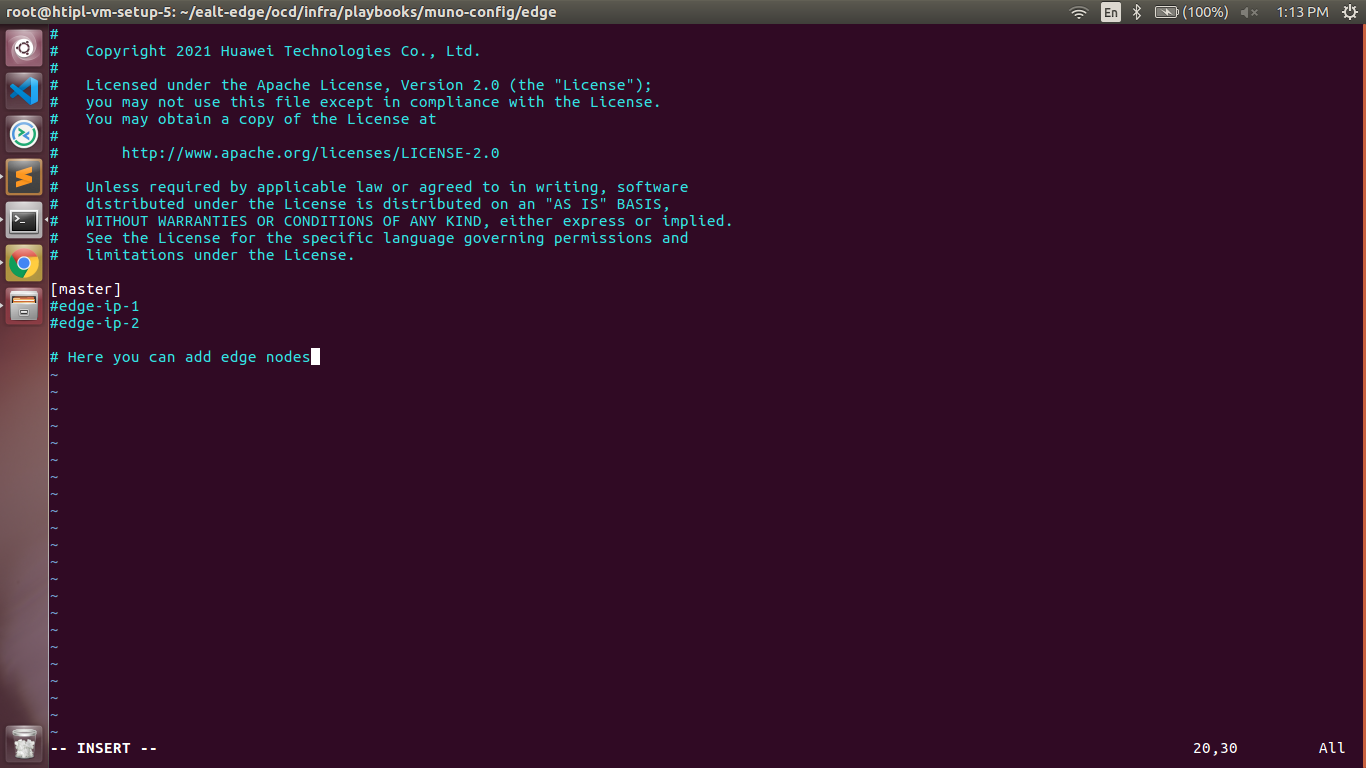
ealt-edge/ocd/infra/playbooks/muno-config/edge/hosts-muno-edge
- Here user can use the private IP as a master IP of a Edge node
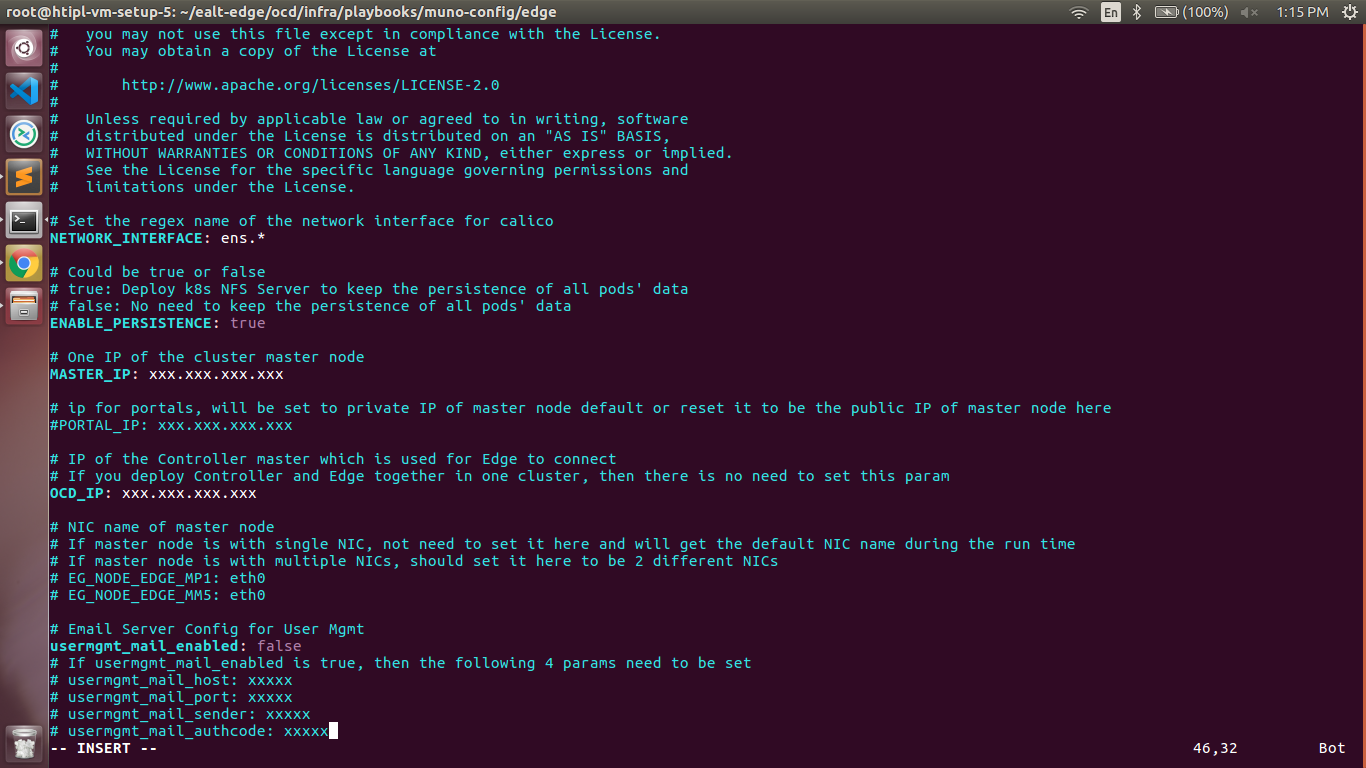
ealt-edge/ocd/infra/playbooks/muno-config/edge/var.yml
- NETWORK_INTERFACE: regex for network interface on the VM. (user can be check ineterrface name by ifconfig and provide inerface name accordingly for example like eth.* )
- MASTER_IP: Here user can use the private IP of a edge node
- OCD_IP: Here user can use the private IP of a Controller Node which is used for Edge to connect
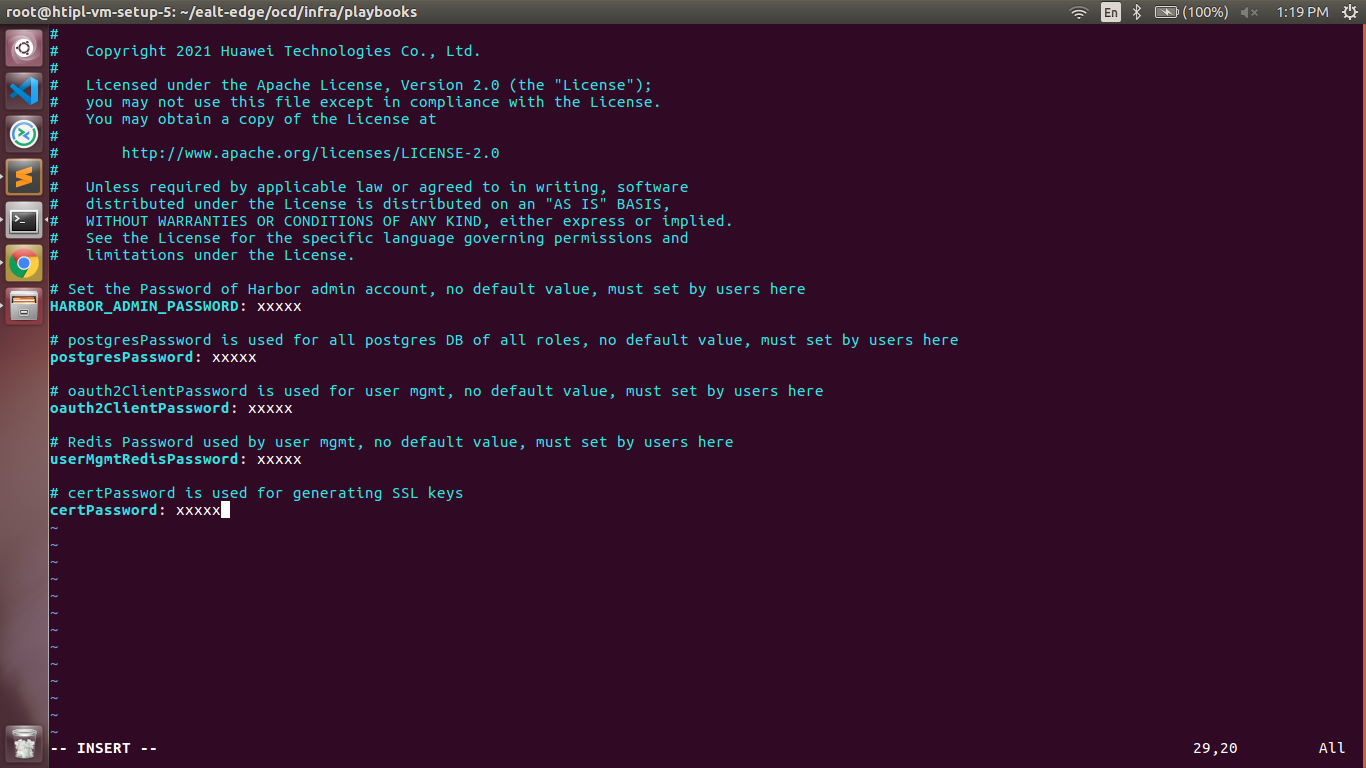
ealt-edge/ocd/infra/playbooks/password-var.yml
- All passwords must include capital letters, lowercase letters, numbers and special characters and whose length must be no less than 8 characters. Also there should be no special characters
&in it. Otherwise, the deployment will failed because of these simple passwords. - A sample password could be "Harbor@12345"
For EALT-EDGE stack:
ealt-edge/ocd/infra/playbooks/ealt-inventory.ini
* Here user can put the public IP in center, edge, ocdhost node.
Installing Mode : EALTEdge using Ansible-Playbooks
1. git clone the ealt-edge repo, to download the software to install the EALTEdge Environment.
root@akraino-mec-0001:~# git clone "https://gerrit.akraino.org/r/ealt-edge"
2. go to the below directory
root@akraino-mec-0001:~# cd ealt-edge/ocd/infra/playbooks
3. Modify the Configuration File :
ealt-inventory.ini with the details of CENTER and EDGE Nodes.
For Edge Gallery installation:
MUNO-Mode:
Execute the below command:
cd ealt-edge/ocd/infra/playbooks
ansible-playbook -i muno-config/controller/hosts-muno-controller ealt-eg-muno-controller.yml --extra-vars "operation=install" -e "ansible_user=root"
ansible-playbook -i muno-config/edge/hosts-muno-edge ealt-eg-muno-edge.yml --extra-vars "operation=install" -e "ansible_user=root"
For AIO mode:
Execute the below command
cd ealt-edge/ocd/infra/playbooks
ansible-playbook ealt-eg-aio-latest.yml -i hosts-aio --extra-vars "operation=install" -e "ansible_user=root"
Installation of ealt-edge stack:
ansible-playbook ealt-all.yml -i ealt-inventory.ini --extra-vars "operation=install"
Once the execution is completed in console will see prompt "EALTEdge Environment Installed , Components Install CENTER and EDGE Nodes Successfully"
Snapshot Deployment Overview
N/A
Special Requirements for Virtual Deployments
N/A
Install Jump Host
N/A
Verifying the Setup - VM's
N/A
Upstream Deployment Guide
Upstream Deployment Key Features
N/A
Special Requirements for Upstream Deployments
N/A
Scenarios and Deploy Settings for Upstream Deployments
N/A
Including Upstream Patches with Deployment
N/A
Running
N/A
Interacting with Containerized Overcloud
N/A
Verifying the Setup
Verifying EALTEdge Deployment
Currently the verification is manually done.
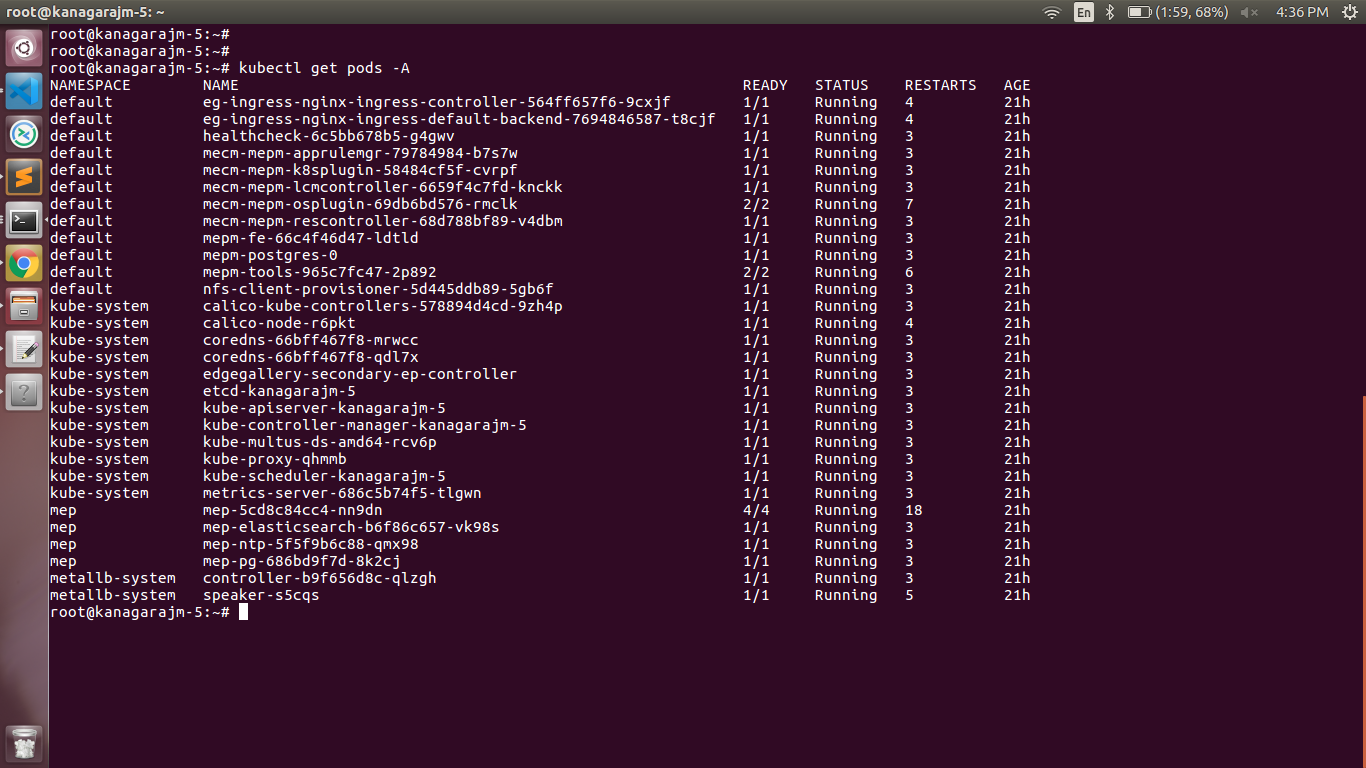
In muno mode
1- Login to the Center Node and check whether K8S cluster is installed.
Components and Services running in Controller Node
Components and Services running EDGE Node
Deploy Application in EALTEdge
- Login to MECM Portal https://ip:30093
1.1 click on Systems ->App LCM ->New Registration
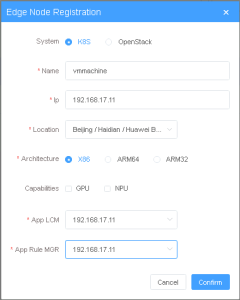
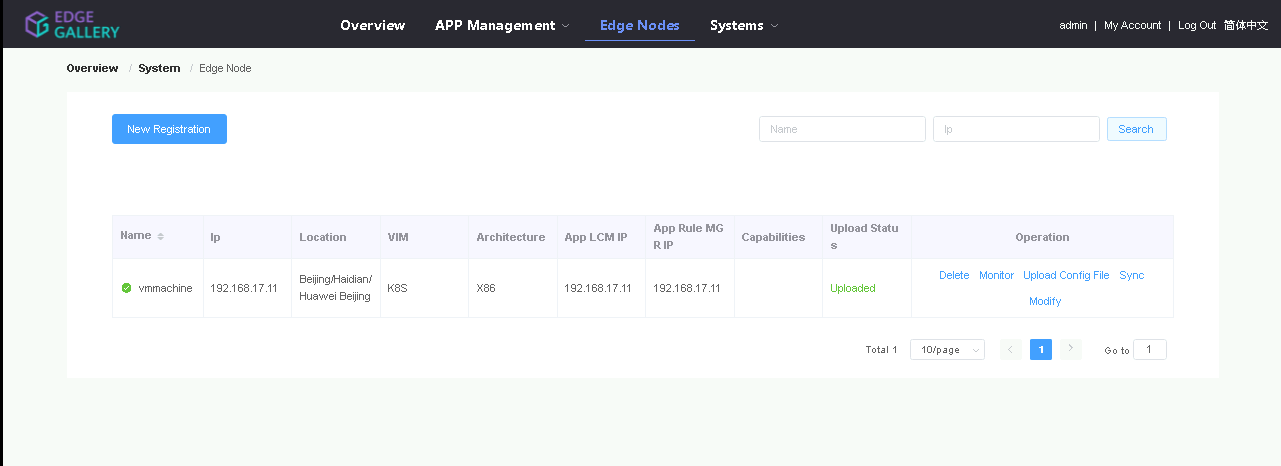
2.1. Add k8s node: Name: Applcm(any general name)
Click on Edge Nodes ->New Rgistration IP: applcm"public ip"
System: k8s Port: 30204
Name: edge1(any general name) 1.2. click on Systems ->App Store ->New Registration
IP: edge public IP App Store Name: appstore(any general name)
Location: Select from the drop-down IP: Appstore public ip
Architecture Port: x86 30099
Capabilities: select none Appstore Repo: {HarborIP:443}(192.168.1.1:443)
App LCM: Select edge IP from the drop-down box Repo Name: appstore(any general name)
App Rule MGR: Select edge IP from the drop-down box
Repo Username: admin(harbor user name)
2.2. Download /root/.kube/config file from edge node Repo Password: Harbor@edge(harbor password)
And click on Upload config file to upload.
Vendor: vendor(any general name)
23. log in to harbor MECM Portal https://ip:443//ip:30093
2.1. Add k8s node:
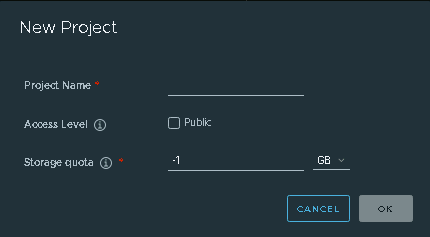
Click on Edge Nodes ->New Rgistration 3.1. Add three new projects
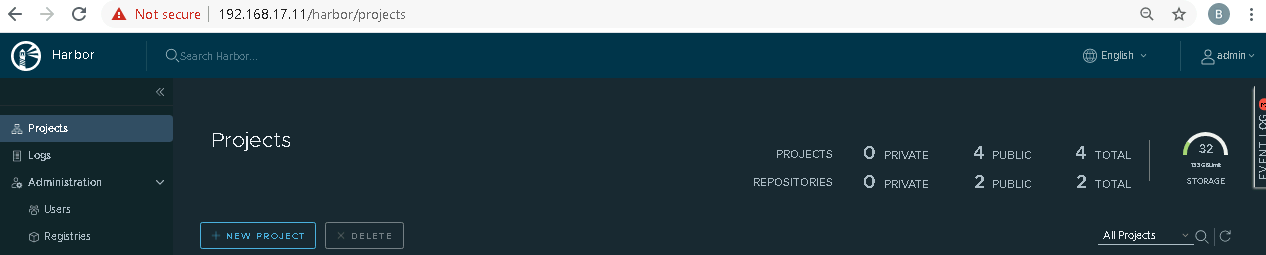
3.2. Those three projects' names are appstore, developer, and mecm. And select access level to the public.
System: k8s
3.3. Final page will look like the below screenshot.

4. log in to Developer Portal https://ip:30092 Name: edge1(any general name)
4.1. Add sandbox env to deploy application before publishing IP: edge public IP
Location: Select from the drop-down
Click System ->Host Management ->Add Host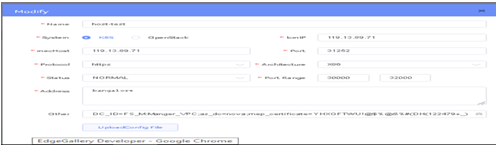 Architecture: x86
. Name: general name Capabilities: select none
System: k8s App LCM: Select edge IP from the drop-down box
Lcmip: sandbox ip(for testing purpose can provide edge ip, if no sandbox env) App Rule MGR: Select edge IP from the drop-down box
mecHost: sandbox ip(for testing purpose can provide edge ip, if no sandbox env) 2.2. Download /root/.kube/config file from edge node
Port: 30204 Protocol: httpsAnd click on Upload config file to upload.
3. log in to harbor Portal https://ip:443
Architecture: X86 3.1. Add three new projects
Status: Normal 3.2. Those three projects' names are appstore, developer, and mecm. And select access level to the public.
Port Range: leave as it is 3.3. Final page will look like the below screenshot.
Address: Bangalore
UploadConfig File: upload sandboxenvkubeconfig file
4.2 Click on Workspace -> Create Project -> Application Integration -> Start

4. log in to Developer Portal https://ip:30092
- Go to Application Integration

4.1. Add sandbox env to deploy application before publishing
- Provide App Name, Version, Provider, Workload Type, Architecture, Industry, Type. Click System ->Host Management ->Add Host
- Upload Icon, provide Description. And click on confirm.

4.3. Now click on Deployment Test. .
- Upload Docker images directly from the portal by clicking on Upload App Image.
...
Name: general name
System: k8s
After that you can take tar file from path and upload image. Lcmip: sandbox ip(for testing purpose can provide edge ip, if no sandbox env)
Or, directly push Docker images to Harbor repo (takes lesser time, preferred). Following command for pushing an image in Harbor:
...
mecHost: sandbox ip(for testing purpose can provide edge ip, if no sandbox env)

Port: 30204
- Click next, upload deployment yaml file now.

Protocol: https
- After config upload, click next and click start deployment Architecture: X86
- After Deployment is successful, click on Release Recourses

Status: Normal
Note: Port Range: leave as it is
- While Deployment test if any error happens, open ATP portal (https://ip:30094) in another tab of the browser, sign in, come back to the developer portal and re run deployment test Address: Bangalore
- gitee.com/edgegallery/applications repo provides A lot of applications with their logo, deployment YAML & user guides UploadConfig File: upload sandboxenvkubeconfig file
3.4. Now click on Application Release 4.2 Demonstration of application Development & Deployment
Upload file for Application Description

Application Development
Click save config

Click Next Step, click Start Test, scroll down to find & click the Start Test button, then confirm. Once the testing is complete click on Next Step


link - https://www.youtube.com/watch?v=AjQNG5d3p84&t=23s
Application Deployment
click publish to publish an application to AppStore. Go to link - https://<IP>:30091 and App Warehouse to confirm that the application is successfully ported. www.youtube.com/watch?v=PbxKpslVnmc&t=31s
Developer Guide and Troubleshooting
...