...
Note: For Development environment two nodes is sufficient, where one node plays a dual role of One-Click Deployment Node and MECM Node with other as MEC Host.

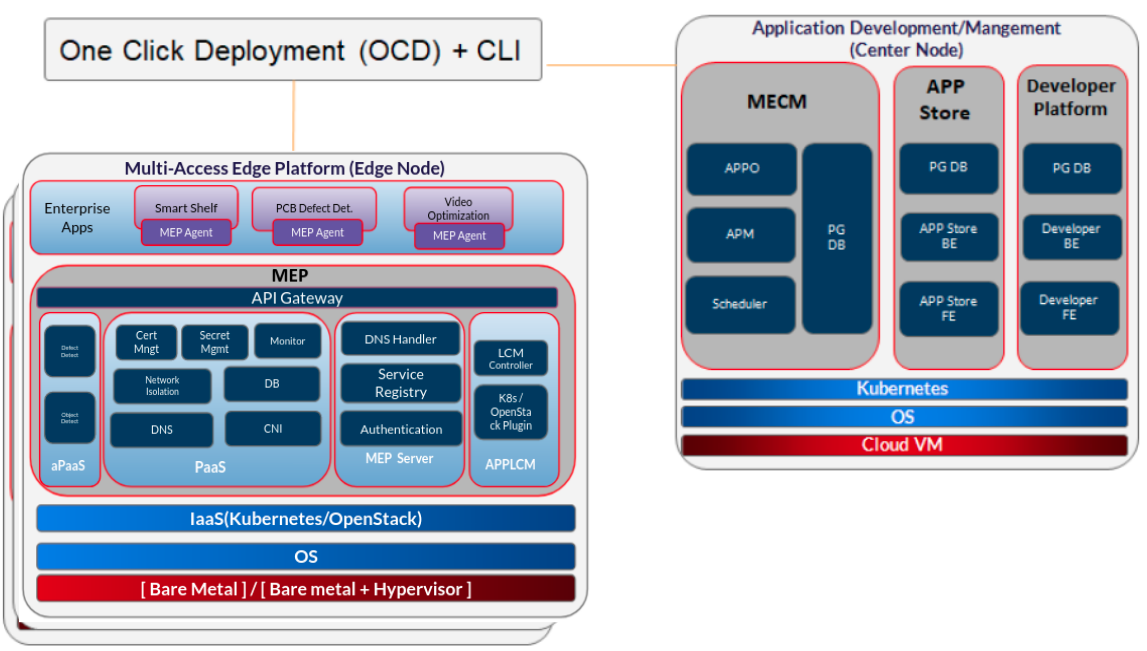
Figure: EALTEdge Deployment Architecture
...
For Virtual Deployment minimum three2 Virtual machines(OCD and Center node can be deploy on same VM or in different VMs), following are the virtual machines and their usage
...
ealt-edge/ocd/infra/playbooks/hosts-aio
ealt-edge/ocd/infra/playbooks/var.yml
For EALT-EDGE stack:
ealt-edge/ocd/infra/playbooks/ealt-inventory.ini
...
Deploy Application in EALTEdge
- Login to Developer MECM Portal https://ip:30092 30093
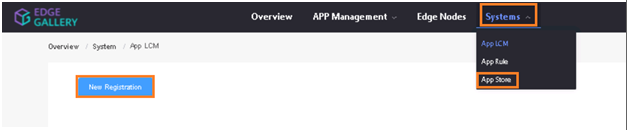
1.1 Add sandbox env to deploy application before publish click on Systems ->App LCM ->New Registration
Click System -> Host Management -> Add Host Name: Applcm(any general name)
IP: applcm"public ip"
. Port: 30204
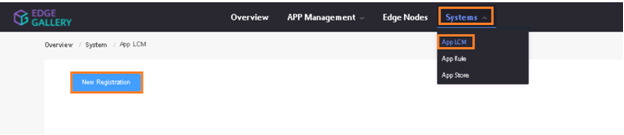

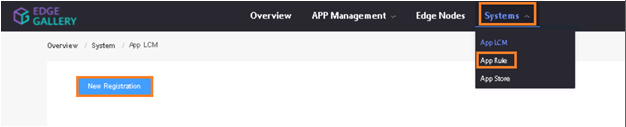
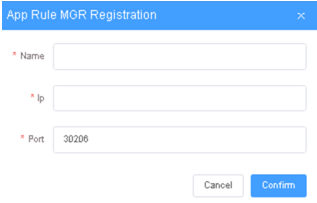
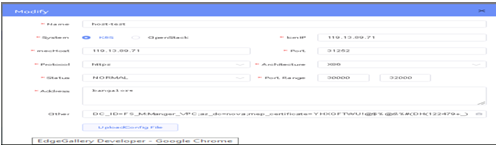
1.2. click on Systems ->App Rule -> New Registration
Name: Name: Apprule(any general name
System: k8s
Lcmip: sandbox ip(for testing purpose can provide edge ip, if no sandbox env)
mecHost: sandbox ip(for testing purpose can provide edge ip, if no sandbox env)
Port: 31252
Protocol: https
Architecture: X86
Status: Normal
Port Range: leave as it is
Address: Bangalore
UploadConfig File: upload sandbox env kubeconfig file
)
IP: applcm"public ip"
Port: 30206
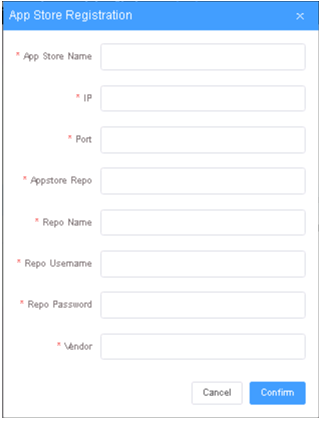
1.3. click on Systems ->App Store ->New Registration 1.2 Click on Workspace -> Create Project -> Application Integration -> Start
- Provide App Name, Version, Provider, Workload Type, Architecture, Industry, Type. App Store Name: appstore(any general name)
- Upload Icon, provide Description. And click on confirm.
1.3. Now click on Deployment Test. IP: Appstore public ip
- Upload Docker images directly from portal by clicking on Upload App Image Port: 30099
Or, directly push Docker images to Harbor repo (takes lesser time, preferred Appstore Repo: {HarborIP:443}(192.168.1.1:443)
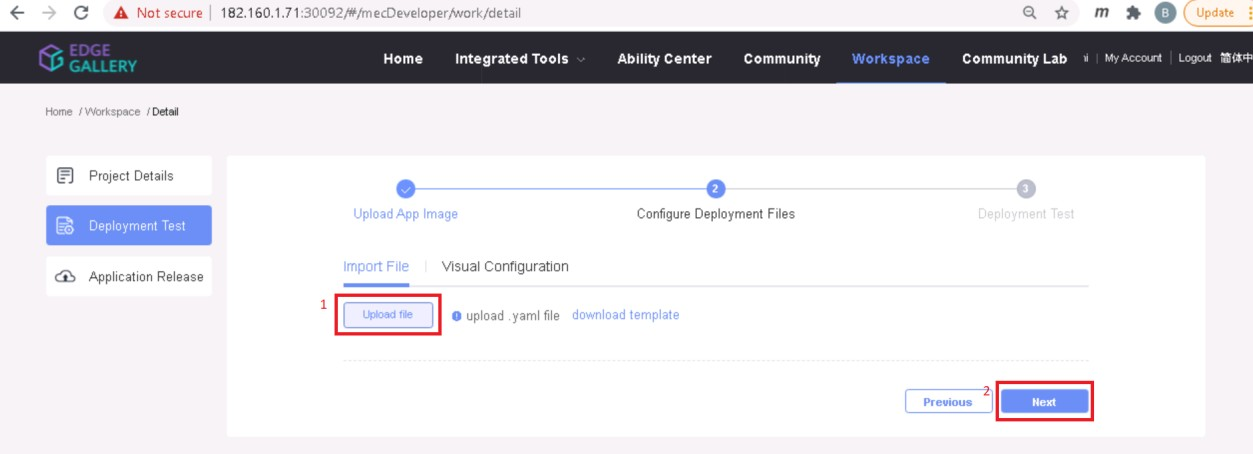
- Click next, upload deployment yaml file now. Repo Name: appstore(any general name)
- After config upload, click next and click start deployment Repo Username: admin(harbor user name)
- After Deployment is success, click on Release Recourses Repo Password: Harbor@edge(harbor password)
Note: - While Deployment test if any error happens, open ATP portal ( Vendor: vendor(any general name)
2. log in to MECM Portal https://ip:30094) in another tab of browser, sing in, come back to developer portal and re run deployment test
- gitee.com/edgegallery/applications repo provides, A lot of applications with their logo, deployment yaml & user guides
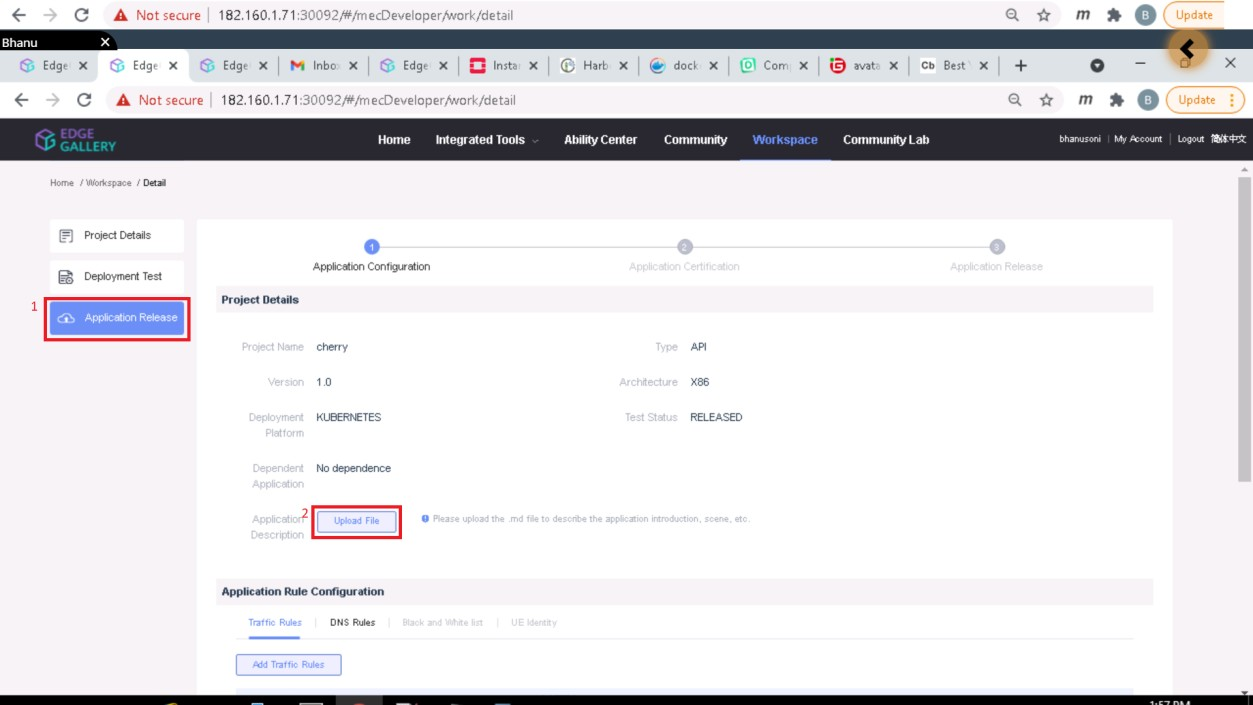
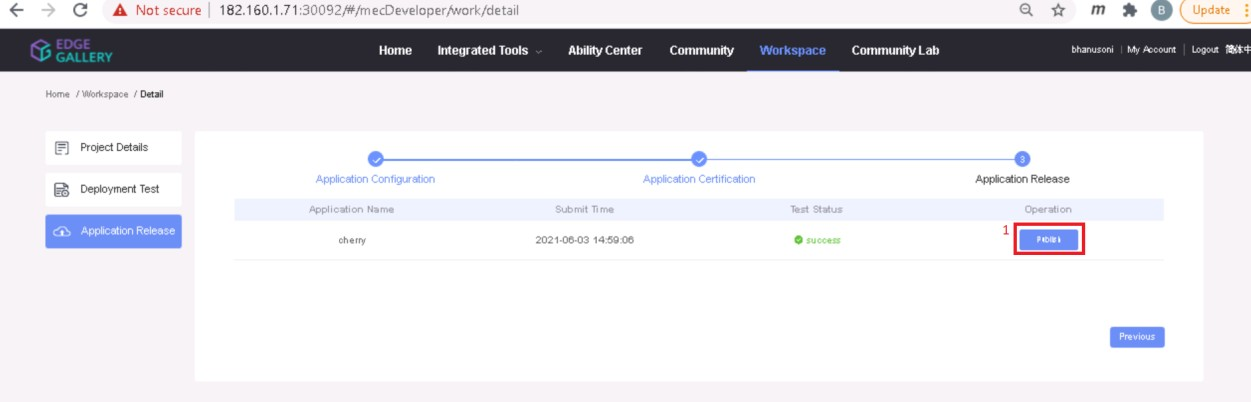
1.4. Now click on Application Release
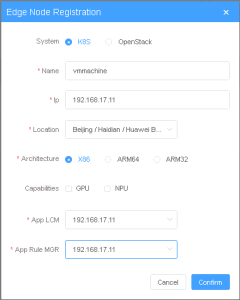
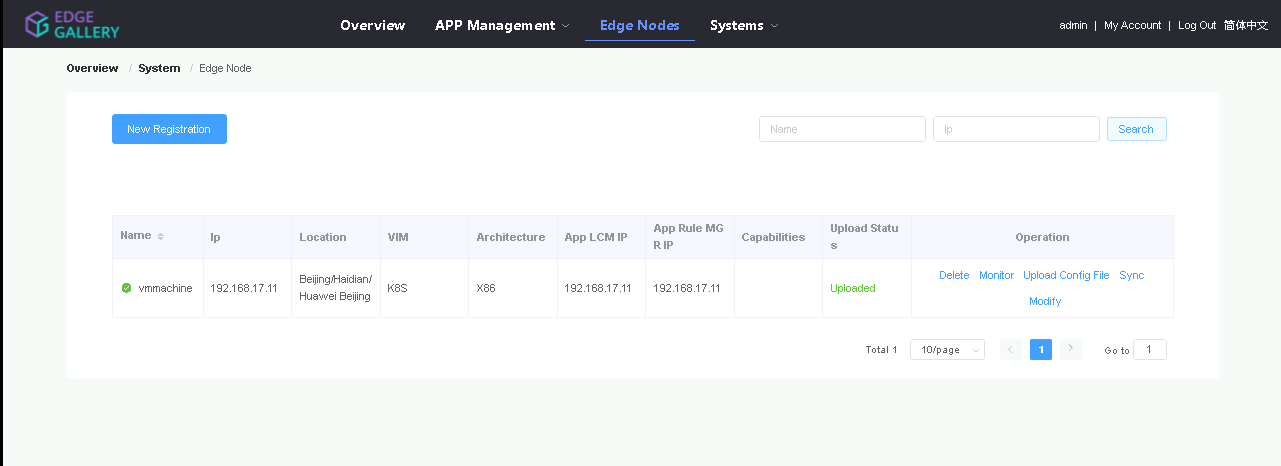
2.1. Add k8s node:
Click on Edge Nodes ->New Rgistration Upload file for Application Description
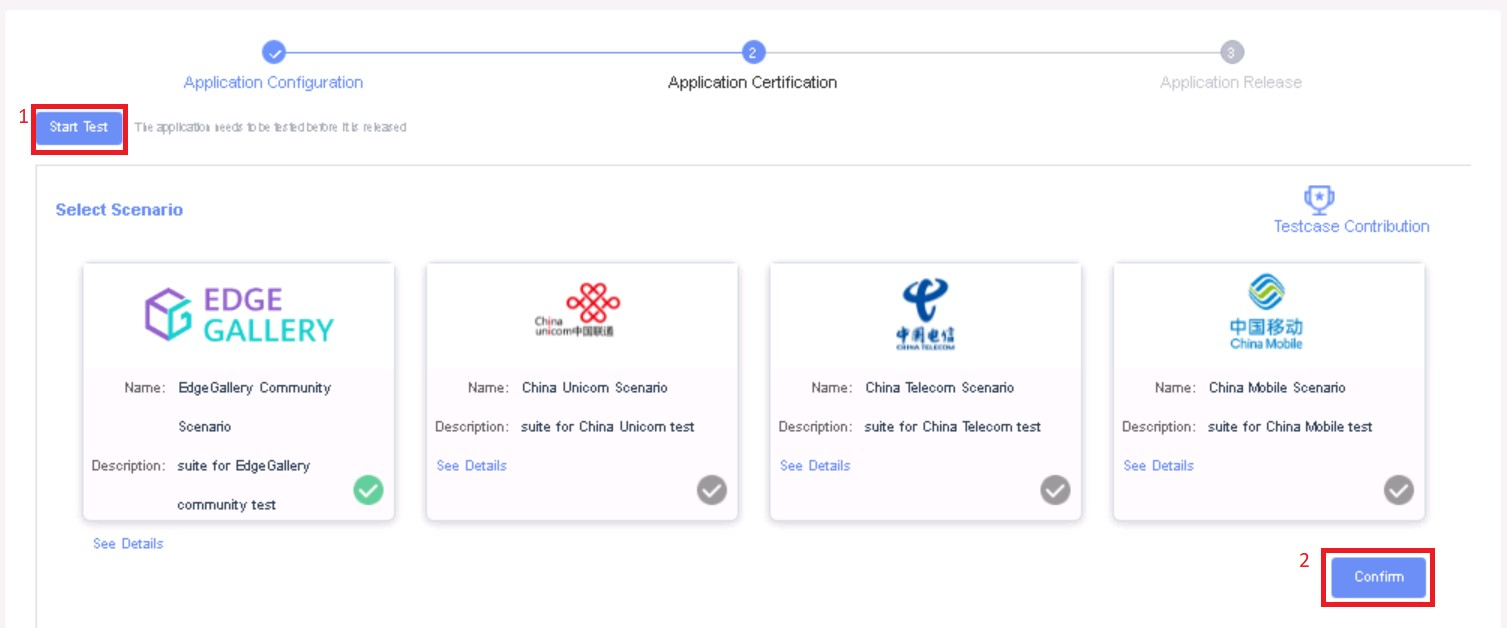
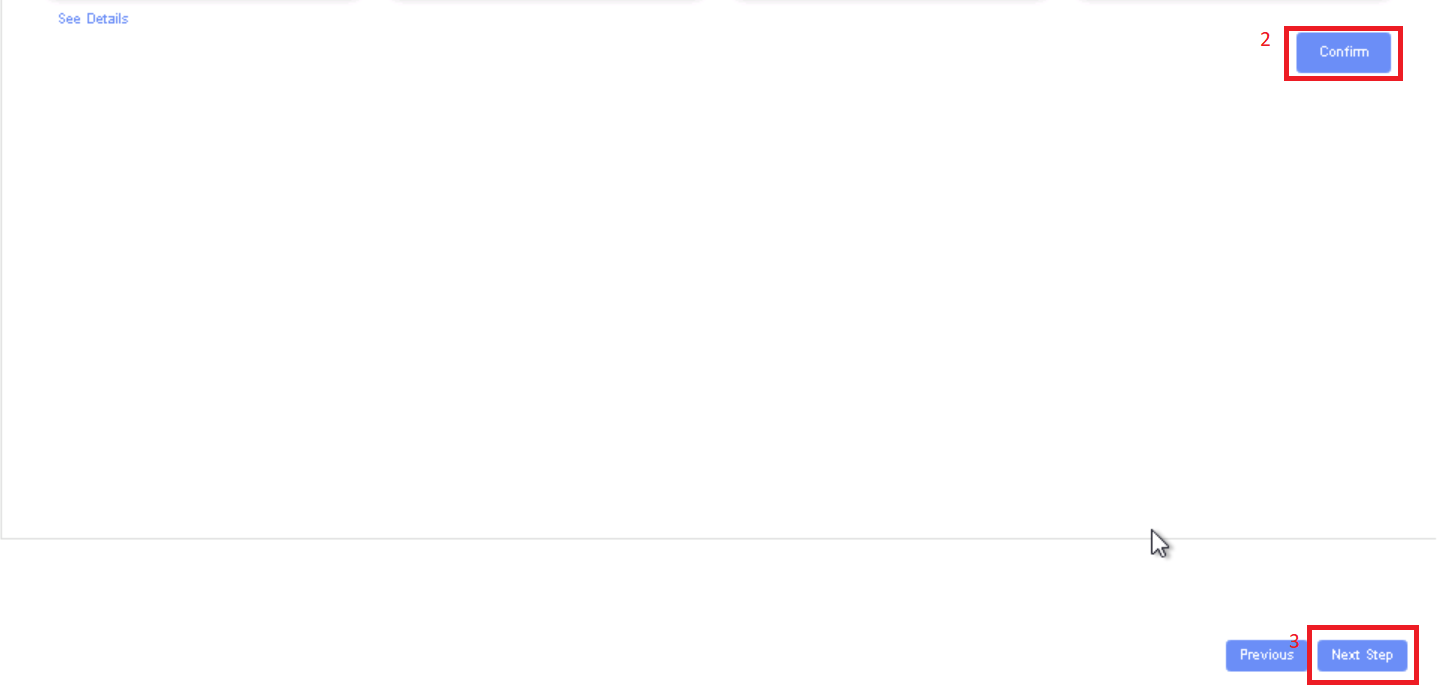
Click save config, click Next Step, click Start Test, scroll down to find & click Start Test button, click Next Step, click publish to publish application to appstore.
2. Login to MECM Portal https://ip:30093
2.1 click on Systems -> MEPM -> New Registration
Name: Applcm
System: k8s
Name: edge1(any general name)
IP: applcm “public ip” IP: edge public IP
Port: 31252

2.2. click on Systems -> App Store -> New Registration Location: Select from the drop-down
App Store Name: appstore(any general name) Architecture: x86
IP: Appstore public ip Port Capabilities: 30099select none
Appstore Repo: {HarborIP:443} App LCM: Select edge IP from the drop-down box
Repo Name: appstore(any general name) App Rule MGR: Select edge IP from the drop-down box
Repo Username: admin(harbor user name) 2.2. Download /root/.kube/config file from edge node
Repo Password: (harbor password)
Vendor: vendor(any general name)

2.3. Add k8s node:
Click on Edge Nodes -> New Registration
And click on Upload config file to upload.
3. log in to harbor Portal https://ip:443
3.1. Add three new projects

3.2. Those three projects' names are appstore, developer, and mecm. And select access level to the public.
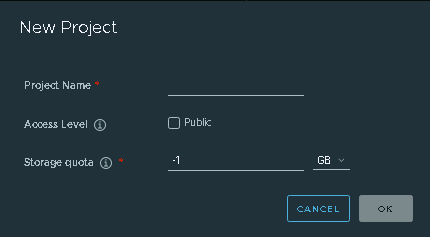
3.3. Final page will look like the below screenshot.

4. log in to Developer Portal https://ip:30092
4.1. Add sandbox env to deploy application before publishing
Click System ->Host Management ->Add Host
 .
.
Name: general name
System: k8s
Lcmip: sandbox ip(for testing purpose can provide edge ip, if no sandbox env)
mecHost: sandbox ip(for testing purpose can provide edge ip, if no sandbox env)
Port: 30204
Protocol: https
Architecture: X86
Status: Normal
Port Range: leave as it is
Address: Bangalore
UploadConfig File: upload sandboxenvkubeconfig file
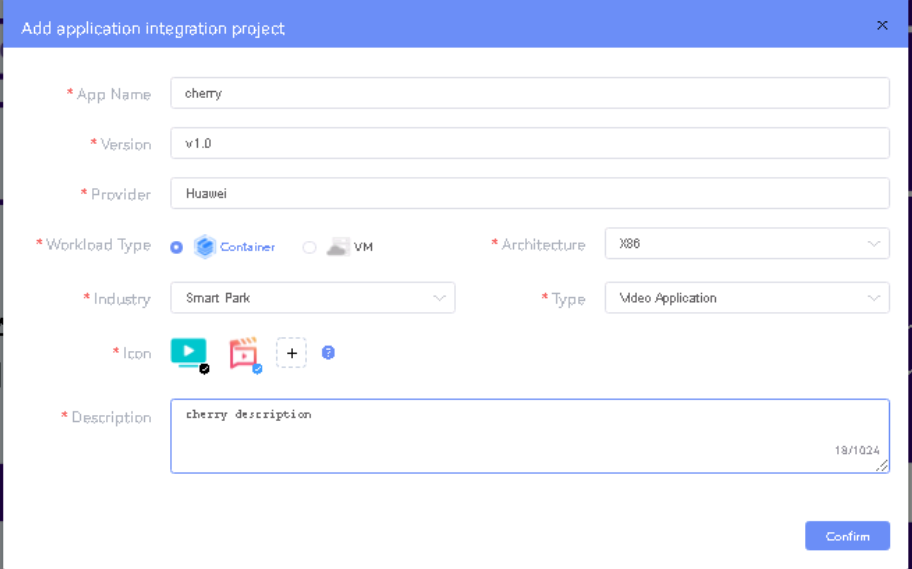
4.2 Click on Workspace -> Create Project -> Application Integration -> Start
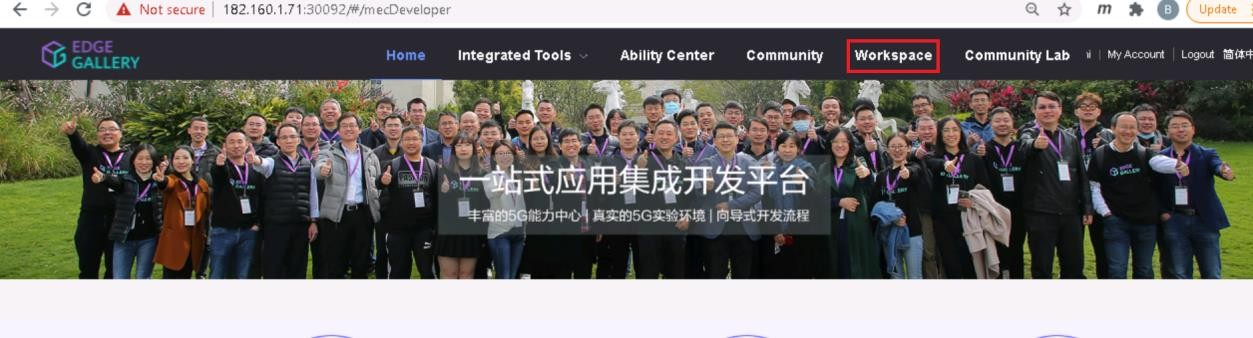
- Go to Application Integration
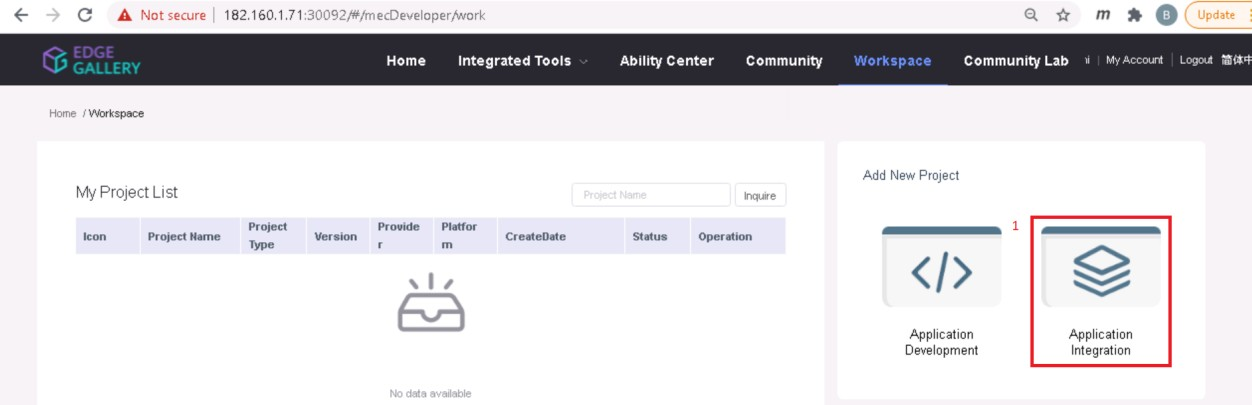
- Provide App Name, Version, Provider, Workload Type, Architecture, Industry, Type.
- Upload Icon, provide Description. And click on confirm.
4.3. Now click on Deployment Test.
- Upload Docker images directly from the portal by clicking on Upload App Image.
- docker save -o <path-to-save>/<repo-name>.tar <repo-name>:<tag>
After that you can take tar file from path and upload image.
Or, directly push Docker images to Harbor repo (takes lesser time, preferred). Following command for pushing an image in Harbor:
- cat /etc/docker/daemon.json (execute this command in Edge gallery installed machine, to get an IP)
- docker tag <repo-name>:<tag> <IP>/developer/<repo-name>:<tag>
- docker push <IP>/developer/<repo-name>:<tag>
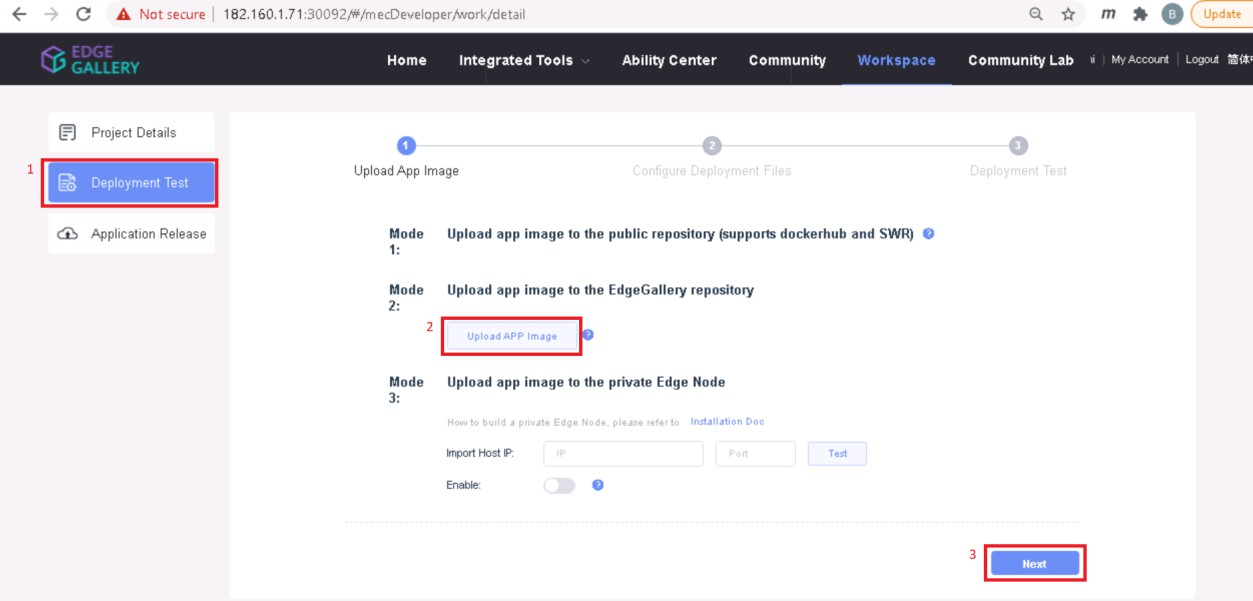
- Click next, upload deployment yaml file now.
VM: k8s Name: edge1- After config upload, click next and click start deployment
IP: edge public ip- After Deployment is successful, click on Release Recourses
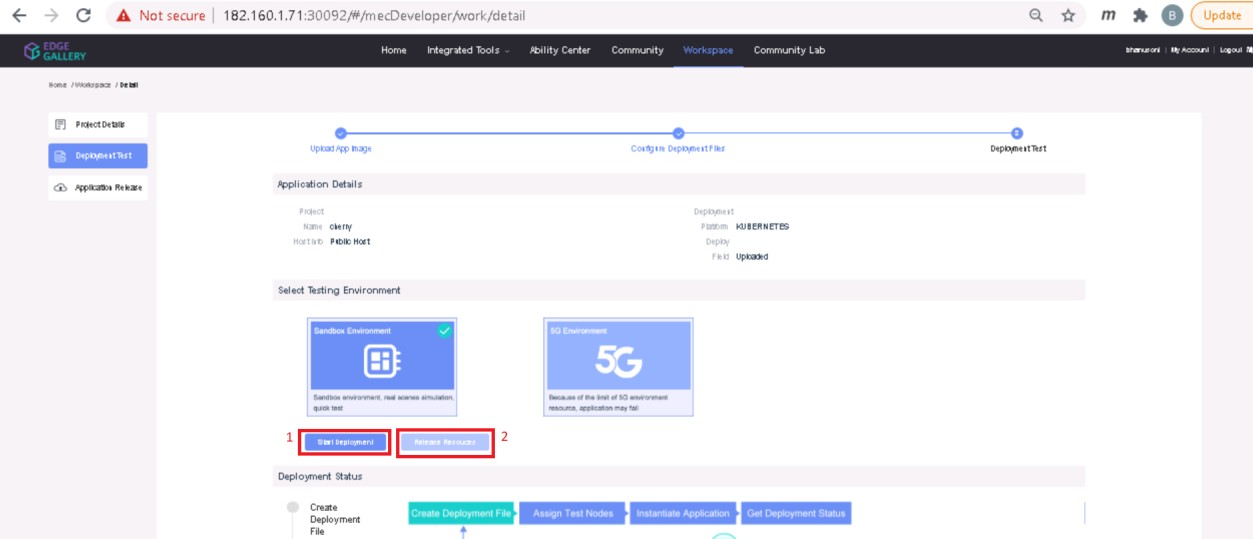
Location: select from drop downNote:
- Address: yanta Coordinates: 116.39,39.90While Deployment test if any error happens, open ATP portal (https://ip:30094) in another tab of the browser, sign in, come back to the developer portal and re run deployment test
- Architecture: x86
Capabilities: select none
MEPM: select applcm node from dropdown

gitee.com/edgegallery/applications repo provides A lot of applications with their logo, deployment YAML & user guides
3.4. Now click on Application Release
Upload file for Application Description
 2.4. Download /root/.kube/config file from edge node.
And click on Upload config file to upload. Click save config
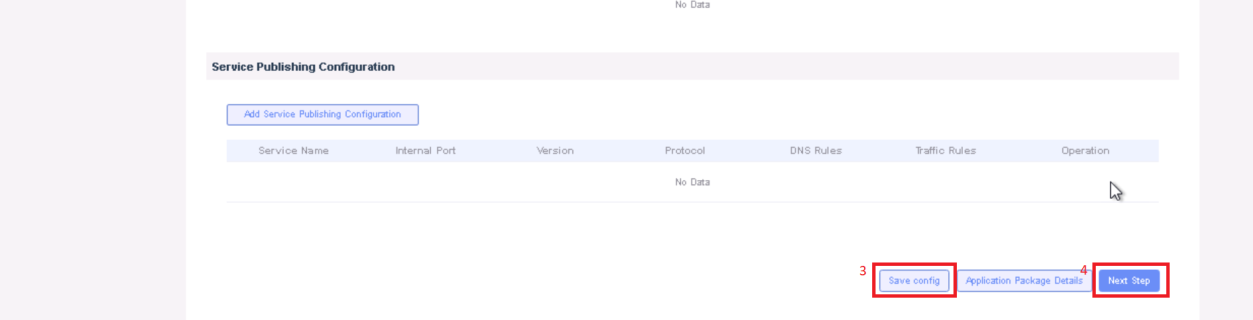

2.5. Sync applications from AppStore Click Next Step, click Start Test, scroll down to find & click the Start Test button, then confirm. Once the testing is complete click on Next Step
Click on APP Management -> Package Management -> Synchronize From App Store Select check boxes of applications to be synced and click confirm. click publish to publish an application to AppStore. Go to https://<IP>:30091 and App Warehouse to confirm that the application is successfully ported.
Developer Guide and Troubleshooting
...