Table of Contents
Introduction
The guide covers the installation details which are related to Enterprise Applications on Lightweight 5G Telco Edge (EALTEdge) Blueprint.
...
The CENTER Node is a K8s Cluster and EDGE Node is a K3s K8s Cluster.
How to use this document
...
Note: For Development environment two nodes is sufficient, where one node plays a dual role of One-Click Deployment Node and MECM Node with other as MEC Host.

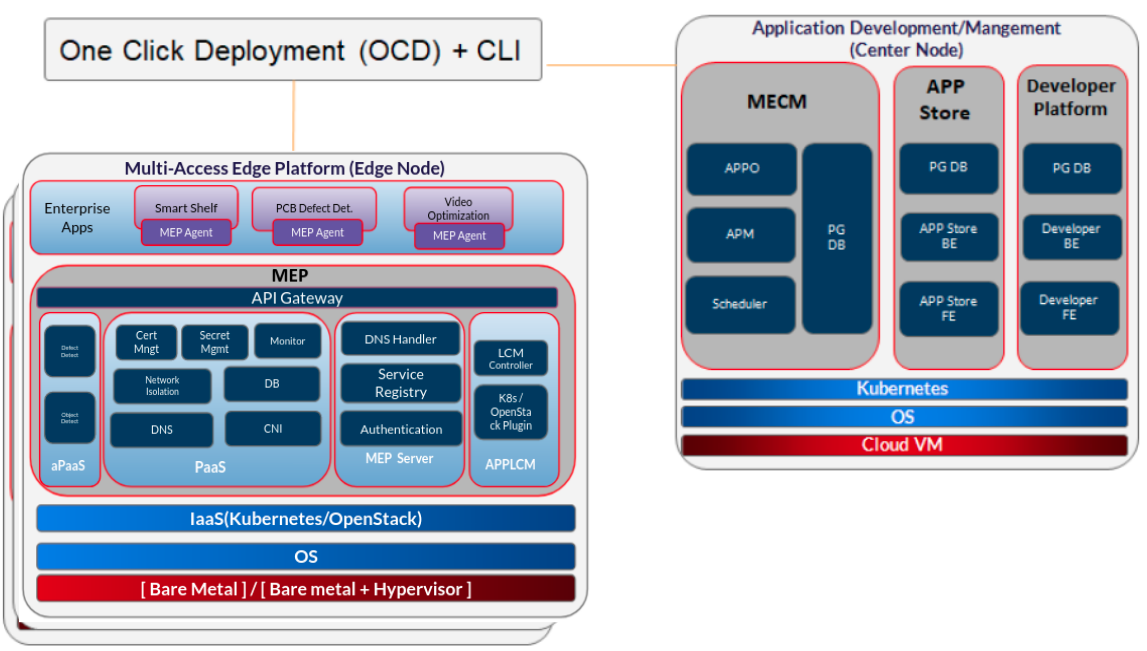
Figure: EALTEdge Deployment Architecture
Note: EALTEdge Blueprint Deployment has been tested on Cloud VM and is not tested on Bare-Metal Environment. Though, theoretically deployment should work in bare metal, provided hardware and software prerequisites are met. Kindly refer R4 R5 - Test Documentation of Enterprise Applications on Lightweight 5G Telco Edge (EALTEdge) to get details on the tested deployment.
...
Minimum Hardware Requirements
CENTER Node | |
|---|---|
| HW Aspect | Requirements |
| # of Node(s) | A virtual machine hosted in any Cloud Provider having internet connectivity. |
| # of CPU | 8 |
| Architecture | x86_AMD64 or ARM64. |
| RAM | 8 GB |
| Disk | 120 GB ~ 512GB |
| Networks | 1 |
EDGE Node(s) | |
|---|---|
| HW Aspect | Requirements |
| # of Node(s) | 1 MEC Host |
# of CPU | 4 |
| Architecture | x86_AMD64 or ARM64. |
| RAM | 4 GB |
| Disk | 20 GB ~ 256 GB |
| Network | 1 |
Note: The above specifications are given considering the EALTEdge CI / CD environment. User can try lower configuration considering lightweight components being used.
Recommended Hardware Requirements
CENTER Node | |
|---|---|
| HW Aspect | Requirements |
| # of Node(s) | A virtual machine hosted in any Cloud Provider having internet connectivity. |
| # of CPU | 8 |
| Architecture | x86_AMD64 or ARM64. |
| RAM | 8 GB |
| Disk | 120 GB ~ 512GB |
| Networks | 1 |
EDGE Node(s) | |
|---|---|
| HW Aspect | Requirements |
| # of Node(s) | 1 MEC Host |
# of CPU | 4 |
| Architecture | x86_AMD64 or ARM64. |
| RAM | 4 GB |
| Disk | 20 GB ~ 256 GB |
| Network | 1 |
Software Prerequisites
- Virtual Machines preinstalled with Ubuntu 16.04 / 18.04 for MECM Node.
- Virtual Machines preinstalled with Ubuntu 16.04 / Ubuntu 18.04 or CentOS 7.X for MEC Host Nodes
- root user created in the Deployment Node, MEC Node and MEC Host Node.
- SSH Server running in all the Nodes.
- Ansible > 2.5 10.7 installed in One Click Deployment Node (Jump Host)
- git installed in Jump Host.
- Kubespray code is downloaded (https://github.com/kubernetes-sigs/kubespray.git)
- GO Lang (version greater than 1.14.2) installed in Jump Host, required for CLI.
Database Prerequisites
Schema scripts
...
For Virtual Deployment minimum three2 Virtual machines(OCD and Center node can be deploy on same VM or in different VMs), following are the virtual machines and their usage
No | Usage |
|---|---|
| 1 | One Click Deployment Node |
| 2 | CENTER Node |
| 3 | EDGE Node |
All the nodes should have internet connectivity , network interface and network connectivity between the VM's. In this release providing two ways to install the EALTEdge environment.
i) EALTEdge Deployment using Ansible-Playbook single command.
ii) EALTEdge Deployment using CLI
Standard Deployment Overview
...
Login to the Jump Host and perform the below steps:
- Install Ansible > 2.910.6 7 [ https://docs.ansible.com/ansible/latest/installation_guide/intro_installation.html]
- Install git
- Install GoLang > 1.14+
- Git clone the Kubespray repo. [https://github.com/kubernetes-sigs/kubespray.git]
- Install python3 and pip3
- cd kubespray && pip install -r requirements.txt
- python3 and pip3
Jump Host Pre-Jump Host Pre-Configurations for Center Components Installation
...
1. Generate public key : #ssh-keygen -t rsa
2. Setup password-less login from ocd to center and ocd to edge.
sshpass -p <password> Copy the ssh key to all the nodes in the MECM Cluster, using ssh-copy-id . (example : #ssh-copy-id root@159.178.17.16)
3. Kubespray configuration
cd kubespray && cp -rfp inventory/sample inventory/mycluster
Update ansible inventory file provided in kubesrpay repo with MECM Cluster node IP's
4. Review and Change Parameters under inventory/mycluster/group_vars
cat inventory/mycluster/group_vars/all/all.yml
cat inventory/mycluster/group_vars/k8s-cluster/k8s-cluster.yml
5. Alter the config.yml and change parameters under path


Installing Mode : EALTEdge using Ansible-Playbooks
-p <ssh-port> -o StrictHostKeyChecking=no root@<node_ip>
3. Review and Change Parameters
For EdgeGallery MUNO Mode
ealt-edge/ocd/infra/playbooks/muno-config/controller/hosts-muno-controller
ealt-edge/ocd/infra/playbooks/muno-config/controller/var.yml
ealt-edge/ocd/infra/playbooks/muno-config/edge/hosts-muno-edge
ealt-edge/ocd/infra/playbooks/muno-config/edge/var.yml
For EdgeGallery AIO Mode
ealt-edge/ocd/infra/playbooks/hosts-aio
ealt-edge/ocd/infra/playbooks/var.yml
For EALT-EDGE stack:
ealt-edge/ocd/infra/playbooks/ealt-inventory.ini
Installing Mode : EALTEdge using Ansible-Playbooks
1. git clone the ealt-edge repo1. git clone the ealt-edge repo, to download the software to install the EALTEdge Environment.
root@akraino-mec-00020001:~# git clone "https://gerrit.akraino.org/r/ealt-edge"
2. go to the below directory
root@akraino-mec-00020001:~# cd ealt-edge/ocd/infra/playbooks
3. Modify the Configuration File :
ealt-inventory.ini with the details of CENTER and EDGE Nodes.
root@akraino-mec-0002:~# vi ealt-inventory.ini
For Edge Gallery installation:
MUNO-Mode:
4. Execute the below command
**Setup environment - command:
cd ealt-edge/ocd/infra/playbooks
ansible-playbook -i muno-config/controller/hosts-muno-controller ealt-eg-muno-controller.yml root@akraino-mec-0002:~# ansible-playbook ealt-all.yml -i ealt-inventory.ini --extra-vars "operation=install"
Once the execution is completed in console will see prompt "EALTEdge Environment Installed , Components Install CENTER and EDGE Nodes Successfully"
Other Options:
-e "ansible_user=root"
ansible-playbook -i muno-config/edge/hosts-muno-edge ealt-eg-muno-edge.yml To Install only Edge node
root@akraino-mec-0002:~# ansible-playbook ealt-all.yml -i ealt-inventory.ini --tags "edge" --extra-vars "operation=install" -e "ansible_user=root"
Installing Mode : EALTEdge using CLI
1. git clone the ealt-edge repo, to download the software to install the EALTEdge Environment.
root@akraino-mec-0002:~# git clone "https://gerrit.akraino.org/r/ealt-edge"
2. go to CLI directory
root@akraino-mec-0002:~#cd ealt/infra/cli/
root@akraino-mec-0002:~#chmod +x build _cli.sh
root@akraino-mec-0002:~#source build_cli.sh
root@akraino-mec-0002:~#cd ~/ealt-edge/ocd/infra/playbooks
Note: The CLI Commands to setup the environment should be executed only from above path.
3. Edit the Configuration File : ealt-inventory.ini with the details of MECM and MEC Hosts.
root@akraino-mec-0002:~#vi ealt-inventory.ini
4. Execute the below command to install EALTEdge Environment
root@akraino-mec-0002:~#ealt init all
Above command will install the various component. Refer the below table for detail information.
Other CLI Commands:
Command to Install only Edge Node
root@akraino-mec-0002:~#ealt init edge
Snapshot Deployment Overview
Not Applicable
Special Requirements for Virtual Deployments
N/A
For AIO mode:
Execute the below command
cd ealt-edge/ocd/infra/playbooks
ansible-playbook ealt-eg-aio-latest.yml -i hosts-aio --extra-vars "operation=install" -e ansible_user=root"
Installation of ealt-edge stack:
ansible-playbook ealt-all.yml -i ealt-inventory.ini --extra-vars "operation=install"
Once the execution is completed in console will see prompt "EALTEdge Environment Installed , Components Install CENTER and EDGE Nodes Successfully"
Snapshot Deployment Overview
N/A
Special Requirements for Virtual Deployments
N/A
Install Jump Host
N/A
Verifying the Setup - VM's
...
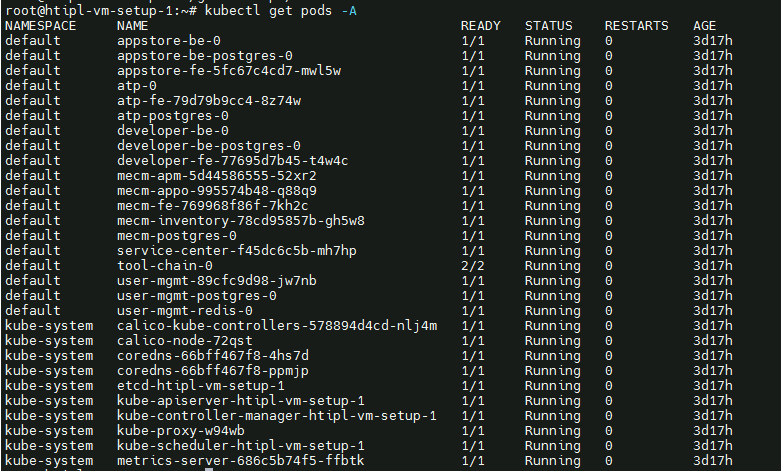
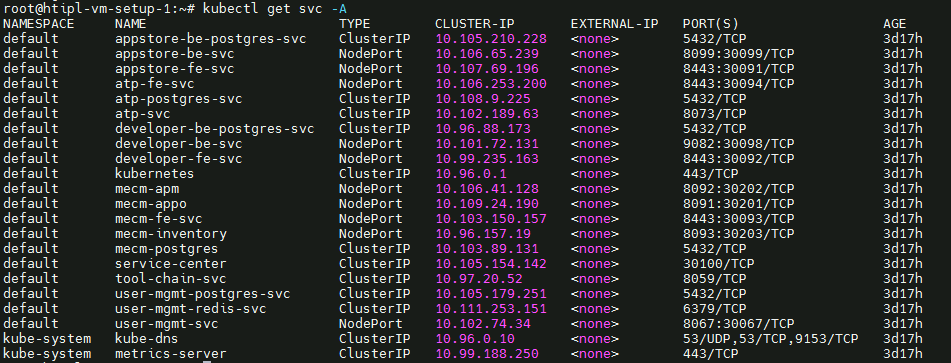
- Login to the Center Node and check whether K8S cluster is installed.
- Check the below mentioned components and services are running as Pods / Services in Kubernetes cluster
- PostgresSQL
- AppLCM
- Appo
- Inventory
- Apm
- MECM - FrontEnd
- Appstore
- Developer Portal
- Service Center
- User Management
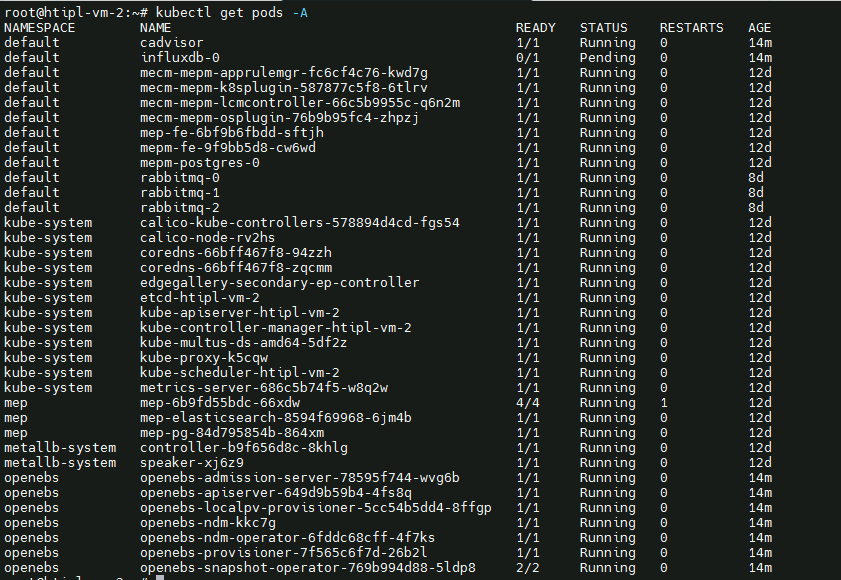
- Login to Edge Host and check K3S is installed.
Components and Services running in CENTER Node

Components and Services running EDGE Node

Developer Guide and Troubleshooting
Uninstall Guide
Using Ansible Playbooks
...
Components and Services running in CENTER Node
Components and Services running EDGE Node
Deploy Application in EALTEdge
- Login to MECM Portal https://ip:30093
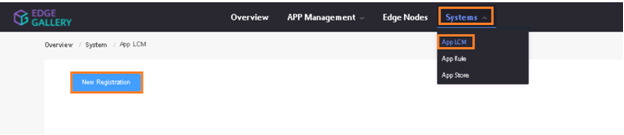
1.1 click on Systems ->App LCM ->New Registration
Name: Applcm(any general name)
IP: applcm"public ip"
Port: 30204

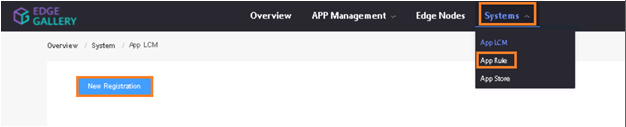
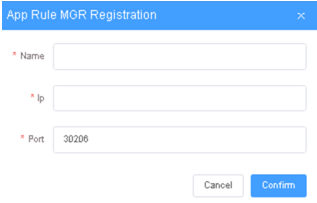
1.2. click on Systems ->App Rule -> New Registration
Name: Apprule(any general name)
IP: applcm"public ip"
Port: 30206
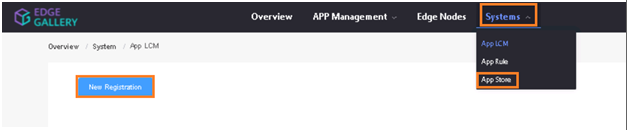
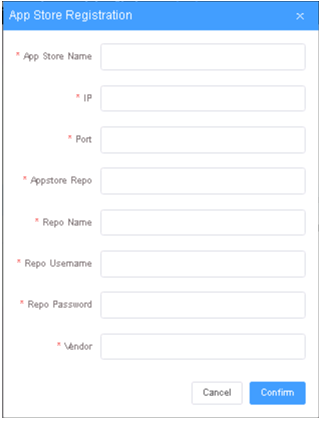
1.3. click on Systems ->App Store ->New Registration
App Store Name: appstore(any general name)
IP: Appstore public ip
Port: 30099
Appstore Repo: {HarborIP:443}(192.168.1.1:443)
Repo Name: appstore(any general name)
Repo Username: admin(harbor user name)
Repo Password: Harbor@edge(harbor password)
Vendor: vendor(any general name)
2. log in to MECM Portal https://ip:30093
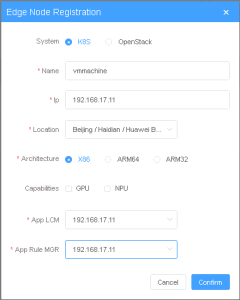
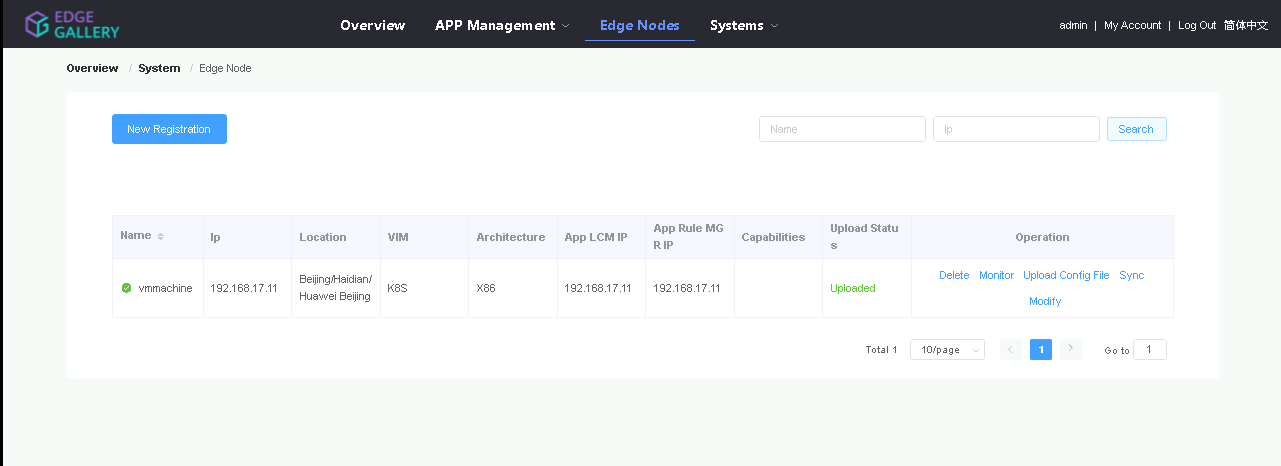
2.1. Add k8s node:
Click on Edge Nodes ->New Rgistration
System: k8s
Name: edge1(any general name)
IP: edge public IP
Location: Select from the drop-down
Architecture: x86
Capabilities: select none
App LCM: Select edge IP from the drop-down box
App Rule MGR: Select edge IP from the drop-down box
2.2. Download /root/.kube/config file from edge node
And click on Upload config file to upload.
3. log in to harbor Portal https://ip:443
3.1. Add three new projects

3.2. Those three projects' names are appstore, developer, and mecm. And select access level to the public.
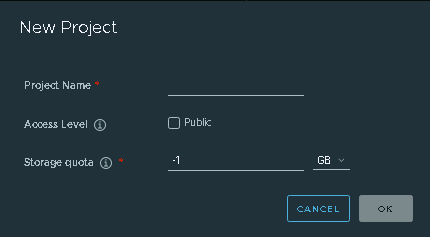
3.3. Final page will look like the below screenshot.

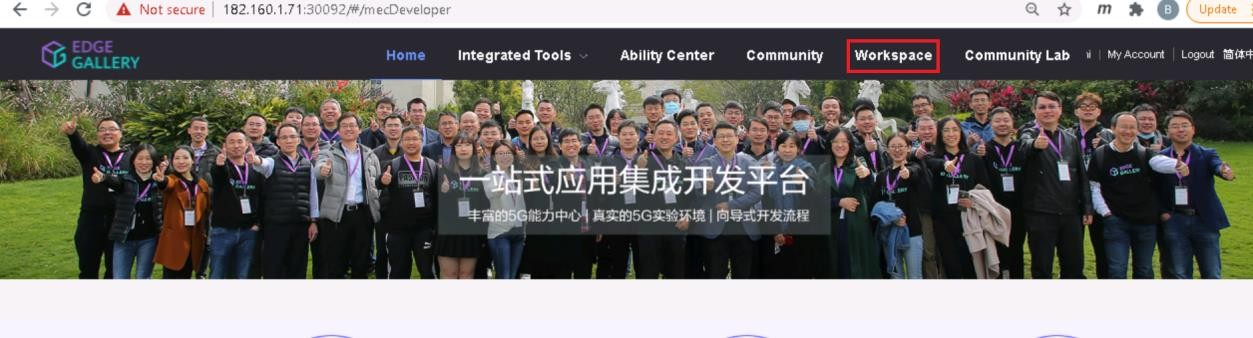
4. log in to Developer Portal https://ip:30092
4.1. Add sandbox env to deploy application before publishing
Click System ->Host Management ->Add Host
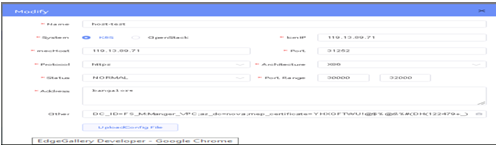 .
.
Name: general name
System: k8s
Lcmip: sandbox ip(for testing purpose can provide edge ip, if no sandbox env)
mecHost: sandbox ip(for testing purpose can provide edge ip, if no sandbox env)
Port: 30204
Protocol: https
Architecture: X86
Status: Normal
Port Range: leave as it is
Address: Bangalore
UploadConfig File: upload sandboxenvkubeconfig file
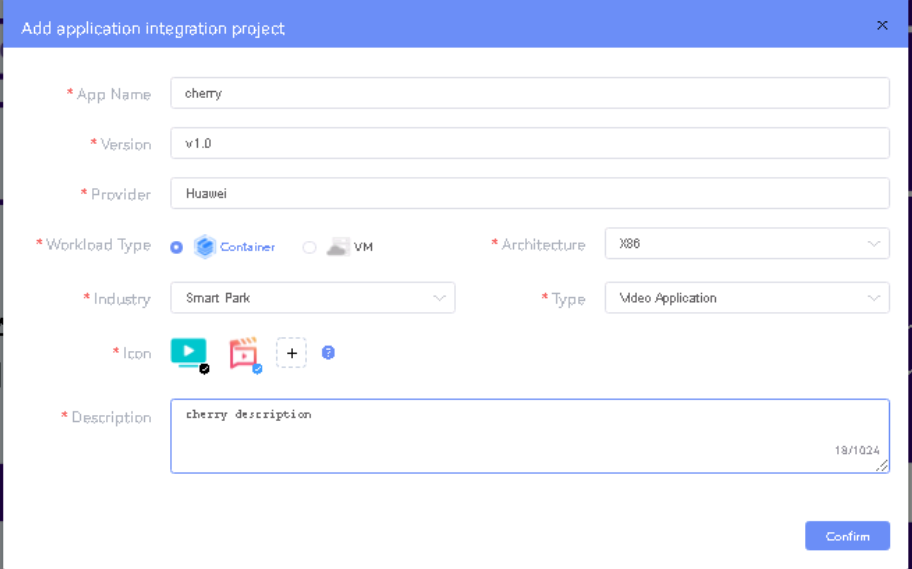
4.2 Click on Workspace -> Create Project -> Application Integration -> Start
- Go to Application Integration
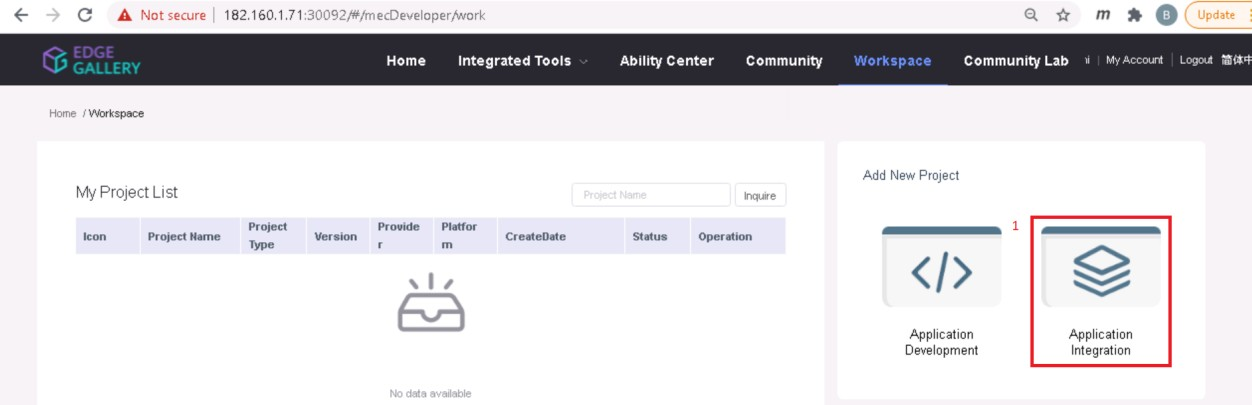
- Provide App Name, Version, Provider, Workload Type, Architecture, Industry, Type.
- Upload Icon, provide Description. And click on confirm.
4.3. Now click on Deployment Test.
- Upload Docker images directly from the portal by clicking on Upload App Image.
- docker save -o <path-to-save>/<repo-name>.tar <repo-name>:<tag>
After that you can take tar file from path and upload image.
Or, directly push Docker images to Harbor repo (takes lesser time, preferred). Following command for pushing an image in Harbor:
- cat /etc/docker/daemon.json (execute this command in Edge gallery installed machine, to get an IP)
- docker tag <repo-name>:<tag> <IP>/developer/<repo-name>:<tag>
- docker push <IP>/developer/<repo-name>:<tag>
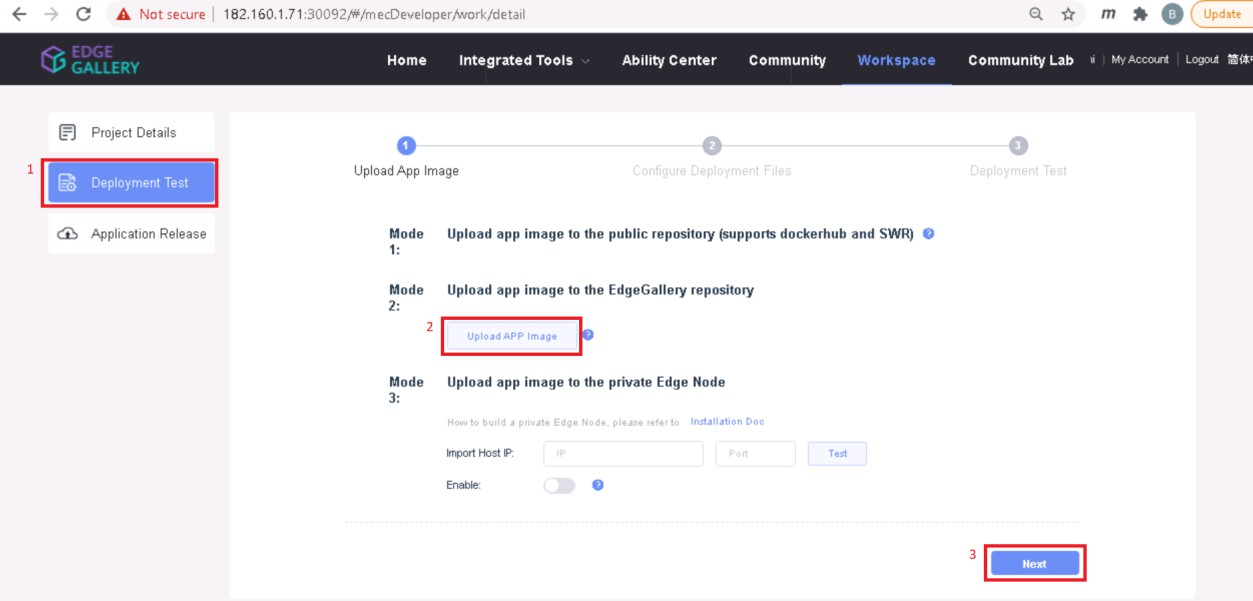
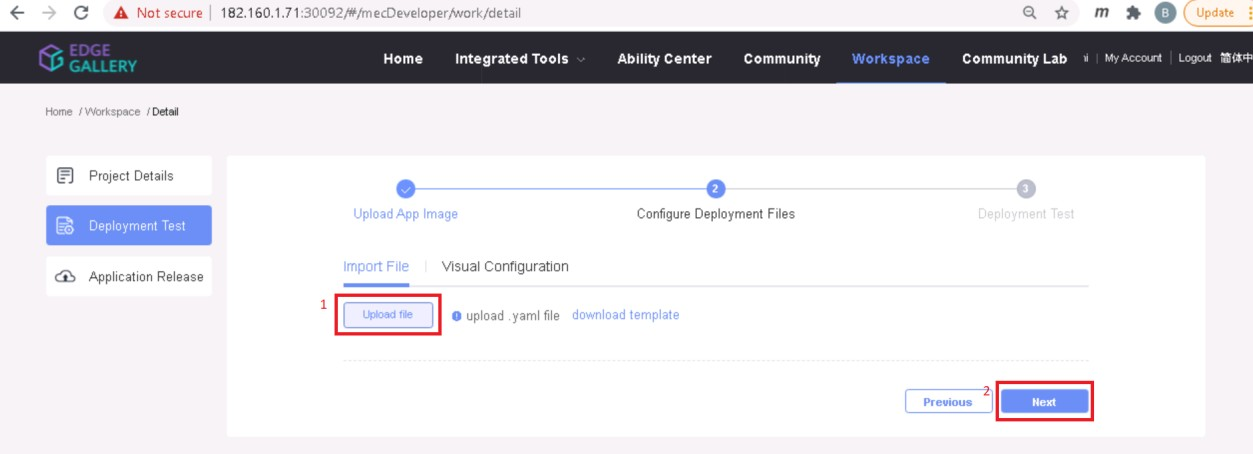
- Click next, upload deployment yaml file now.
- After config upload, click next and click start deployment
- After Deployment is successful, click on Release Recourses
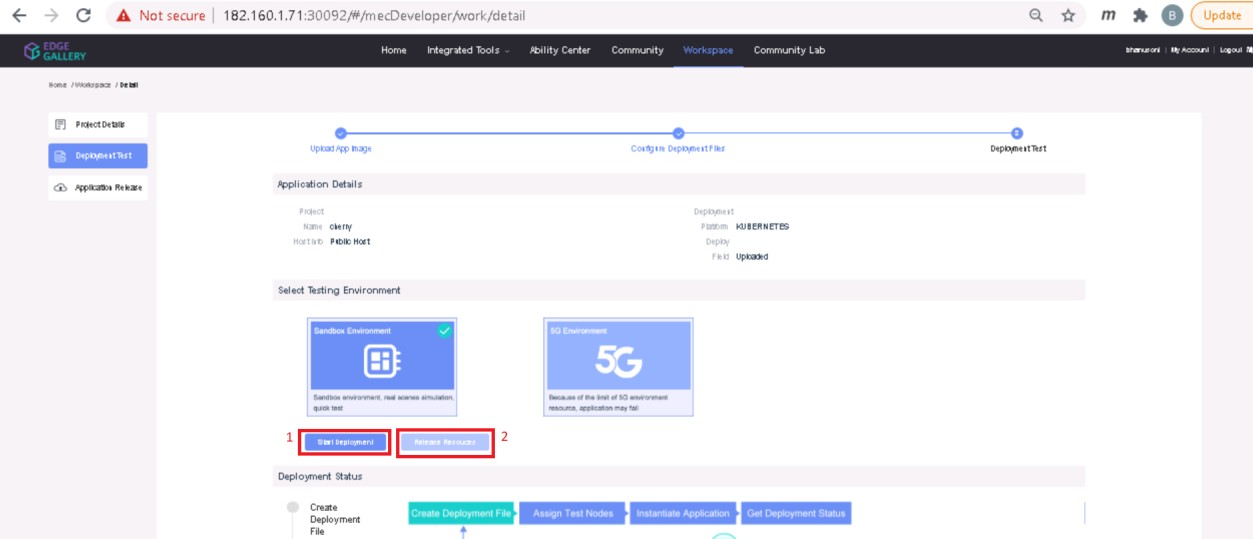
Note:
- While Deployment test if any error happens, open ATP portal (https://ip:30094) in another tab of the browser, sign in, come back to the developer portal and re run deployment test
- gitee.com/edgegallery/applications repo provides A lot of applications with their logo, deployment YAML & user guides
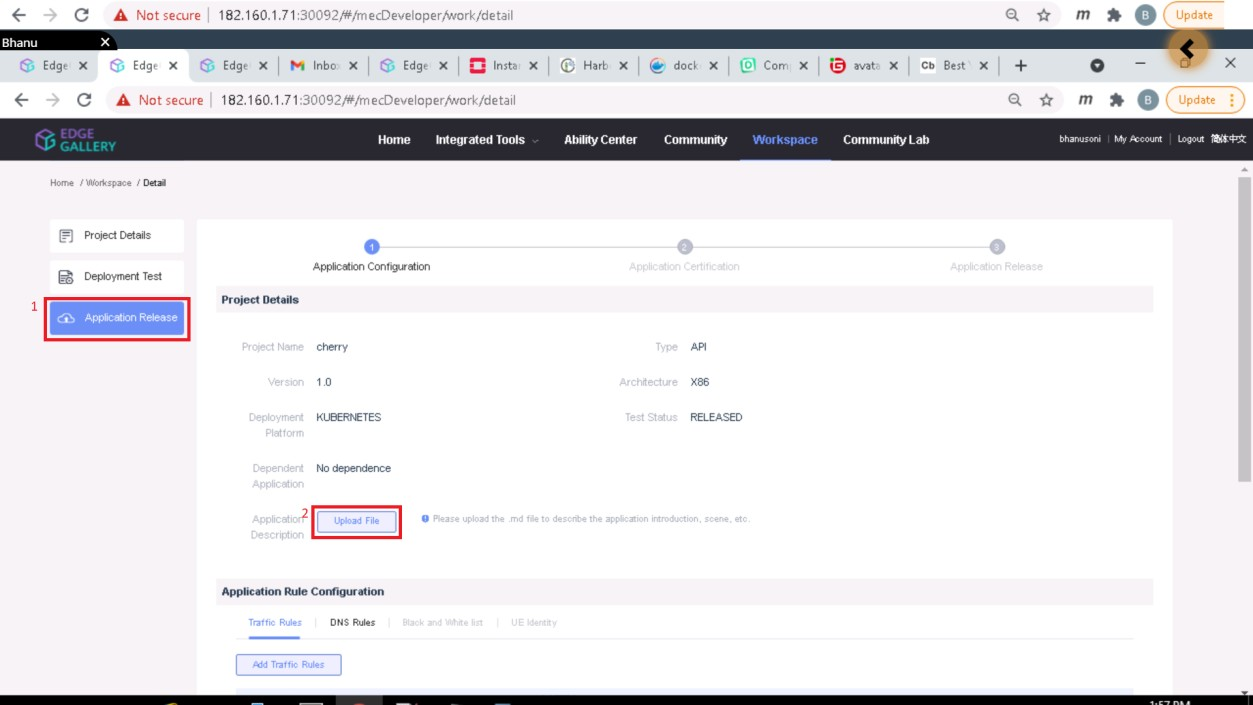
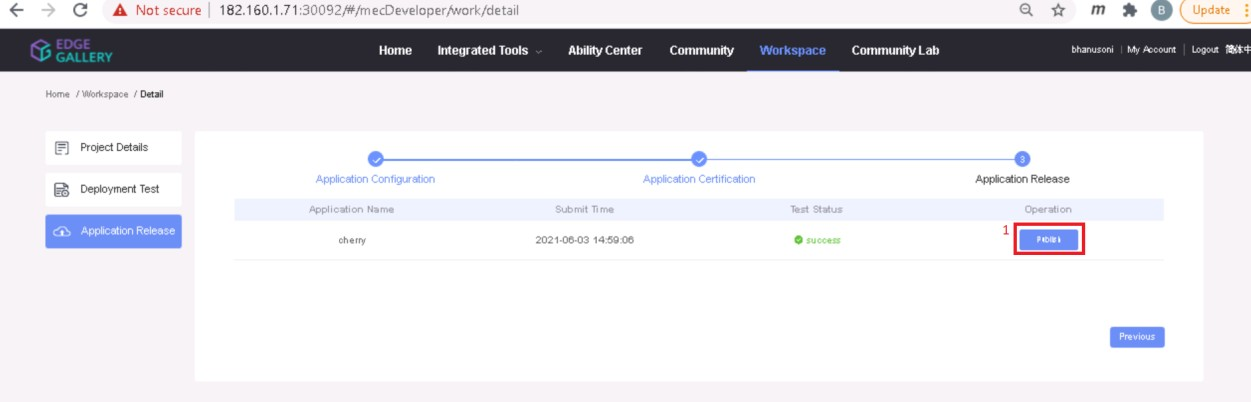
3.4. Now click on Application Release
Upload file for Application Description
Click save config
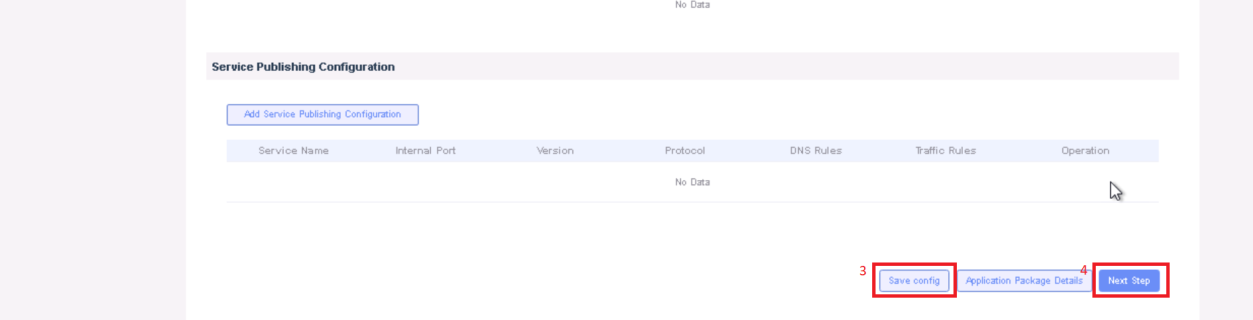
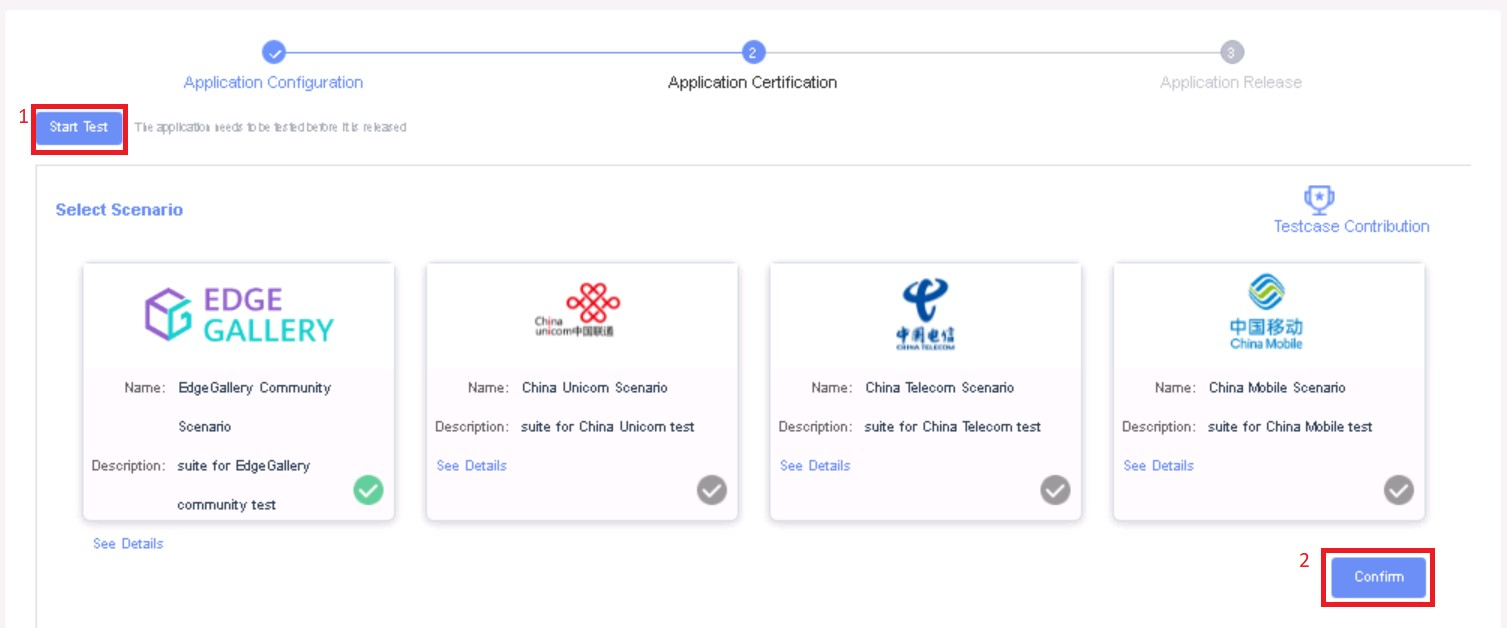
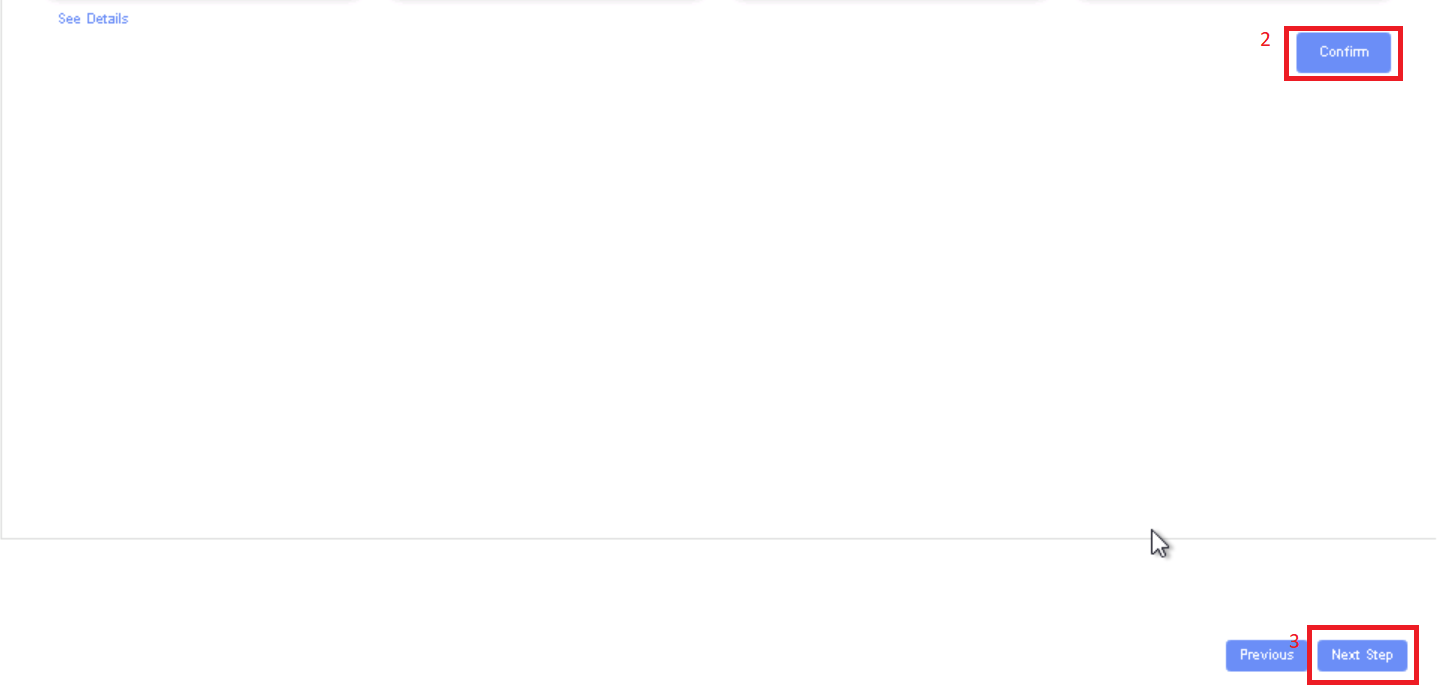
Click Next Step, click Start Test, scroll down to find & click the Start Test button, then confirm. Once the testing is complete click on Next Step
click publish to publish an application to AppStore. Go to https://<IP>:30091 and App Warehouse to confirm that the application is successfully ported.
Developer Guide and Troubleshooting
Uninstall Guide
Using Ansible Playbooks
For EALT-EDGE stack
root@akraino-mec-0001:~#ansible-playbook ealt-all-uninstall.yml -i ealt-inventory.ini --extra-vars "operation=uninstall"
For MUNO Mode
root@akraino-mec-0001:~#ansible-playbook -i muno-config/controller/hosts-muno-controller ealt-eg-muno-controller.yml --extra-vars "operation=uninstall" -e "ansible_user=root"
root@akraino-mec-0001:~#ansible-playbook -i muno-config/edge/hosts-muno-edge ealt-eg-muno-edge.yml --extra-vars "operation=uninstall" -e "ansible_user=root"
For AIO Mode
root@akraino-mec-0001:~#ansible-playbook -i hosts-aio ealt-eg-aio-latest.yml --extra-vars "operation=uninstall" -e "ansible_user=root"
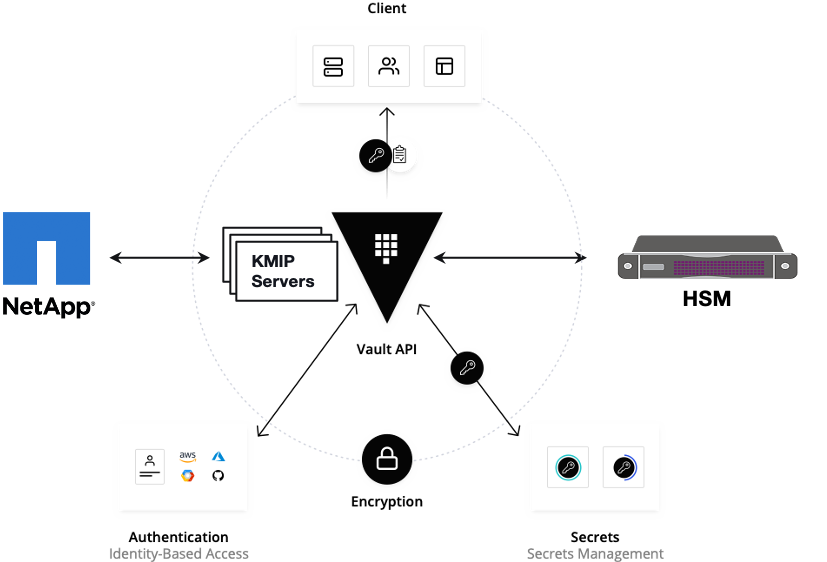
Vault documentation
**This document explains how to generate certificate by using vault and cert manager**
##Cluster Architecture

##Make a cluster
##The Image try to put with reference to our environment, with reference to EALT Edge. Can make a picture where Vault will be running in MEC Host (as Root CA) , ##Cert Manager and Applications (App1, App2)
##1. Add helm repo
```
helm repo add hashicorp https://helm.releases.hashicorp.com
helm install vault hashicorp/vault
```
##2. Generate root token and Unseal Key
```
kubectl exec vault-0 -- vault operator init -key-shares=1 -key-threshold=1 -format=""
```
##Note: Root token we will use when we will login vault pod, Unseal Key and Root token will looks like below ex-
##Unseal Key 1: QcTX47IacKidIjFWSrkGLiQG1fwaqoInEz0SqAZ7rMs=
##Initial Root Token: s.A0SXgscZxbCeJRd1AjsVzvUU
##Generated Unseal key need to put in below command then vault will start running as a pod
```
kubectl exec -ti vault-0 -- vault operator unseal <Unseal Key>
```
##Vault is initialised as a pod
##By using below command can login in vault pod
```
kubectl exec -it vault-0 -- /bin/sh
```
##Vault Initialisation and Configuration Steps
####Once we initialize the vault pod we get unseal key and root token, need to put the root token
```
vault login <root token>
```
##Enable the PKI secrets engine
##By default, the secrets engine will mount at the name of the engine. To enable the secrets engine at a ##different path, use the -path argument.
```
vault secrets enable pki
```
##Keep the value in sync with the comment. 30 days, Increase the TTL by tuning the secrets engine. The default value of 30 days may be too short
```
vault secrets tune -default-lease-ttl=2160h -max-lease-ttl=87600h pki
```
##Configure a CA certificate and private key. It can generate ##its own self-signed root
## ealtedge.com is a your common_name or base url
```
vault write pki/root/generate/internal common_name=ealtedge.com ttl=8760h
```
##Update the CRL location and issuing certificates. These values can be updated in the future.
```
vault write pki/config/urls issuing_certificates="http://127.0.0.1:8200/v1/pki/ca" crl_distribution_points="http://127.0.0.1:8200/v1/pki/crl"
```
##It will allow your domain and subdomain
```
vault write pki/roles/my-role allowed_domains=ealtedge.com allow_subdomains=true max_ttl=8760h
```
##Generate a new credential by writing to the /issue endpoint with the name of the role
##The output will include a dynamically generated private key and certificate which corresponds to the ##given role
##The issuing CA and trust chain is also returned for automation simplicity
```
vault write pki/issue/my-role common_name=www.ealtedge.com
```
####Enabling AppRole in Vault
```
vault auth enable approle
```
##Writing vault policy
```
vault policy write pki-policy -<<EOF
path "pki*" { capabilities = ["create", "read", "update", "delete", "list", "sudo"]}
EOF
```
##Write Auth role
```
vault write auth/approle/role/my-role secret_id_ttl=8760h token_num_uses=0 token_ttl=2160h token_max_ttl=8760h secret_id_num_uses=0 policies=pki-policy
```
##Note:-
##my-role - is the role name
##secret_id_ttl - (Optional) The number of seconds after which any SecretID expires
##token_num_uses - (Optional) The period, if any, in number of seconds to set on the token
##token_ttl - (Optional) The incremental lifetime for generated tokens in number of seconds. Its current value will be referenced at renewal time
##token_max_ttl - (Optional) The maximum lifetime for generated tokens in number of seconds. Its current value will be referenced at renewal time
##secret_id_num_uses - (Optional) The number of times any particular SecretID can be used to fetch a token from this AppRole, after which the SecretID will expire. ##A value of zero will allow unlimited uses.
##Read Auth role
##Here it will give you role id which you need to use in vault-approle-issuer.yml
```
vault read auth/approle/role/my-role/role-id
```
##Generate secret id
```
vault write -f auth/approle/role/my-role/secret-id
```
##By using above 2 command role id and secret id you need to pass in below command
```
vault write auth/approle/login role_id=<role-id> secret_id=<secret-id>
```
###########################
##If the command successful then vault configuration and authentication via approle is completed
###########################
##YAML files to be modified
##First execute below yaml file
```
kubectl apply -f cert-manager.yaml
```
##Need to replace with the latest secret id in base64 format by using below command
##Secret id already generate when we are executing vault command, need to use same secret id here
```
echo secret-id | base64
```
##The output of above command has to be replaced in the vault-apply-secret.yml file data.secretId
```
kubectl apply -f vault-apply-secret.yml
```
##No you will get one ip where your vault is running so that ip you can get by using below command
##Copy vault ip from below command
```
kubectl get svc
```
##Now vault ip and role id need to replace in vault-approle-issuer.yml file
##Role id already generated when we are executing vault commands
```
kubectl apply -f vault-approle-issuer.yml
```
##NOTE: spec.vault.server: IP here you need to change vault ip which you will get when u ren 'kubectl get svc'
##spec.vault.auth.roleId this is you need to replace and need to put latest role id which you get in 'vault read auth/approle/role/my-role/role-id'
##Then final we need to execute below yaml file
```
kubectl apply -f vault-cert-certificate.yml
```
#######################################
Certificate generate process completed
#######################################
##Now get ca certificate use below command
```
curl http://10.43.130.35:8200/v1/pki/ca/pem
```
##10.43.130.35 is your vault ip, need to replace with latest vault ip
Troubleshooting
N/A
Maintenance
Blueprint Package Maintenance
Software maintenance
N/A
Hardware maintenance
N/A
Blueprint Deployment Maintenance
N/A
Frequently Asked Questions
N/A
License
Any software developed by the "Akraino Enterprise Applications on Lightweight 5G Telco Edge Project is licensed under the
Apache License, Version 2.0 (the "License");
you may not use the content of this software bundle except in compliance with the License.
You may obtain a copy of the License at <https://www.apache.org/licenses/LICENSE-2.0>
Unless required by applicable law or agreed to in writing, software
distributed under the License is distributed on an "AS IS" BASIS,
WITHOUT WARRANTIES OR CONDITIONS OF ANY KIND, either express or implied.
See the License for the specific language governing permissions and
limitations under the License.
License information of EALTEdge Blueprint Components
OCD Host
CENTER Node
Center Node consists of 3 components . MECM , Appstore and Developer Portal.
Refer:
MECM Edge Gallery http://docs.edgegallery.org/zh_CN/latest/Projects/MECM/MECM.html#
| S. No | Software | Type | Version | License | Remarks |
| 1. | Docker | CRI | 18.09 |
Using CLI
root@akraino-mec-0002:~#ealt clean all
root@akraino-mec-0002:~#ealt clean edge
Vault documentation
**This document explains how to generate certificate by using vault and cert manager**
##Cluster Architecture

##Make a cluster
##The Image try to put with reference to our environment, with reference to EALT Edge. Can make a picture where Vault will be running in MEC Host (as Root CA) , ##Cert Manager and Applications (App1, App2)
##1. Add helm repo
```
helm repo add hashicorp https://helm.releases.hashicorp.com
helm install vault hashicorp/vault
```
##2. Generate root token and Unseal Key
```
kubectl exec vault-0 -- vault operator init -key-shares=1 -key-threshold=1 -format=""
```
##Note: Root token we will use when we will login vault pod, Unseal Key and Root token will looks like below ex-
##Unseal Key 1: QcTX47IacKidIjFWSrkGLiQG1fwaqoInEz0SqAZ7rMs=
##Initial Root Token: s.A0SXgscZxbCeJRd1AjsVzvUU
##Generated Unseal key need to put in below command then vault will start running as a pod
```
kubectl exec -ti vault-0 -- vault operator unseal <Unseal Key>
```
##Vault is initialised as a pod
##By using below command can login in vault pod
```
kubectl exec -it vault-0 -- /bin/sh
```
##Vault Initialisation and Configuration Steps
####Once we initialize the vault pod we get unseal key and root token, need to put the root token
```
vault login <root token>
```
##Enable the PKI secrets engine
##By default, the secrets engine will mount at the name of the engine. To enable the secrets engine at a ##different path, use the -path argument.
```
vault secrets enable pki
```
##Keep the value in sync with the comment. 30 days, Increase the TTL by tuning the secrets engine. The default value of 30 days may be too short
```
vault secrets tune -default-lease-ttl=2160h -max-lease-ttl=87600h pki
```
##Configure a CA certificate and private key. It can generate ##its own self-signed root
## ealtedge.com is a your common_name or base url
```
vault write pki/root/generate/internal common_name=ealtedge.com ttl=8760h
```
##Update the CRL location and issuing certificates. These values can be updated in the future.
```
vault write pki/config/urls issuing_certificates="http://127.0.0.1:8200/v1/pki/ca" crl_distribution_points="http://127.0.0.1:8200/v1/pki/crl"
```
##It will allow your domain and subdomain
```
vault write pki/roles/my-role allowed_domains=ealtedge.com allow_subdomains=true max_ttl=8760h
```
##Generate a new credential by writing to the /issue endpoint with the name of the role
##The output will include a dynamically generated private key and certificate which corresponds to the ##given role
##The issuing CA and trust chain is also returned for automation simplicity
```
vault write pki/issue/my-role common_name=www.ealtedge.com
```
####Enabling AppRole in Vault
```
vault auth enable approle
```
##Writing vault policy
```
vault policy write pki-policy -<<EOF
path "pki*" { capabilities = ["create", "read", "update", "delete", "list", "sudo"]}
EOF
```
##Write Auth role
```
vault write auth/approle/role/my-role secret_id_ttl=8760h token_num_uses=0 token_ttl=2160h token_max_ttl=8760h secret_id_num_uses=0 policies=pki-policy
```
##Note:-
##my-role - is the role name
##secret_id_ttl - (Optional) The number of seconds after which any SecretID expires
##token_num_uses - (Optional) The period, if any, in number of seconds to set on the token
##token_ttl - (Optional) The incremental lifetime for generated tokens in number of seconds. Its current value will be referenced at renewal time
##token_max_ttl - (Optional) The maximum lifetime for generated tokens in number of seconds. Its current value will be referenced at renewal time
##secret_id_num_uses - (Optional) The number of times any particular SecretID can be used to fetch a token from this AppRole, after which the SecretID will expire. ##A value of zero will allow unlimited uses.
##Read Auth role
##Here it will give you role id which you need to use in vault-approle-issuer.yml
```
vault read auth/approle/role/my-role/role-id
```
##Generate secret id
```
vault write -f auth/approle/role/my-role/secret-id
```
##By using above 2 command role id and secret id you need to pass in below command
```
vault write auth/approle/login role_id=<role-id> secret_id=<secret-id>
```
###########################
##If the command successful then vault configuration and authentication via approle is completed
###########################
##YAML files to be modified
##First execute below yaml file
```
kubectl apply -f cert-manager.yaml
```
##Need to replace with the latest secret id in base64 format by using below command
##Secret id already generate when we are executing vault command, need to use same secret id here
```
echo secret-id | base64
```
##The output of above command has to be replaced in the vault-apply-secret.yml file data.secretId
```
kubectl apply -f vault-apply-secret.yml
```
##No you will get one ip where your vault is running so that ip you can get by using below command
##Copy vault ip from below command
```
kubectl get svc
```
##Now vault ip and role id need to replace in vault-approle-issuer.yml file
##Role id already generated when we are executing vault commands
```
kubectl apply -f vault-approle-issuer.yml
```
##NOTE: spec.vault.server: IP here you need to change vault ip which you will get when u ren 'kubectl get svc'
##spec.vault.auth.roleId this is you need to replace and need to put latest role id which you get in 'vault read auth/approle/role/my-role/role-id'
##Then final we need to execute below yaml file
```
kubectl apply -f vault-cert-certificate.yml
```
#######################################
Certificate generate process completed
#######################################
##Now get ca certificate use below command
```
curl http://10.43.130.35:8200/v1/pki/ca/pem
```
##10.43.130.35 is your vault ip, need to replace with latest vault ip
Troubleshooting
Error Message Guide
Error: Most of mecm-pods down state including service center pod,
In service center pod logs , "decryption password incorrect" issue
Solution: Please use common_pwd in config.yaml as te9Fmv%qaq
Maintenance
Blueprint Package Maintenance
Software maintenance
N/A
Hardware maintenance
N/A
Blueprint Deployment Maintenance
N/A
Frequently Asked Questions
N/A
License
Any software developed by the "Akraino Enterprise Applications on Lightweight 5G Telco Edge Project is licensed under the
Apache License, Version 2.0 (the "License");
you may not use the content of this software bundle except in compliance with the License.
You may obtain a copy of the License at <https://www.apache.org/licenses/LICENSE-2.0>
Unless required by applicable law or agreed to in writing, software
distributed under the License is distributed on an "AS IS" BASIS,
WITHOUT WARRANTIES OR CONDITIONS OF ANY KIND, either express or implied.
See the License for the specific language governing permissions and
limitations under the License.
License information of EALTEdge Blueprint Components
OCD Host
...
CENTER Node
Center Node consists of 3 components . MECM , Appstore and Developer Portal.
Refer:
MECM Edge Gallery http://docs.edgegallery.org/zh_CN/latest/Projects/MECM/MECM.html#
...
Docker
...
19.03+
...
No code modifications done
...
v1.17.2
...
3.0.2
...
Monitoring
MEC-Graphana
...
7.1.1
...
AppLCM
...
Code part of Edge Gallery
...
MECM - FrontEnd
...
Edge Node
1.19.4+
| Apache 2.0 license | No code modifications done |
| 2. |
| Kubernetes |
| Orchestration |
v0.36.0
3.7
v1.18.7 | Apache 2.0 license | No code modifications done |
| 3. |
| Edge Gallery | Opensource MEC Platform | 1.1 |
.1 | Apache 2.0 license |
Service
Database
12.3
| No code modifications done |
Edge Node
| S. No | Software | Type | Version | License Information | Remarks |
| 1. | Docker | CRI | 18.09 | Apache 2.0 license | No code modifications done |
| 2. | K8s | Orchestration | 1.18.7 | Apache 2.0 license |
| No code modifications done | |
| 3. | Edge Gallery |
| Opensource MEC platform | 1.1.1 |
| Apache 2.0 license |
| Open Source MEC Platform |
References
Definitions, acronyms and abbreviations
...