Introduction
IEC Akraino Edge Stack supports AR/VR applications. It could support AR/VR Algorithms that with GPU Modeling (i.e. modeling describes the process of forming the shape of an object) Compositing (e.g. Environmental Mapping, Tone Mapping) Rendering and Illumination Models Visualization of Large Volume 3D Models (e.g. Global Network Operations Center monitoring) Registration (e.g. Stitching data from distributed sources) Segmentation (e.g. Segmentation and detection for security monitoring). This IEC Type 4 AR/VR platform utilizes Tars for remote direct memory access control. In this document, we use Virtual Classroom as demo for IEC Type4. Virtual Classroom is an online learning environment that allows teachers and students to communicate and interact with each other in real time. We use WebGL, Three.js and JavaScript to develop Virtual Classroom application.
License
Apache License - V2
How to use this document
The document includes details of prerequisites /pre-installation, installation and uninstalls steps.
The prerequisites and pre-installation software and hardware should be ready before executing the installation steps.
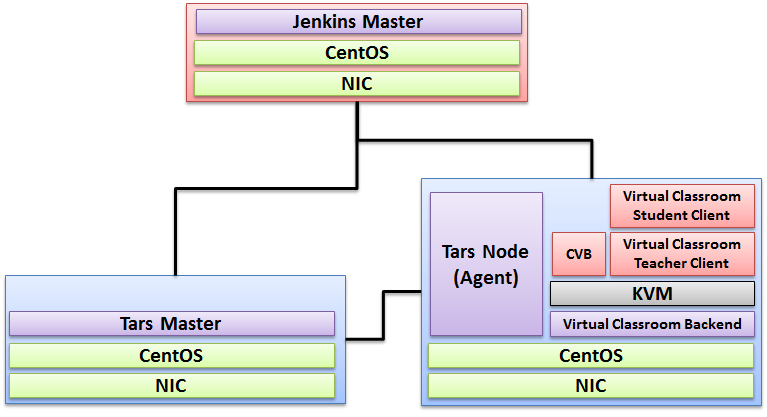
Deploy Architecture
To make the system deploy, the minimum deployment architecture is shown below, which consist of:
Pre-Installation Requirements
Hardware Requirements
- Wearable Glass (Optional)
- Teacher Client-Side — Personal Computer with Camera
- Student Client-Side — Personal Computer with Camera
- Server Side — 8 Core 16G Virtual Machine on ARM or x86 Platform
Software Prerequisites
- Teacher Side: Windows 10 with a Web Browser that supports WebSockets.
- Student Side: Windows 10 with a Web Browser that supports WebSockets.
- Server Side: CentOS 8
- Virtual Classroom (OpenVidu 2.13.0)
- Tars 2.1.0
- IEC 3.0
Database Prerequisites
N/A
Other Installation Requirements
N/A
Installation on the Client PC side(Teacher/Student Client)
Note well: No special software to access the application. The general software is itemized below:
- Install Windows 10
- Install camera driver
- Install Firefox browser
Installation High-Level Overview
Upstream Deployment Guide
Installation for Tars Master
- Install CentOS 8, refer to https://phoenixnap.com/kb/how-to-install-centos-8
- Install IEC, refer to IEC Type1&2 Installation Guide for R2
- Install Tars, refer to https://tarscloud.github.io/TarsDocs_en/installation/source.html
1. Dependency install
yum install -y glibc-devel gcc gcc-c++ bison flex make cmake psmisc ncurses-devel zlib-devel openssl openssl-devel
## install mysql
wget -i -c http://dev.mysql.com/get/mysql57-community-release-el7-10.noarch.rpm
yum -y install mysql57-community-release-el7-10.noarch.rpm
yum -y install mysql-community-server
yum -y install mysql-devel
If you have problems to install mysql with the above step, add the new mysql repository to local server with this yum command and then re-run the previous commands.
sudo yum localinstall https://dev.mysql.com/get/mysql57-community-release-el7-10.noarch.rpm
yum install mariadb-server -y
## Configure mysql
systemctl start mariadb.service
systemctl enable mariadb.service
systemctl status mariadb.service
mysql -u root -p
grep "password" /var/log/mariadb/mariadb.log
ALTER USER 'root'@'localhost' IDENTIFIED BY '${your passwd}';
flush privileges;
2. Install develop environment for Tars
yum install -y npm
npm i -g pm2
wget -qO- https://raw.githubusercontent.com/creationix/nvm/v0.33.11/install.sh | bash
source ~/.bashrc
nvm install v8.11.3
npm install -g pm2 --registry=https://registry.npm.taobao.org
mkdir Tars
cd Tars
git clone https://github.com/TarsCloud/TarsFramework.git --recursive
cd TarsFramework/build
chmod u+x build.sh
./build.sh prepare
./build.sh all
###Recompile if needed.###
./build.sh cleanall
./build.sh all
Change to user root and create the installation directory.
cd /usr/local
mkdir tars
mkdir app
chown ${normal user}:${normal user} ./tars/
chown ${normal user}:${normal user} ./app/
cd
cd Tars/TarsFramework/build/
./build.sh install or make install
The default install path is /usr/local/tars/cpp。
If you want to install on different path:
**modify tarscpp/CMakeLists.txt**
**modify TARS_PATH in tarscpp/servant/makefile/makefile.tars**
**modify DEMO_PATH in tarscpp/servant/script/create_tars_server.sh**
3.Tars framework Installation
3.0 Firewall setup
firewall-cmd --zone=public --permanent --add-service=http
firewall-cmd --add-port 3000/tcp
firewall-cmd --add-port 3001/tcp
firewall-cmd --add-port 3306/tcp
3.1. Add user
mysql -u root -p
grant all on *.* to 'tarsAdmin'@'%' identified by 'Tars@2019' with grant option;
grant all on *.* to 'tarsAdmin'@'172.22.195.10' identified by 'Tars@2019' with grant option;
grant all on *.* to 'tarsAdmin'@'Node-1' identified by 'Tars@2019' with grant option;
flush privileges;
3.2 setup mysql privileges
mysql -u root -p
>use mysql
>select Host from user where User='root';
if shown as “localhost”,we can update as follwing command:
>update user set host = '%' where user ='root';
>FLUSH PRIVILEGES;
'%'update to the host IP,and then use mysql -u root -p --host '%ip' change back'%'
cd /Tars
git clone https://github.com/TarsCloud/TarsWeb.git
mv TarsWeb web
cp -rf web /usr/local/tars/cpp/deploy/
cd /usr/local/tars/cpp/deploy
chmod a+x linux-install.sh
./linux-install.sh MYSQL_HOST MYSQL_ROOT_PASSWORD INET REBUILD(false[default]/true) SLAVE(false[default]/true)
./linux-install.sh 192.168.1.10 our_PW eno1 false false admin 3306
Installation for Tars Agent(Jenkins Slave)
- Install CentOS 8, refer to https://phoenixnap.com/kb/how-to-install-centos-8
- Install IEC, refer to IEC Type1&2 Installation Guide for R2
- Install Tars, refer to https://github.com/TarsCloud/Tars/blob/master/Install.md
Install Virtual Classroom BackEnd
0. prepare : firewall

firewall-cmd --add-port 22/tcp
firewall-cmd --add-port 80/tcp
firewall-cmd --add-port 443/tcp
firewall-cmd --add-port 3478/tcp
firewall-cmd --add-port 3478/udp
firewall-cmd --add-port 40000-57000/tcp
firewall-cmd --add-port 40000-57000/udp
firewall-cmd --add-port 57001-65535/tcp
firewall-cmd --add-port 57001-65535/udp
firewall-cmd --list-all

1. deployment
cd /opt
yum install docker-ce --nobest --allowerasing
systemctl enable --now docker
curl -L https://github.com/docker/compose/releases/download/1.25.0/docker-compose-`uname -s`-`uname -m` -o /usr/local/bin/docker-compose
chmod +x /usr/local/bin/docker-compose
docker-compose --version

curl https://s3-eu-west-1.amazonaws.com/aws.openvidu.io/install_openvidu_2.13.0.sh | bash

2. Configuration
vi /opt/openvidu/.env

# add IP and admin PW
OPENVIDU_DOMAIN_OR_PUBLIC_IP= $your_host_IP

OPENVIDU_SECRET= $admin_PW

3. Execution
cd /opt/openvidu/
./openvidu start

Available services
Consume OpenVidu REST API through https://$your_host_IP/
If the application is enabled, it will also be available at https://$your_host_IP/
You can open OpenVidu Dashboard to verify everything is working as expected at https://$your_host_IP/dashboard/ with credentials:
user: OPENVIDUAPP
pass: $admin_PW

4. Install Java for Jenkins Slave

For Slave Mode, install Java will be ok.

sudo yum install -y java-1.8.0-openjdk-devel
Install Virtual Classroom Frontend
##http-server install
npm install -g http-server-ssl

## Virtual Classroom front-end setup
git clone https://github.com/OpenVidu/openvidu-vr.git
cd openvidu-vr/openvidu-vr-room
vi app.js
modify line 163
var OPENVIDU_SERVER_URL = 'https://demos.openvidu.io'; //backend IP
var OPENVIDU_SERVER_SECRET = 'MY_SECRET'; //backend password

http-server-ssl -S &


Run Testing: https://$your_host_IP:8080
Installation on VM2(Jenkins Master)
Jenkins is a Java application, so the first step is to install Java. Run the following command to install the OpenJDK 8 package:
sudo yum install -y java-1.8.0-openjdk-devel
The next step is to enable the Jenkins repository. To do that, import the GPG key using the following curl command:
curl --silent --location http://pkg.jenkins-ci.org/redhat-stable/jenkins.repo | sudo tee /etc/yum.repos.d/jenkins.repo
And add the repository to your system with:
sudo rpm --import https://jenkins-ci.org/redhat/jenkins-ci.org.key
Once the repository is enabled, install the latest stable version of Jenkins by typing:
sudo yum install -y jenkins
After the installation process is completed, start the Jenkins service with:
sudo systemctl start jenkins
To check whether it started successfully run:
systemctl status jenkins
You should see something similar to this:
# systemctl status jenkins
* jenkins.service - LSB: Jenkins Automation Server
   Loaded: loaded (/etc/rc.d/init.d/jenkins; bad; vendor preset: disabled)
   Active: active (running) since Tue 2019-10-15 11:16:26 CST; 1min 15s ago
     Docs: man:systemd-sysv-generator(8)
  Process: 489 ExecStart=/etc/rc.d/init.d/jenkins start (code=exited, status=0/SUCCESS)
   CGroup: /system.slice/jenkins.service
           `-510 /etc/alternatives/java -Dcom.sun.akuma.Daemon=daemonized -Djava.awt.headless=true -DJENKINS_HOME=/var/lib/jenkins -jar /usr/l...

Oct 15 11:16:25 VM_0_4_centos systemd[1]: Starting LSB: Jenkins Automation Server...
Oct 15 11:16:26 VM_0_4_centos runuser[491]: pam_unix(runuser:session): session opened for user jenkins by (uid=0)
Oct 15 11:16:26 VM_0_4_centos runuser[491]: pam_unix(runuser:session): session closed for user jenkins
Oct 15 11:16:26 VM_0_4_centos jenkins[489]: Starting Jenkins [  OK  ]
Oct 15 11:16:26 VM_0_4_centos systemd[1]: Started LSB: Jenkins Automation Server.
Finally enable the Jenkins service to start on system boot.
sudo systemctl enable jenkins
output
# sudo systemctl enable jenkins
jenkins.service is not a native service, redirecting to /sbin/chkconfig.
Executing /sbin/chkconfig jenkins on
Adjust the Firewall If you are installing Jenkins on a remote CentOS server that is protected by a firewall you need to port 8080.
Use the following commands to open the necessary port:
sudo firewall-cmd --permanent --zone=public --add-port=8080/tcp
sudo firewall-cmd --reload
Setting Up Jenkins To set up your new Jenkins installation, open your browser and type your domain or IP address followed by port 8080:
http://your_ip_or_domain:8080
You will see the website itemized below: 
Select the left option and install the plugin later: 
Automatic install process: 
Configure username/password: 
Visit Website: 
Jenkins is ready: 
Verifying the Setup
N/A
Developer Guide and Troubleshooting
Virtual Classroom demo includes two parts: (1) server side and (2) client side. The technologies used to develop these applications includes WebGL, Three.js and JavaScript.
The code could be find at:
git clone https://github.com/OpenVidu/openvidu-vr.git
cd /root/openvidu-vr/openvidu-vr-room/
sed -i 's/demos.openvidu.io/${Local_IP_Address}/g' app.js
To execute:
docker run --rm --name openvidu_server -d -p 4443:4443 -e openvidu.secret=MY_SECRET -e openvidu.publicurl=https://${Local_IP_Address}:4443/ openvidu/openvidu-server-kms
Uninstall Guide
- Stop all tars processes
/usr/local/app/tars/tars-stop.sh
2. Delete files
rm -rf /usr/local/app/tars
rm -rf /usr/local/app/patchs
rm -rf /usr/local/app/web
rm -rf /usr/local/tars
3. Delete crontab
crontab -e
**Delete this line " * * * * * /usr/local/app/tars/tarsnode/util/monitor.sh "**
Troubleshooting
N/A
Maintenance
Blueprint Package Maintenance
Frequently Asked Questions
TBD...
License
Any software developed by the "Akraino Enterprise Applications on IEC-Type4 AR/VR Project is licensed under the
Apache License, Version 2.0 (the "License");
you may not use the content of this software bundle except in compliance with the License.
You may obtain a copy of the License at <https://www.apache.org/licenses/LICENSE-2.0>
Unless required by applicable law or agreed to in writing, software
distributed under the License is distributed on an "AS IS" BASIS,
WITHOUT WARRANTIES OR CONDITIONS OF ANY KIND, either express or implied.
See the License for the specific language governing permissions and
limitations under the License.
References
N/A
Definitions, acronyms and abbreviations
N/A