Introduction
This document describes steps required to deploy a sample environment and test for CFN (Computing Force Network) Ubiquitous Computing Force Scheduling Blueprint.
Deployment Architecture
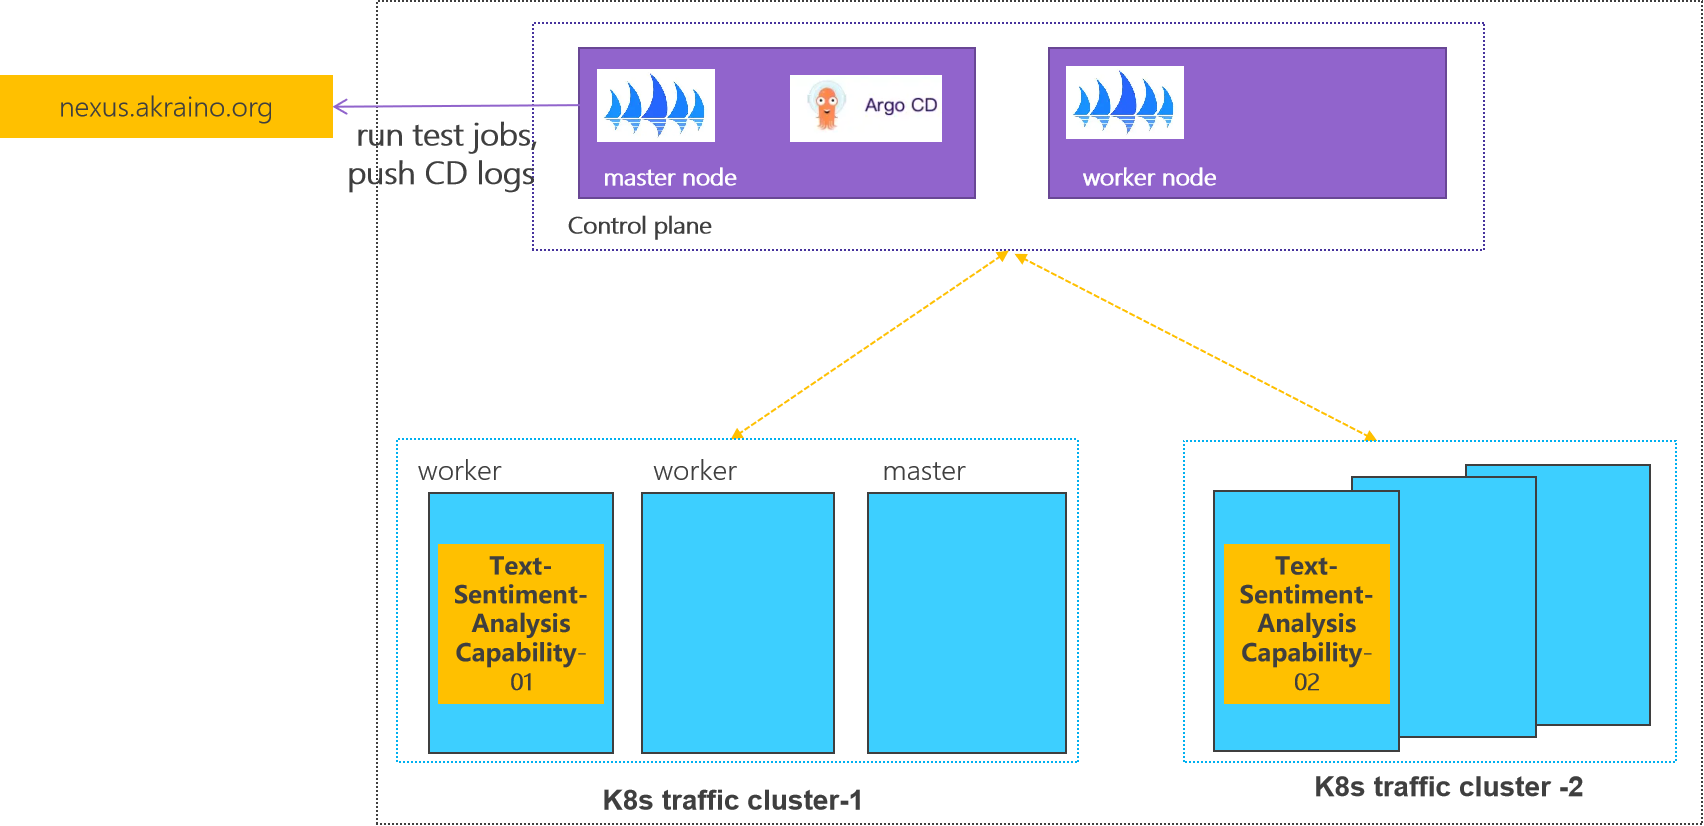
Control plane: one k8s cluster is deployed in private lab.
Traffic plane: two K8s clusters are deployed in private lab.
Pre-Installation Requirements
Hardware Requirements
64-bit CentOS 7
- Software Perequisites
docker-ce-20.10.11
kubelet-1.23.7
kubeadm-1.23.7
kubectl-1.23.7
- Database Perequisites
schema scripts: N/A
- Other Installation Requirements
- Jump Host Requirements:N/A
- Network Requirements: N/A
- Bare Metal Node Requirements :N/A
- Execution Requirements (Bare Metal Only) :N/A
Installation control plane cluster
0 Environmental description
At least two CentOS machines are required, one as the master node and the other as the worker node. The installed k8s version is 1.23.7.
There will be a comment like #master in front of each bash command, which is used to indicate which type of machine the command is used on. If there is no comment, the bash command needs to be executed on both types of machines
This document contains the operation and execution process, you can compare the screenshots of the document during the installation process.
1 Basic environment preparation
Both master node and worker node need to execute.
Preparing the basic environment to ensure the normal execution of subsequent operations.
1.1 Confirm your OS
Confirm that the operating system of the current machine is CentOS 7 .
Execute command
cat /etc/redhat-release
Execute screenshot
![]()
1.2 Set hostname
If the name is long, it is recommended to use a combination of letters and dashes, such as "aa-bb-cc", here directly set to master and worker1.
Execute command
# master
hostnamectl set-hostname master
hostnamectl
# worker
hostnamectl set-hostname worker1
hostnamectl
Execute screenshot


The changed host name needs to take effect after reboot.
Execute command
reboot
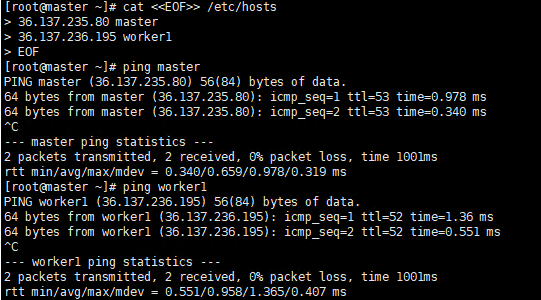
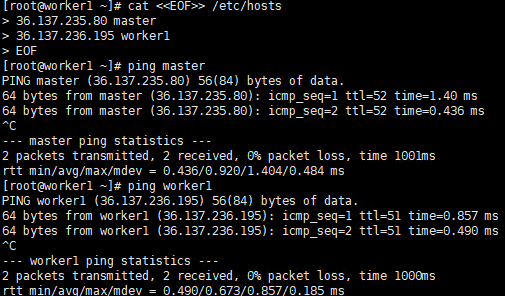
1.3 Set address mapping
Set address mapping, and test the network.
Execute command
cat <<EOF>> /etc/hosts
${YOUR IP} master
${YOUR IP} worker1
EOF
ping master
ping worker1
Execute screenshot
1.4 Turn off firewall, selinux and swap
Execute command
systemctl stop firewalld
systemctl disable firewalld
setenforce 0 sed -i "s/^SELINUX=enforcing/SELINUX=disabled/g" /etc/selinux/config
swapoff -a
sed -i 's/.*swap.*/#&/' /etc/fstab
Execute screenshot


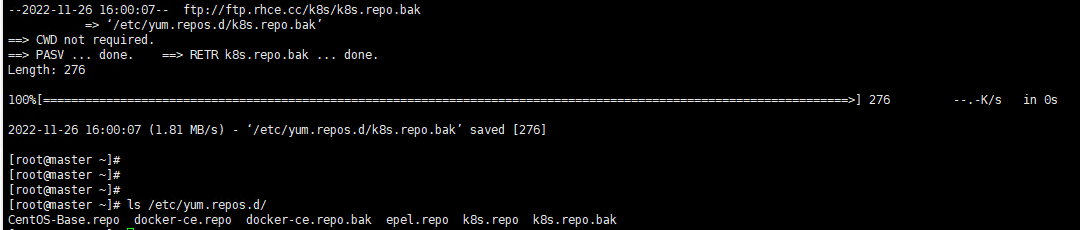
1.5 Download the new yum source
Execute command
rm -rf /etc/yum.repos.d/* ;wget ftp://ftp.rhce.cc/k8s/* -P /etc/yum.repos.d/
ls /etc/yum.repos.d/
Execute screenshot
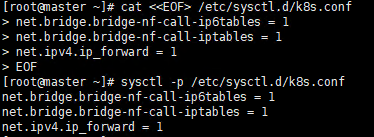
1.6 Set iptables
Execute command
cat <<EOF> /etc/sysctl.d/k8s.conf
net.bridge.bridge-nf-call-ip6tables = 1
net.bridge.bridge-nf-call-iptables = 1
net.ipv4.ip_forward = 1
EOF
sysctl -p /etc/sysctl.d/k8s.conf
Execute screenshot
1.7 Make sure the time zone and time are correct
Execute command
timedatectl set-timezone Asia/Shanghai
systemctl restart rsyslog
Execute screenshot
![]()
2 Install docker
Both master node and worker node need to execute
The main content is to install docker-ce, and configure the cgroup driver of docker as systemd, confirm the driver.
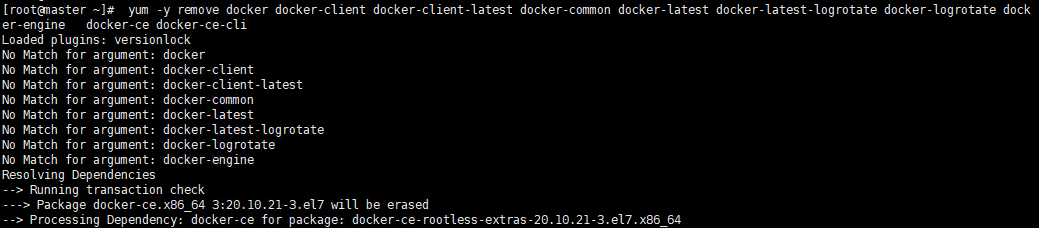
2.1 Uninstall old docker
Execute command
yum -y remove docker docker-client docker-client-latest docker-common docker-latest docker-latest-logrotate docker-logrotate docker-engine docker-ce docker-ce-cli
Execute screenshot

2.2 Install docker
Execute command
yum -y install docker-ce
Execute screenshot

2.3 Set docker to boot and confirm docker status
Execute command
systemctl enable docker
systemctl start docker
systemctl status docker
Execute screenshot

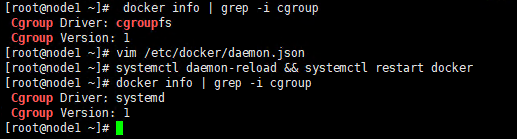
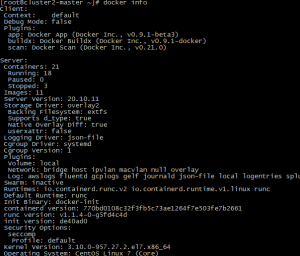
2.4 Configure the driver of docker's cgroup
The driver of docker's cgroup needs to be consistent with that of kubelet. It is recommended to set it to systemd.
Execute command
docker info | grep -i cgroup
Check the current configuration, if it is the system in the figure below, skip the follow-up and go directly to the third section
Execute screenshot
![]()
If it is cgroupfs, add the following statement
Execute command
vim /etc/docker/daemon.json
# add this
{
  "exec-opts": ["native.cgroupdriver=systemd"]
}
Restart to check for changes
Execute command
systemctl daemon-reload && systemctl restart docker
docker info | grep -i cgroup
3 Install k8s basic components
Both master node and worker node need to execute
The main content is to install the 1.23.7 version of the component kubeadm kubectl kubelet
3.1 Check kubeadm kubectl kubelet
If it is the version inconsistent, you need to uninstall it through yum remove ${name}.
Execute command
yum list installed | grep kube
Execute screenshot
![]()
3.2 Install kubelet kubeadm kubectl version 1.23.7
Execute command
yum -y install kubelet-1.23.7 kubeadm-1.23.7 kubectl-1.23.7
Execute screenshot


3.3 Verify installation
Execute command
kubelet --version
kubeadm version
kubectl version
Execute screenshot

4 Initialize the master
Execute only on the master node
The main content is to pull the image of version 1.23.7, initialize the master node, and configure the cilium network plugin for the master node
4.1 Pull the k8s image Pull the k8s image
Execute command
# master
kubeadm config images list --kubernetes-version=v1.23.7 |sed -e 's/^/docker pull /g' -e 's#k8s.gcr.io#registry.aliyuncs.com/google_containers#g' |sh -x
docker pull registry.aliyuncs.com/google_containers/coredns:v1.8.6
docker images
Execute screenshot
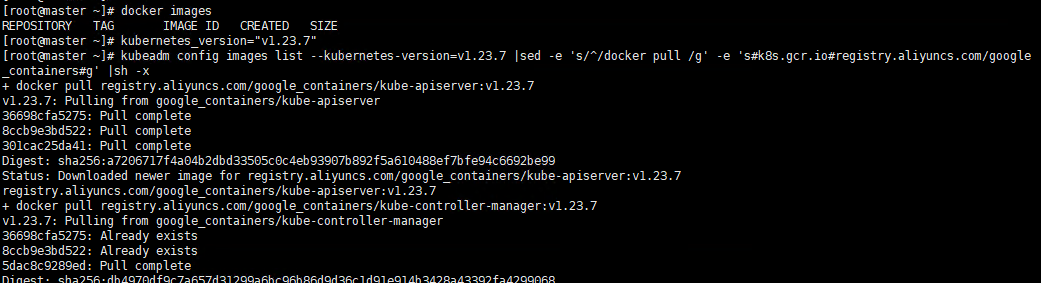
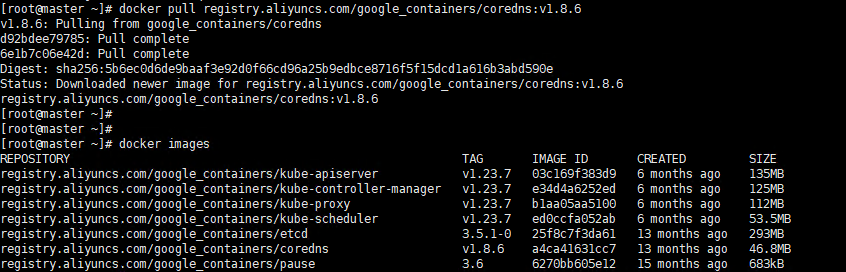
Please make sure that the above 7 images have been pulled down
4.2 Init master
Execute command
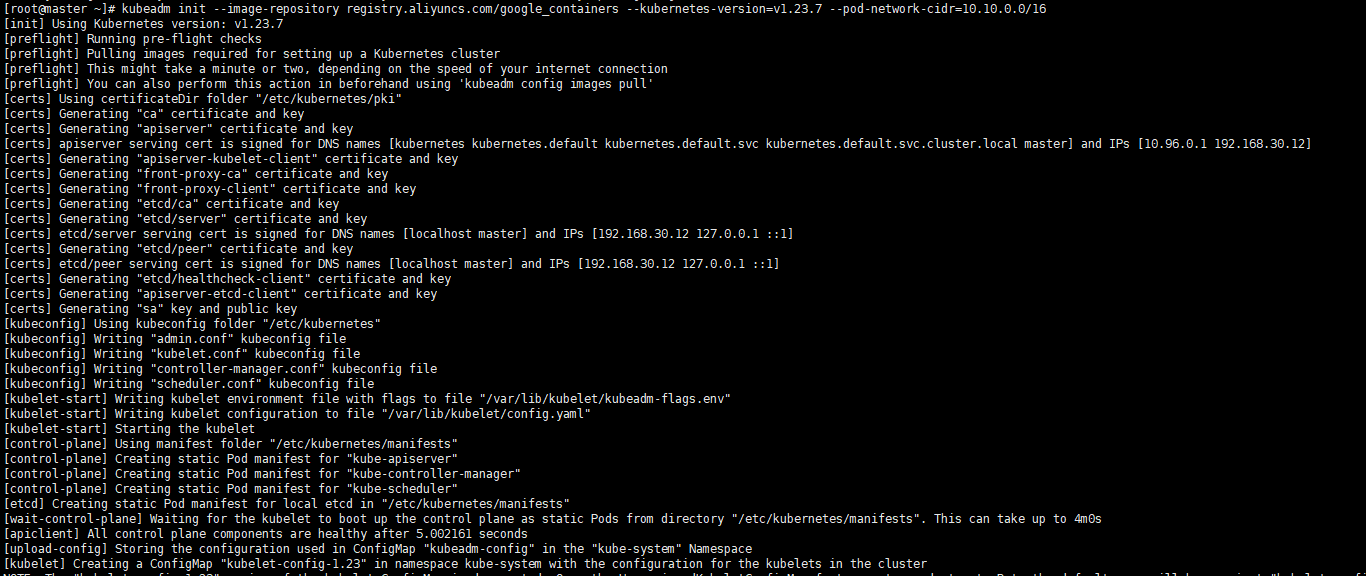
# master
kubeadm init --image-repository registry.aliyuncs.com/google_containers --kubernetes-version=v1.23.7 --pod-network-cidr=10.10.0.0/16
Execute screenshot
Let kubectl take effect
Execute command
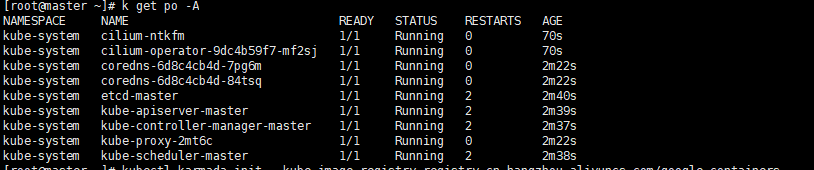
# master
mkdir -p $HOME/.kube
sudo cp -i /etc/kubernetes/admin.conf $HOME/.kube/config
sudo chown $(id -u):$(id -g) $HOME/.kube/config
kubectl get po -A
Execute screenshot
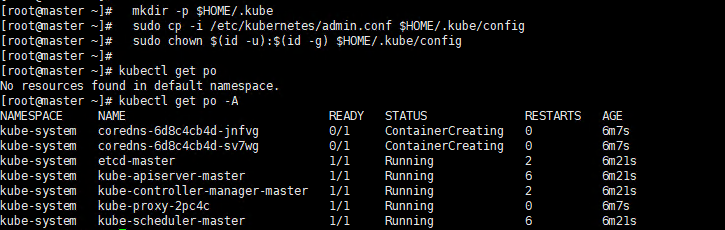
We can see that the coredns is not ready, so we need configure the network plugin
Note that if an error occurs and you need to reinit, you need to execute the following statement first to ensure that kubeadm is re-executed normally
# master, if an error occurs
kubeadm reset -f
rm -rf ~/.kube/
rm -rf /etc/kubernetes/
rm -rf /var/lib/etcd
rm -rf /var/etcd
4.3 Configure the cilium network plugin
Here select cilium as the network plugin
Confirm that your current default version of the kernel is above 4.9
Check the current kernel version
Execute command
# master
uname -sr
If current version ist not satisfied, you need update kernel
Cilium install
Execute command
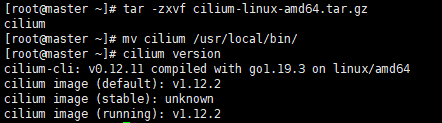
# master
curl -L --remote-name-all https://github.com/cilium/cilium-cli/releases/latest/download/cilium-linux-amd64.tar.gz
tar -zxvf cilium-linux-amd64.tar.gz
mv cilium /usr/local/bin/
cilium version
cilium install
kubectl get po -A
Execute screenshot


We can see that the all the pod is ready
If an error occur, you can use cilium uninstall to reset.
5 Initialize workers
The main content is to add worker nodes to the cluster
5.1 Get the join command on the master node
The joining of the worker node needs to initialize the join statement given by the master. If you forget this statement, execute the following statement on the master node machine to get it again.
Execute command
# master
kubeadm token create --print-join-command
Execute screenshot

5.2 Join the master node
Execute command
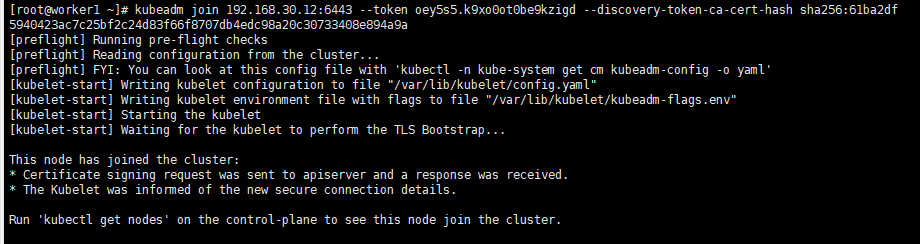
# worker, change the ip,token and cert-hash to your's
kubeadm join ${YOUR IP} --token ${YOUR TOKEN} --discovery-token-ca-cert-hash ${YOUR CERT HASH}
When you have the join statement, copy it and execute it on the worker node
Note that if an error occurs and you need to re-init, you need to execute the following statement first to ensure that kubeadm is re-executed normally
# worker
kubeadm reset -f
rm -rf ~/.kube/
rm -rf /etc/kubernetes/
rm -rf /var/lib/etcd
rm -rf /var/etcd
5.3 Verify the joining of worker nodes
After the worker is added, you can execute the following command on the master machine to confirm the newly added node.
Execute command
# master
kubectl get nodes
Execute screenshot

6 Install karmada
The main content is to install karmada on control plane cluster
6.1 Install the Karmada kubectl plugin
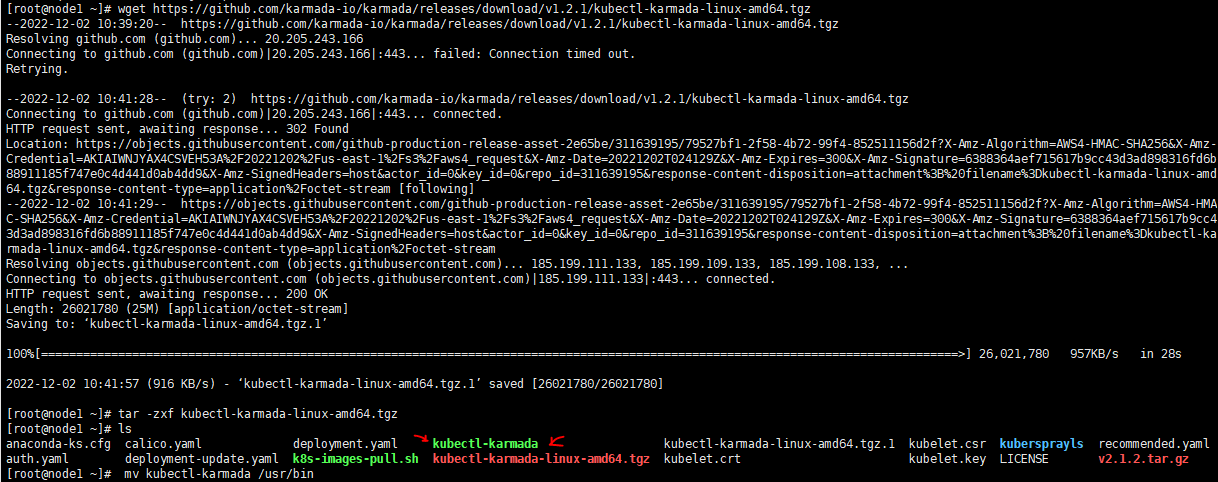
Execute command
# master
wget https://github.com/karmada-io/karmada/releases/download/v1.4.0/kubectl-karmada-linux-amd64.tgz
tar -zxf kubectl-karmada-linux-amd64.tgz
mv kubectl-karmada /usr/bin
Execute screenshot
6.2 Install karamda via karmadactl
Install karamda via kubectl. China mainland registry mirror can be specified by using kube-image-mirror-country
Execute command
kubectl karmada init --kube-image-registry=registry.cn-hangzhou.aliyuncs.com/google_containers
Due to network problems, you may need to retry a few times
Execute screenshot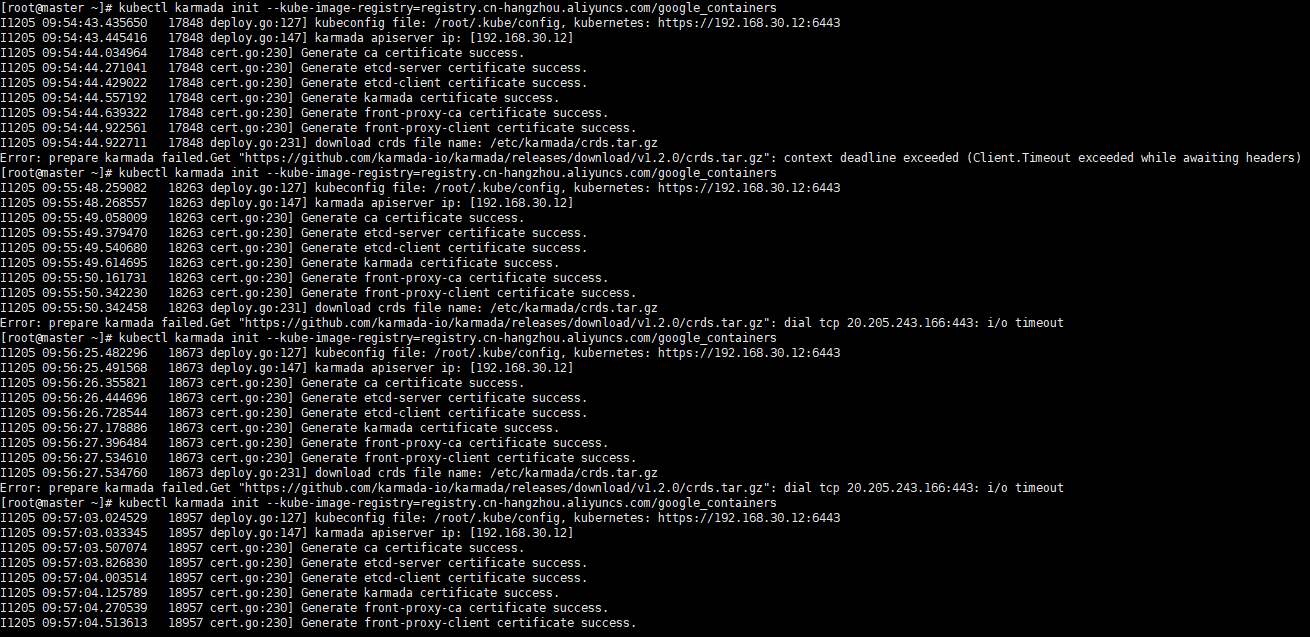
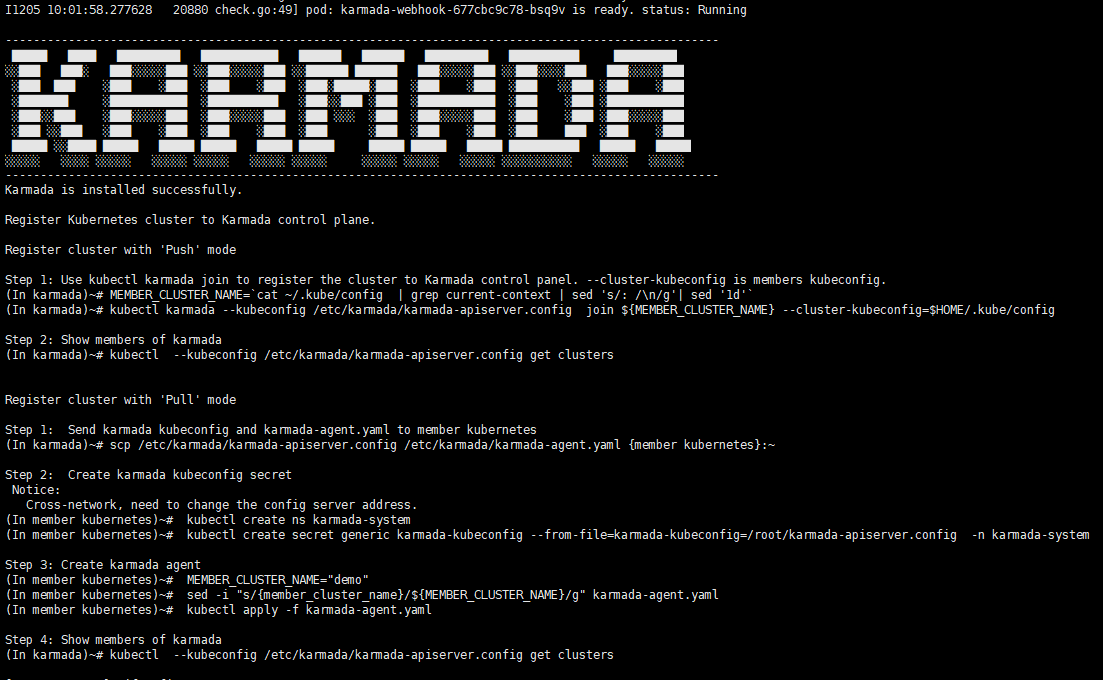
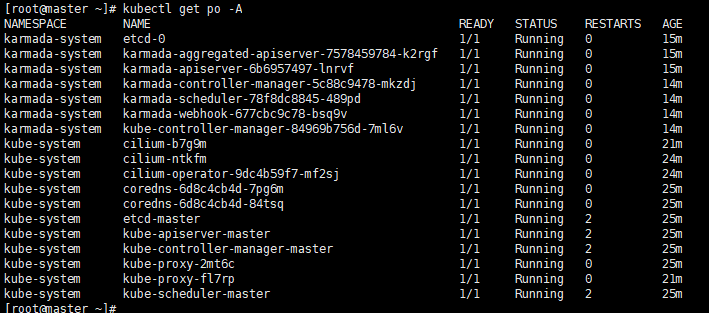
Check all your pod is READY
Execute command
kubectl get po -A
Execute screenshot
7 Propagate a deployment by Karmada
Before propagating a deployment, make sure the worker cluster is already working properly And get the latest config currently running
In the following steps, we are going to propagate a deployment by Karmada. We use the installation of nginx as an example
7.1 Join a worker/member cluster to karmada control plane
Here we add the working node cluster through push mode
It is worth noting that /root/.kube/config is Kubernetes host config and the /etc/karmada/karmada-apiserver.config is karmada-apiserver config
Execute command
kubectl karmada --kubeconfig /etc/karmada/karmada-apiserver.config join ${YOUR MEMBER NAME} --cluster-kubeconfig=${YOUR MEMBER CONFIG PATH} --cluster-context=${YOUR CLUSTER CONTEXT}
![]()
Here is example command for your information: kubectl karmada --kubeconfig /etc/karmada/karmada-apiserver.config join member1 --cluster-kubeconfig=/root/.kube/member1-config --cluster-context=kubernetes-admin@kubernetes
--kubeconfig specifies the Karmada'skubeconfigfile and the CLI- --cluster-kubeconfig
specifies the member's config. Generally, it can be obtained from the worker cluster in "/root/.kube/config" --cluster-context the value of current-context from --cluster-kubeconfig
If you want unjoin the member cluster, just change the join to unjoin: kubectl karmada --kubeconfig /etc/karmada/karmada-apiserver.config unjoin member2 --cluster-kubeconfig=/root/.kube/192.168.30.2_config --cluster-context=kubernetes-admin@kubernetes
check the members of karmada
Execute command
kubectl --kubeconfig /etc/karmada/karmada-apiserver.config get clusters

7.2 Create nginx deployment in Karmada
deployment.yaml are obtained through here https://github.com/karmada-io/karmada/tree/master/samples/nginx
Execute command
kubectl create -f /root/sample/nginx/deployment.yaml --kubeconfig /etc/karmada/karmada-apiserver.config
kubectl get deployment  --kubeconfig /etc/karmada/karmada-apiserver.config
![]()

7.3 Create PropagationPolicy that will propagate nginx to member cluster
propagationpolicy.yaml are obtained through here https://github.com/karmada-io/karmada/tree/master/samples/nginx
Execute command
kubectl create -f /root/sample/nginx/propagationpolicy.yaml --kubeconfig /etc/karmada/karmada-apiserver.config
![]()
7.4 Check the deployment status from Karmada
kubectl get po  --kubeconfig /root/.kube/member1-config
kubectl get po  --kubeconfig /root/.kube/member2-config

Reference
https://lazytoki.cn/index.php/archives/4/
https://developer.aliyun.com/article/931926
https://zhuanlan.zhihu.com/p/368879345
https://docs.docker.com/engine/install/centos/
https://kubernetes.io/zh-cn/docs/setup/production-environment/container-runtimes/
https://karmada.io/docs/installation/install-kubectl-karmada
https://karmada.io/docs/installation/
https://docs.cilium.io/en/stable/gettingstarted/k8s-install-kubeadm/
https://karmada.io/docs/get-started/nginx-example
Installation worker cluster
0 Environmental
Three centos machines are required, one as the master node and others as the worker node. The installed k8s version is 1.23.5
1 Preparation
The main content is to prepare the basic environment to ensure the normal execution of subsequent operations.
2 Install docker
The main content is to install docker, and configure the cgroup driver of docker as systemd, confirm the driver
2.1 uninstall old docker
Execute command
yum -y remove docker docker-client docker-client-latest docker-common docker-latest docker-latest-logrotate docker-logrotate docker-engine docker-ce docker-ce-cli
2.2 install docker
Execute command
yum -y install docker-ce-20.10.11
Execute screenshot
2.3 Set docker to boot and confirm docker status
Execute command
systemctl enable docker
systemctl start docker
systemctl status docker
2.4 Configure the driver of docker's cgroup
The driver of docker's cgroup needs to be consistent with that of kubelet. It is recommended to set it to systemd. At this time, the execution of subsequent commands may be stuck. Wait for a few minutes or restart, and then try again
Execute command
docker info | grep -i cgroup
Check the current configuration, if it is the system in the figure below, skip the follow-up and go directly to the third section
If it is cgroupfs, add the following statement
vim /etc/docker/daemon.json
# add this
{
  "exec-opts": ["native.cgroupdriver=systemd"],
  "insecure-registries": ["0.0.0.0/0"]
}
Restart to check for changes
systemctl daemon-reload && systemctl restart docker
docker info | grep -i cgroup
3 Install k8s
The main content is to install the 1.23.5 version of the component kubeadm kubectl kubelet
3.1 Uninstall old k8s
If it is the version inconsistent, you need to uninstall.
kubeadm reset -f
modprobe -r ipip
lsmod
rm -rf ~/.kube/
rm -rf /etc/kubernetes/
rm -rf /etc/systemd/system/kubelet.service.d
rm -rf /etc/systemd/system/kubelet.service
rm -fr /usr/lib/systemd/system/kubelet.service
rm -fr /etc/systemd/system/multi-user.target.wants/kubelet.service
rm -rf /usr/bin/kube*
rm -rf /etc/cni
rm -rf /opt/cni
rm -rf /var/lib/etcd
rm -rf /var/etcd
yum remove kubeadm
yum remove kubelet
yum remove kube*
3.2 Download the new yum source
rm -rf /etc/yum.repos.d/* ;
wget ftp://ftp.rhce.cc/k8s/* -P /etc/yum.repos.d/ ls /etc/yum.repos.d/
3.2 Remove kubeadm kubectl kubelet
If it is the version inconsistent, you need to uninstall it through yum remove.
yum -y remove kubelet kubeadm kubectl
3.3 Install kubelet kubeadm kubectl version 1.23.5
yum -y install kubelet-1.23.5 kubeadm-1.23.5 kubectl-1.23.5
3.3 verify installation
kubelet --version
kubeadm version
kubectl version
3.5 Set kubelet to boot
systemctl daemon-reload
systemctl start kubelet
systemctl enable kubelet
4 Initialize master
The main content is to pull the image of version 1.23.5, initialize the master node.
4.1 Edit init-config.yaml
# init-config.yaml
apiVersion: kubeadm.k8s.io/v1beta3
bootstrapTokens:
- groups:
  - system:bootstrappers:kubeadm:default-node-token
  token: abcdef.0123456789abcdef
  ttl: 24h0m0s
  usages:
  - signing
  - authentication
kind: InitConfiguration
localAPIEndpoint:
  advertiseAddress: 192.168.30.22
  bindPort: 6443
nodeRegistration:
  criSocket: /var/run/dockershim.sock
  imagePullPolicy: IfNotPresent
  name: cluster1-master
  taints: null
---
apiServer:
  timeoutForControlPlane: 4m0s
apiVersion: kubeadm.k8s.io/v1beta3
certificatesDir: /etc/kubernetes/pki
clusterName: kubernetes
controllerManager: {}
dns: {}
etcd:
  local:
    dataDir: /var/lib/etcd
imageRepository: registry.aliyuncs.com/google_containers
kind: ClusterConfiguration
kubernetesVersion: 1.23.5
networking:
  dnsDomain: cluster.local
  serviceSubnet: 10.1.0.0/12
scheduler: {}
4.2 Pull the k8s image
kubeadm config images list --config=init-config.yaml
# images list
registry.aliyuncs.com/google_containers/kube-apiserver:v1.23.0
registry.aliyuncs.com/google_containers/kube-controller-manager:v1.23.0
registry.aliyuncs.com/google_containers/kube-scheduler:v1.23.0
registry.aliyuncs.com/google_containers/kube-proxy:v1.23.0
registry.aliyuncs.com/google_containers/pause:3.6
registry.aliyuncs.com/google_containers/etcd:3.5.1-0
registry.aliyuncs.com/google_containers/coredns:v1.8.6

# pull images
kubeadm config images pull --config=init-config.yaml
Please make sure that the above images have been pulled down
4.2 init master
kubeadm init --apiserver-advertise-address=192.168.30.22 --apiserver-bind-port=6443 --pod-network-cidr=10.100.0.0/16 --service-cidr=10.1.0.0/12 --kubernetes-version=1.23.5 --image-repository registry.aliyuncs.com/google_containers
You can see that the prompt initialization is successful. The prompt executes the following command to use kubectl normally
# master
mkdir -p $HOME/.kube
sudo cp -i /etc/kubernetes/admin.conf $HOME/.kube/config
sudo chown $(id -u):$(id -g) $HOME/.kube/config
5 Initialize workers
The main content is to add worker nodes to the cluster
5.1 Join the master node
# worker
kubeadm join 192.168.30.22:6443 --token zb4ydd.afsdnt1k58ow3z8x \
        --discovery-token-ca-cert-hash sha256:a73132eb5e9a911f24697e8550333ddc20d3ae641d35ba17c09580730b607080
Note that if an error occurs and you need to re-init, you need to execute the following statement first to ensure that kubeadm is re-executed normally
# worker
kubeadm reset -f
rm -rf ~/.kube/
rm -rf /etc/kubernetes/
rm -rf /var/lib/etcd
rm -rf /var/etcd
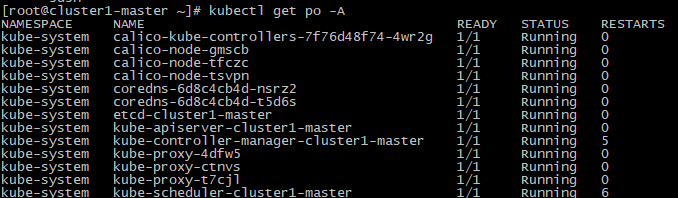
5.3 Verify worker nodes
After the worker is added, you can execute the following command on the master machine to confirm .
# master
kubectl get nodes
Execute screenshot
5.4 Configure the calico network plugin
Configure the calico network plug-in to make it work. Create the calico.yaml file.
# master
curl https://docs.projectcalico.org/v3.11/manifests/calico.yaml -O
vi calico.yaml
#
kubectl apply -f calico.yaml
# loop,until all the pod's status is running
kubectl get po -A
Execute screenshot
Deploy Application
0 Environmental
The k8s version is 1.23.5.
1 Preparation
The main content is to prepare the Application image.
192.168.30.20:5000/migu/sentiment:latest
2 Deployment
The main content is to install sentiment application.
2.1 namespace
# namespace.yaml
apiVersion: v1
kind: Namespace
metadata:
  name: migu
Execute command
kubectl create -f namespace.yaml
2.2 image pull secret
Add Harbor Image Registry Pull Secret to Kubernetes.
#harborsecret
kubectl create secret generic harborsecret \
    --from-file=.dockerconfigjson=/root/.docker/config.json \
    --type=kubernetes.io/dockerconfigjson \
    -n migu
2.3 deployment
#deploy.yaml
kind: Deployment
apiVersion: apps/v1
metadata:
  labels:
    app: sentiment
  name: migu-sentiment
  namespace: migu
spec:
  replicas: 2
  selector:
    matchLabels:
      app: sentiment
  template:
    metadata:
      labels:
        app: sentiment
    spec:
      imagePullSecrets:
      - name: harborsecret
      containers:
      - name: sentiment-container
        image: 192.168.30.20:5000/migu/sentiment:latest
        imagePullPolicy: IfNotPresent
        imagePullPolicy: Always
        ports:
        - containerPort: 9600
          protocol: TCP
          name: http
        resources:
          limits:
            cpu: 2
            memory: 4G
          requests:
            cpu: 2
            memory: 4G
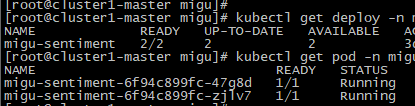
Execute command
kubectl create -f deploy.yaml
Execute screenshot
2.3 service
#service.yaml
apiVersion: v1
kind: Service
metadata:
  labels:
   app: sentiment
  name: sentiment
  namespace: migu
spec:
  ports:
  - port: 9600
    protocol: TCP
    targetPort: 9600
    nodePort: 30960
  selector:
    app: sentiment
  type: NodePort
Execute command
kubectl create -f service.yaml
Execute screenshot

2.4 test service
## request
curl http://192.168.30.20:30960/health

##response
{"status": "UP"}
Execute screenshot
Installation High-Level Overview
Bare Metal Deployment Guide
Install Bare Metal Jump Host : N/A
Creating a Node Inventory File: N/A
Creating the Settings Files: N/A
Running: N/A
Virtual Deployment Guide
- Standard Deployment Overview :N/A
- Snapshot Deployment Overview:N/A
- Special Requirements for Virtual Deployments
- Install Jump Host: N/A
- Verifying the Setup - VMs:N/A
Upstream Deployment Guide
- Upstream Deployment Key Features :N/A
- Special Requirements for Upstream Deployments :N/A
- Scenarios and Deploy Settings for Upstream Deployments :N/A
- Including Upstream Patches with Deployment:N/A
- Running: N/A
- Interacting with Containerized Overcloud: N/A
Developer Guide and Troubleshooting
- Utilization of Images
N/A
- Post-deployment Configuration
N/A
- Debugging Failures
N/A
- Reporting a Bug
N/A
Uninstall Guide
Troubleshooting
1. Network problem: the working cluster uses the default communication mode of calico, and the access between nodes is blocked; After many attempts, calico vxlan is feasible and flannel is feasible at present;
2. Disaster recovery scenario scheduling, test scenario 2, requires the karmada control plane to install the deschedule component;
Maintenance
Blue Print Package Maintenance
- Software maintenance: N/A
- Hardware maintenance:N/A
Blue Print Deployment Maintenance (N/A)
Frequently Asked Questions
N/A
License
N/A
References
N/A
Definitions, acronyms and abbreviations
N/A