Introduction
IEC Akraino Edge Stack supports AR/VR applications. It could support AR/VR Algorithms that with GPU Modeling (i.e. modeling describes the process of forming the shape of an object) Compositing (e.g. Environmental Mapping, Tone Mapping) Rendering and Illumination Models Visualization of Large Volume 3D Models (e.g. Global Network Operations Center monitoring) Registration (e.g. Stitching data from distributed sources) Segmentation (e.g. Segmentation and detection for security monitoring). This IEC Type 4 AR/VR platform utilizes Tars for remote direct memory access control. In this document, we use Virtual Classroom as demo for IEC Type4. Virtual Classroom is an online learning environment that allows teachers and students to communicate and interact with each other in real time. We use WebGL, Three.js and JavaScript to develop Virtual Classroom application.
License
Apache License - V2
How to use this document
The document includes details of prerequisites /pre-installation, installation and uninstalls steps.
The prerequisites and pre-installation software and hardware should be ready before executing the installation steps.
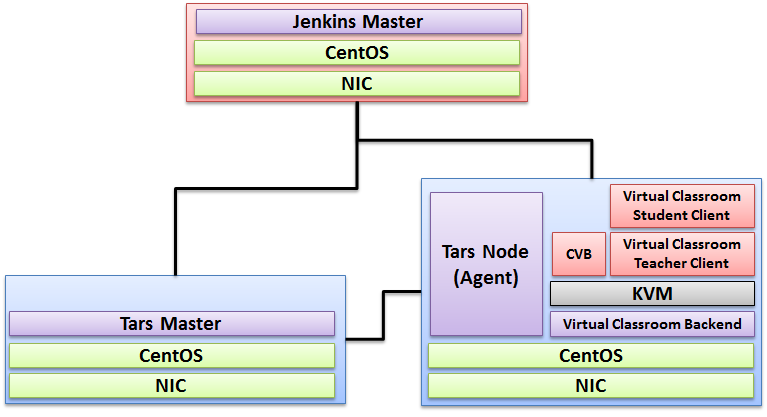
Deploy Architecture
To make the system deploy, the minimum deployment architecture is shown below, which consist of:
Pre-Installation Requirements
Hardware Requirements
- Wearable Glass (Optional)
- Teacher Client-Side — Personal Computer with Camera
- Student Client-Side — Personal Computer with Camera
- Server Side — 8 Core 16G Virtual Machine on ARM or x86 Platform
Software Prerequisites
- Teacher Side: Windows 10 with a Web Browser that supports WebSockets.
- Student Side: Windows 10 with a Web Browser that supports WebSockets.
- Server Side: CentOS 7.8
- Virtual Classroom (OpenVidu 2.13.0)
- Tars 2.4.13
- IEC 3.0
Database Prerequisites
N/A
Other Installation Requirements
N/A
Installation on the Client PC side(Teacher/Student Client)
Note well: No special software to access the application. The general software is itemized below:
- Install Windows 10
- Install camera driver
- Install Firefox browser
Installation High-Level Overview
Upstream Deployment Guide
K8STARS is a convenient solution to run TARS services in Kubernetes, and it has the following characteristics:
- Maintain the native development capability of TARS;
- Automatic registration and configuration deletion of name service for TARS;
- Support smooth migration of original TARS services to K8S and other container platforms;
- Non intrusive design, no coupling relationship with operating environment.
How K8STARS works?
Three interfaces are added in the tarsregistry, which are used for automatic registration, heartbeat reporting and node offline. For details, please refer to interface definition。
A 'tarscli' command-line tool is provided to allocate ports, generate configuration, report heartbeat and node offline.
Deployment
- Deployment tars basic service
- Deployment service example
- Deploy sample simpleserver:
cd examples/simple && kubectl apply -f simpleserver.yaml
Example description:
- The image is created by the
examples/simple/dockerfilefile, and the basic image is created bycmd/tarscli/dockerfile - start.sh:
tarscli genconfin is used to generate the tars service startup configuration - server_ meta.yaml The file is used to configure the metadata of the service. For field information, please refer to
app/genconf/config.gostructureServerConf. Endpoint defaults totcp -h ${local_ip} -p ${random_port}, supports automatic filling of IP and random ports. -ased on Golang HelloWorld program TestApp.HelloGo See examples/README.md
3. Verify the deployment Login db_tars , then execute select * from t_server_conf\G The node information of simpleserver has been registered automatically.
Tars deployment directory structure
tarscli based on environment variable TARS_PATH(default/tars) to manage services. The directory functions are as follows:
${TARS_PATH}/bin:Startup scripts and binaries${TARS_PATH}/conf:Configuration file${TARS_PATH}/log: Log file${TARS_PATH}/data:Runtime, Cache file
About tarscli
tarscli provides a set of command tools to facilitate container deployment of TARS services. Parameters can be specified through environment variables. For details, see tarscli help.
Here are the sub commands supported by tarscli
genconfis used to generate the startup configuration file of the TARS service. The supported environment variables are:TARS_APPLICATIONthe application name specified. By default, the_ server_ meta.yamlRead fromTARS_SERVERis the service name specified by the_ server_ meta.yamlRead fromTARS_BUILD_SERVERthe service name at compile time. It will be used when the compiled service name is different from the running service nameTARS_LOCATORcan specify the address of registry. The default istars.tarsregistry.QueryObj@tcp -h tars-registry.tars-system.svc.cluster.local -p 17890(address of service)TARS_SET_IDcan specify service setTARS_MERGE_Confcan specify the configuration template file and merge the configuration into the service startup configuration file
supervisorexecutes thegenconfcommand by default, and then starts and monitors the service. The supported environment variables are:TARS_START_PATHThe startup script of the service$TARS_PATH/bin/start.shTARS_STOP_PATHThe stop script, by default, kill all service processes under path$TARS_PATHTARS_REPORT_INTERVALreports the interval heartbeat to registryTARS_DISABLE_FLOWwhether to enable traffic when registering with registry. If it is not empty, it means it is off. It is enabled by defaultTARS_CHECK_INTERVALcheck the service status interval. If the status changes, it will be synchronized to the registry in real timeTARS_BEFORE_CHECK_SCRIPTthe shell command that runs before each checkTARS_CHECK_SCRIPT_TIMEOUTthe timeout to run the shell command before each checkTARS_PRESTOP_WAITTIMEturn off traffic - the waiting time before stopping the service. It is used for lossless changes. The default value is 80 seconds
hzcheckis used to synchronize the service status and the pod status of k8s. You need to set thereadiness Probeof pod totarscli hzcheckcommandprestopis used to delete the configuration corresponding to the registry before the service exitsTARS_PRESTOP_WAITTIMEturn off traffic - the waiting time before stopping the service. It is used for lossless changes. The default value is 80 seconds
notifyis used to send management commands. The common commands are: tars.setloglevel/tars.pprof, etc
Basic services
TARS related basic services provide rich service governance functions. Please refer to baseserver for deployment.
Install Virtual Classroom BackEnd
0. prepare : firewall

firewall-cmd --add-port 22/tcp
firewall-cmd --add-port 80/tcp
firewall-cmd --add-port 443/tcp
firewall-cmd --add-port 3478/tcp
firewall-cmd --add-port 3478/udp
firewall-cmd --add-port 40000-57000/tcp
firewall-cmd --add-port 40000-57000/udp
firewall-cmd --add-port 57001-65535/tcp
firewall-cmd --add-port 57001-65535/udp
firewall-cmd --list-all

1. deployment
cd /opt
yum-config-manager \
    --add-repo \
    https://download.docker.com/linux/centos/docker-ce.repo
yum install -y docker-ce docker-ce-cli containerd.io
systemctl enable  docker
curl -L https://github.com/docker/compose/releases/download/1.25.0/docker-compose-`uname -s`-`uname -m` -o /usr/local/bin/docker-compose
chmod +x /usr/local/bin/docker-compose
docker-compose --version

curl https://s3-eu-west-1.amazonaws.com/aws.openvidu.io/install_openvidu_2.13.0.sh | bash

2. Configuration
vi /opt/openvidu/.env

# add IP and admin PW
OPENVIDU_DOMAIN_OR_PUBLIC_IP= $your_host_IP

OPENVIDU_SECRET= $admin_PW

3. Execution
cd /opt/openvidu/
./openvidu start

Available services
Consume OpenVidu REST API through https://$your_host_IP/
If the application is enabled, it will also be available at https://$your_host_IP/
You can open OpenVidu Dashboard to verify everything is working as expected at https://$your_host_IP/dashboard/ with credentials:
user: OPENVIDUAPP
pass: $admin_PW

4. Install Java for Jenkins Slave

For Slave Mode, install Java will be ok.

sudo yum install -y java-1.8.0-openjdk-devel
Install Virtual Classroom Frontend
##http-server install
npm install -g http-server-ssl

## Virtual Classroom front-end setup
git clone https://github.com/OpenVidu/openvidu-vr.git
cd openvidu-vr/openvidu-vr-room
vi app.js
modify line 163
var OPENVIDU_SERVER_URL = 'https://demos.openvidu.io'; //backend IP
var OPENVIDU_SERVER_SECRET = 'MY_SECRET'; //backend password

http-server-ssl -S &


Run Testing: https://$your_host_IP:8080
Installation on VM2(Jenkins Master)
Jenkins is a Java application, so the first step is to install Java. Run the following command to install the OpenJDK 8 package:
sudo yum install -y java-1.8.0-openjdk-devel
The next step is to enable the Jenkins repository. To do that, import the GPG key using the following curl command:
curl --silent --location http://pkg.jenkins-ci.org/redhat-stable/jenkins.repo | sudo tee /etc/yum.repos.d/jenkins.repo
And add the repository to your system with:
sudo rpm --import https://jenkins-ci.org/redhat/jenkins-ci.org.key
Once the repository is enabled, install the latest stable version of Jenkins by typing:
sudo yum install -y jenkins
After the installation process is completed, start the Jenkins service with:
sudo systemctl start jenkins
To check whether it started successfully run:
systemctl status jenkins
You should see something similar to this:
# systemctl status jenkins
* jenkins.service - LSB: Jenkins Automation Server
   Loaded: loaded (/etc/rc.d/init.d/jenkins; bad; vendor preset: disabled)
   Active: active (running) since Tue 2020-11-15 11:16:26 CST; 1min 15s ago
     Docs: man:systemd-sysv-generator(8)
  Process: 489 ExecStart=/etc/rc.d/init.d/jenkins start (code=exited, status=0/SUCCESS)
   CGroup: /system.slice/jenkins.service
           `-510 /etc/alternatives/java -Dcom.sun.akuma.Daemon=daemonized -Djava.awt.headless=true -DJENKINS_HOME=/var/lib/jenkins -jar /usr/l...

Nov 15 11:16:25 VM_0_4_centos systemd[1]: Starting LSB: Jenkins Automation Server...
Nov 15 11:16:26 VM_0_4_centos runuser[491]: pam_unix(runuser:session): session opened for user jenkins by (uid=0)
Nov 15 11:16:26 VM_0_4_centos runuser[491]: pam_unix(runuser:session): session closed for user jenkins
Nov 15 11:16:26 VM_0_4_centos jenkins[489]: Starting Jenkins [  OK  ]
Nov 15 11:16:26 VM_0_4_centos systemd[1]: Started LSB: Jenkins Automation Server.
Finally enable the Jenkins service to start on system boot.
sudo systemctl enable jenkins
output
# sudo systemctl enable jenkins
jenkins.service is not a native service, redirecting to /sbin/chkconfig.
Executing /sbin/chkconfig jenkins on
Adjust the Firewall If you are installing Jenkins on a remote CentOS server that is protected by a firewall you need to port 8080.
Use the following commands to open the necessary port:
sudo firewall-cmd --permanent --zone=public --add-port=8080/tcp
sudo firewall-cmd --reload
Setting Up Jenkins To set up your new Jenkins installation, open your browser and type your domain or IP address followed by port 8080:
http://your_ip_or_domain:8080
You will see the website itemized below: 
Select the left option and install the plugin later: 
Automatic install process: 
Configure username/password: 
Visit Website: 
Jenkins is ready: 
Verifying the Setup
N/A
Developer Guide and Troubleshooting
Virtual Classroom demo includes two parts: (1) server side and (2) client side. The technologies used to develop these applications includes WebGL, Three.js and JavaScript.
The code could be find at:
git clone https://github.com/OpenVidu/openvidu-vr.git
cd /root/openvidu-vr/openvidu-vr-room/
sed -i 's/demos.openvidu.io/${Local_IP_Address}/g' app.js
To execute:
docker run --rm --name openvidu_server -d -p 4443:4443 -e openvidu.secret=MY_SECRET -e openvidu.publicurl=https://${Local_IP_Address}:4443/ openvidu/openvidu-server-kms
Uninstall Guide
- Stop all tars processes
/usr/local/app/tars/tars-stop.sh
2. Delete files
rm -rf /usr/local/app/tars
rm -rf /usr/local/app/patchs
rm -rf /usr/local/app/web
rm -rf /usr/local/tars
3. Delete crontab
crontab -e
**Delete this line " * * * * * /usr/local/app/tars/tarsnode/util/monitor.sh "**
Troubleshooting
N/A
Maintenance
Blueprint Package Maintenance
Frequently Asked Questions
- https://tarscloud.github.io/TarsDocs_en/question/Install_faq-en.html
- https://tarscloud.github.io/TarsDocs_en/question/tarscpp-question.html
- https://tarscloud.github.io/TarsDocs_en/question/tarsjava-question.html
- https://tarscloud.github.io/TarsDocs_en/question/tarsphp-question.html
License
Any software developed by the "Akraino Enterprise Applications on IEC-Type4 AR/VR Project is licensed under the
Apache License, Version 2.0 (the "License");
you may not use the content of this software bundle except in compliance with the License.
You may obtain a copy of the License at <https://www.apache.org/licenses/LICENSE-2.0>
Unless required by applicable law or agreed to in writing, software
distributed under the License is distributed on an "AS IS" BASIS,
WITHOUT WARRANTIES OR CONDITIONS OF ANY KIND, either express or implied.
See the License for the specific language governing permissions and
limitations under the License.
References
N/A
Definitions, acronyms and abbreviations
N/A