- Example Configuration Input File - Rover Pods on Dell 740XD Servers
- Example Configuration Input File - Rover Pods on HP DL380 Gen10 Servers
Introduction
Rover pods are deployed from an existing Regional Controller and consist of a single nodes. In this guide since a Rover pod is implemented on a single server the term Rover pod and Rover Server are used interchangeably.
A choice of Dell or HP servers is supported. The choice of which type of servers are deployed is achieved by simply creating different pod specific yaml input files.
In R1 the options include:
| Blueprint | Servers | Dataplane | Validated HW details | Validated by |
|---|---|---|---|---|
| Rover | Dell 740XD | ATT Rover Validation HW, Networking and IP plan | AT&T | |
| Ericsson | ||||
| Rover | HP 380 Gen10 | ATT Rover Validation HW, Networking and IP plan | AT&T |
Preflight Requirements
Server iDRAC/iLO provisioning
The Target Rover Server's iDRAC/iLO IP address and subnet must be manually pre-provisioned into the server before installation begins.
Networking
The Target Rover Server has two physical and multiple VLAN interfaces. The RC uses different interfaces on the Target Rover Server during the different stages of its creation of a Rover pod. A very detailed description of the entire networking setup can be found in the Network Architecture section of this release documentation. In addition the networking configuration with example values similar to that used during validation testing is contained in the Validation Labs section of this release documentation Ericsson Rover Validation HW, Networking and IP plan.
The RC must have IP connectivity to the Target Rover Server's dedicated BMC port using ports 80 (http) and 443 (https) in order to issue Redfish commands to configure the Target Rover Server's BIOS settings. The Target Rover Server's BMC IP address is denoted as <SRV_OOB_IP> in this guide. The Target Rover Server's BMC must be manually pre-configured with the <SRV_OOB_IP> address.
After setting the Target Rover Server's BIOS, the RC will then (usually) act as the DHCP server for the initial Target Rover Server's boot process. The Target Rover Server will be automatically configured by the Redfish API commands to send its initial DHCP Request from one of its main NICs via the VLAN tagged 'host' network. Thus the Target Rover Server's 'host' interface and the RC's DHCP server interface must be in the same broadcast domain so that the DHCP Request broadcast frame can reach the RC. It is possible to remove the need for the Build Server and Target Server to be on the same L2 domain using DHCP relay/helper functionality in the TOR to relay the Target Server's DHCP requests across an IP routed network, however this has not been verified in the R1 release and this guide assumes the RC and Target Rover Server to be on the same L2 broadcast domain as described in the detailed networking section.
During the layer stages of the installation the Target Rover Server's 'host' interface must have connectivity to the internet to be able to download the necessary repos and packages.
Software
When the Rover pod is installed no software is required on the Target Rover Server. All software will be installed from the RC and/or external repos via the internet.
Preflight Checks
To verify the necessary IP connectivity from the RC to the Target Rover Server's BMC confirm from the RC that at least port 443 is open to the Target Rover Server's iDRAC/iLO BMC IP address <SRV_OOB_IP> :
root@regional_controller# #nmap -sS <SRV_OOB_IP>

root@regional_controller# nmap -sS 10.51.35.145

Starting Nmap 7.01 ( https://nmap.org ) at 2018-07-10 13:55 UTC Nmap scan report for 10.51.35.145 Host is up (0.00085s latency). Not shown: 996 closed ports PORT STATE SERVICE 22/tcp open ssh 80/tcp open http 443/tcp open https 5900/tcp open vnc Nmap done: 1 IP address (1 host up) scanned in 1.77 second
Note: The enumerated IP shown (10.51.35.146) is an example iDRAC address for a RC deployed in a validation lab.
Preflight Rover Pod and Site Specific Input Data
The automated deployment process configures the new Rover Server based on a set of user defined values specific to each Rover pod. These values must be defined and stored in a site and pod specific input configuration file before the Rover pod deployment process can be started.
An example input file similar to that used during Ericsson Validation testing is shown at the end of this page.
During the installation using the RC's UI the input site yaml file will need to be accessible from RC.
Deploying a Rover Pod
Deployment of each new Rover pod at a given site is performed from the RC's UI.
Warning! Internet Explorer and Edge may not work thus it is strongly recommended to use Chrome.
If an action appears to fail click 'Refresh'.
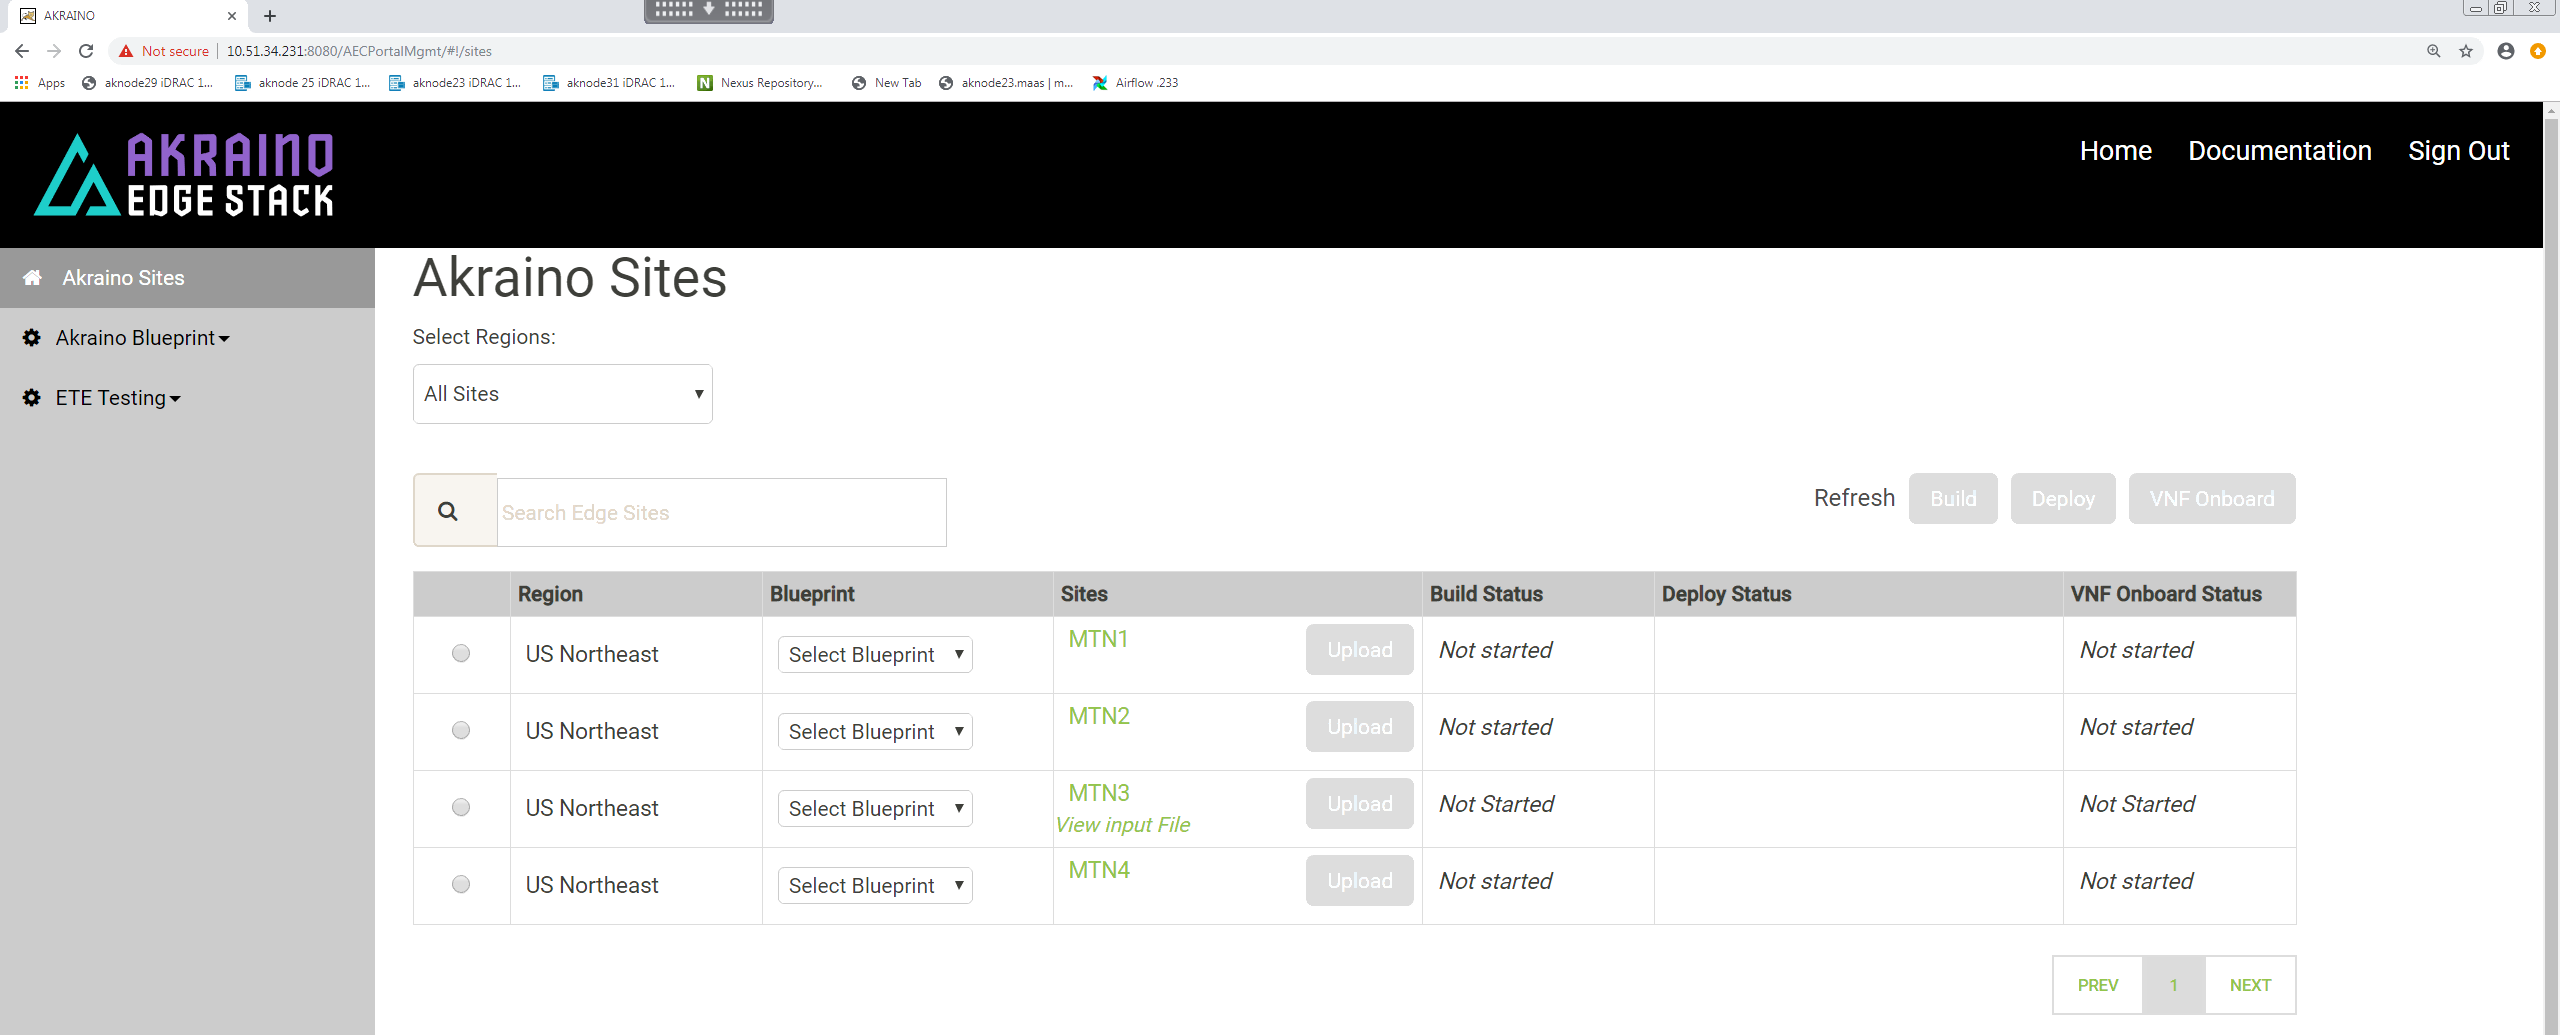
Select a Region and select 'Rover' for the blueprint :
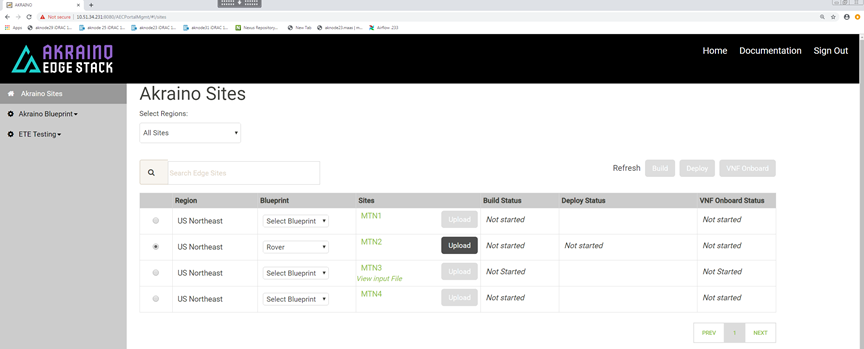
Click 'Upload' to allow you to select the Rover site and pod specific input file:
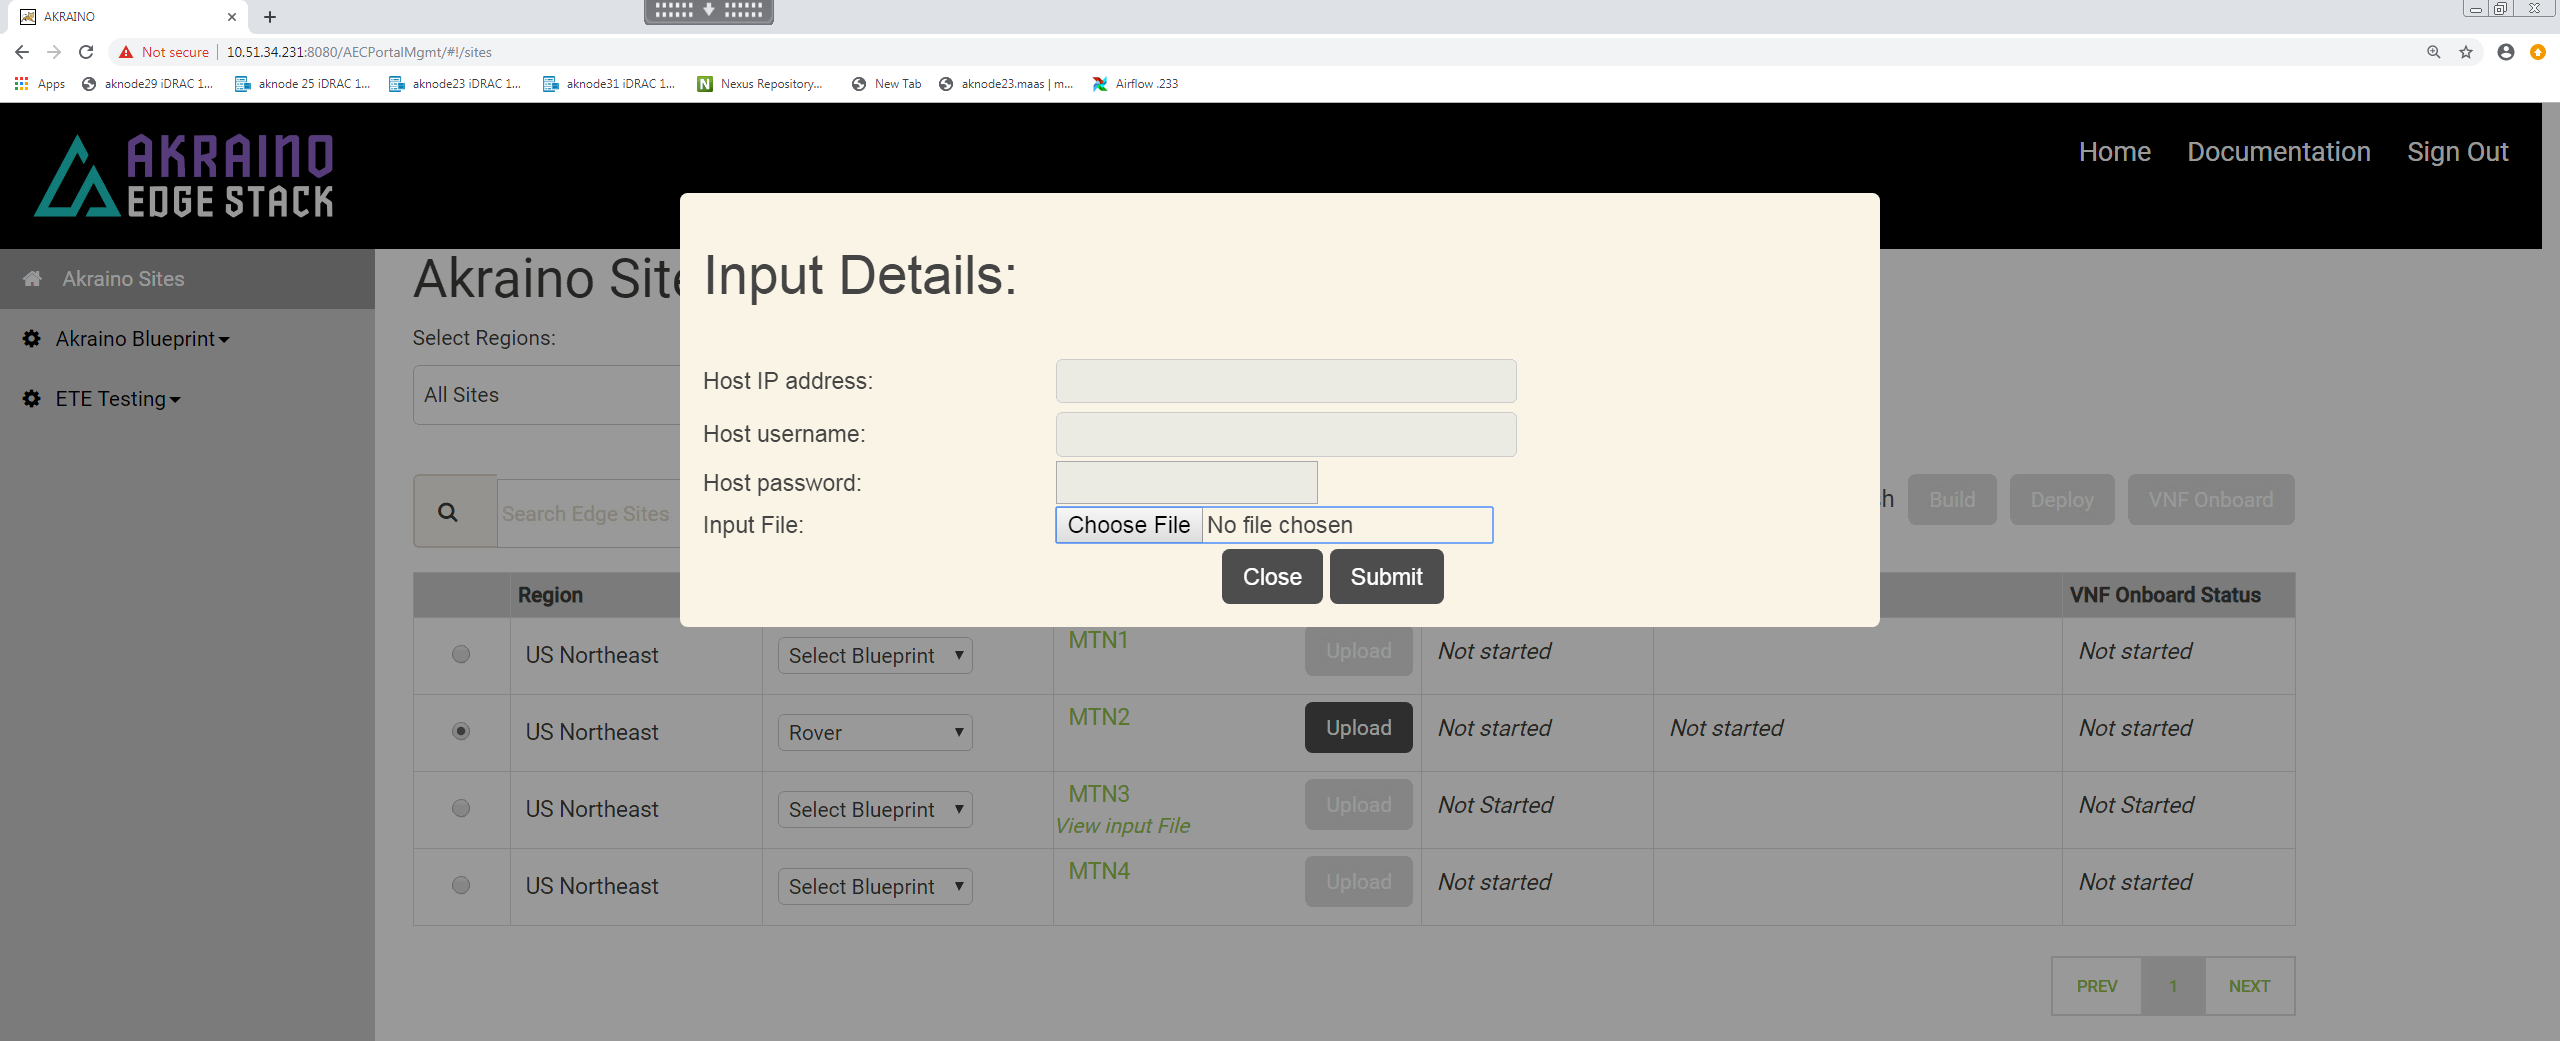
Choose the input file that you have created for the new Rover pod you want to deploy then click 'Submit'.
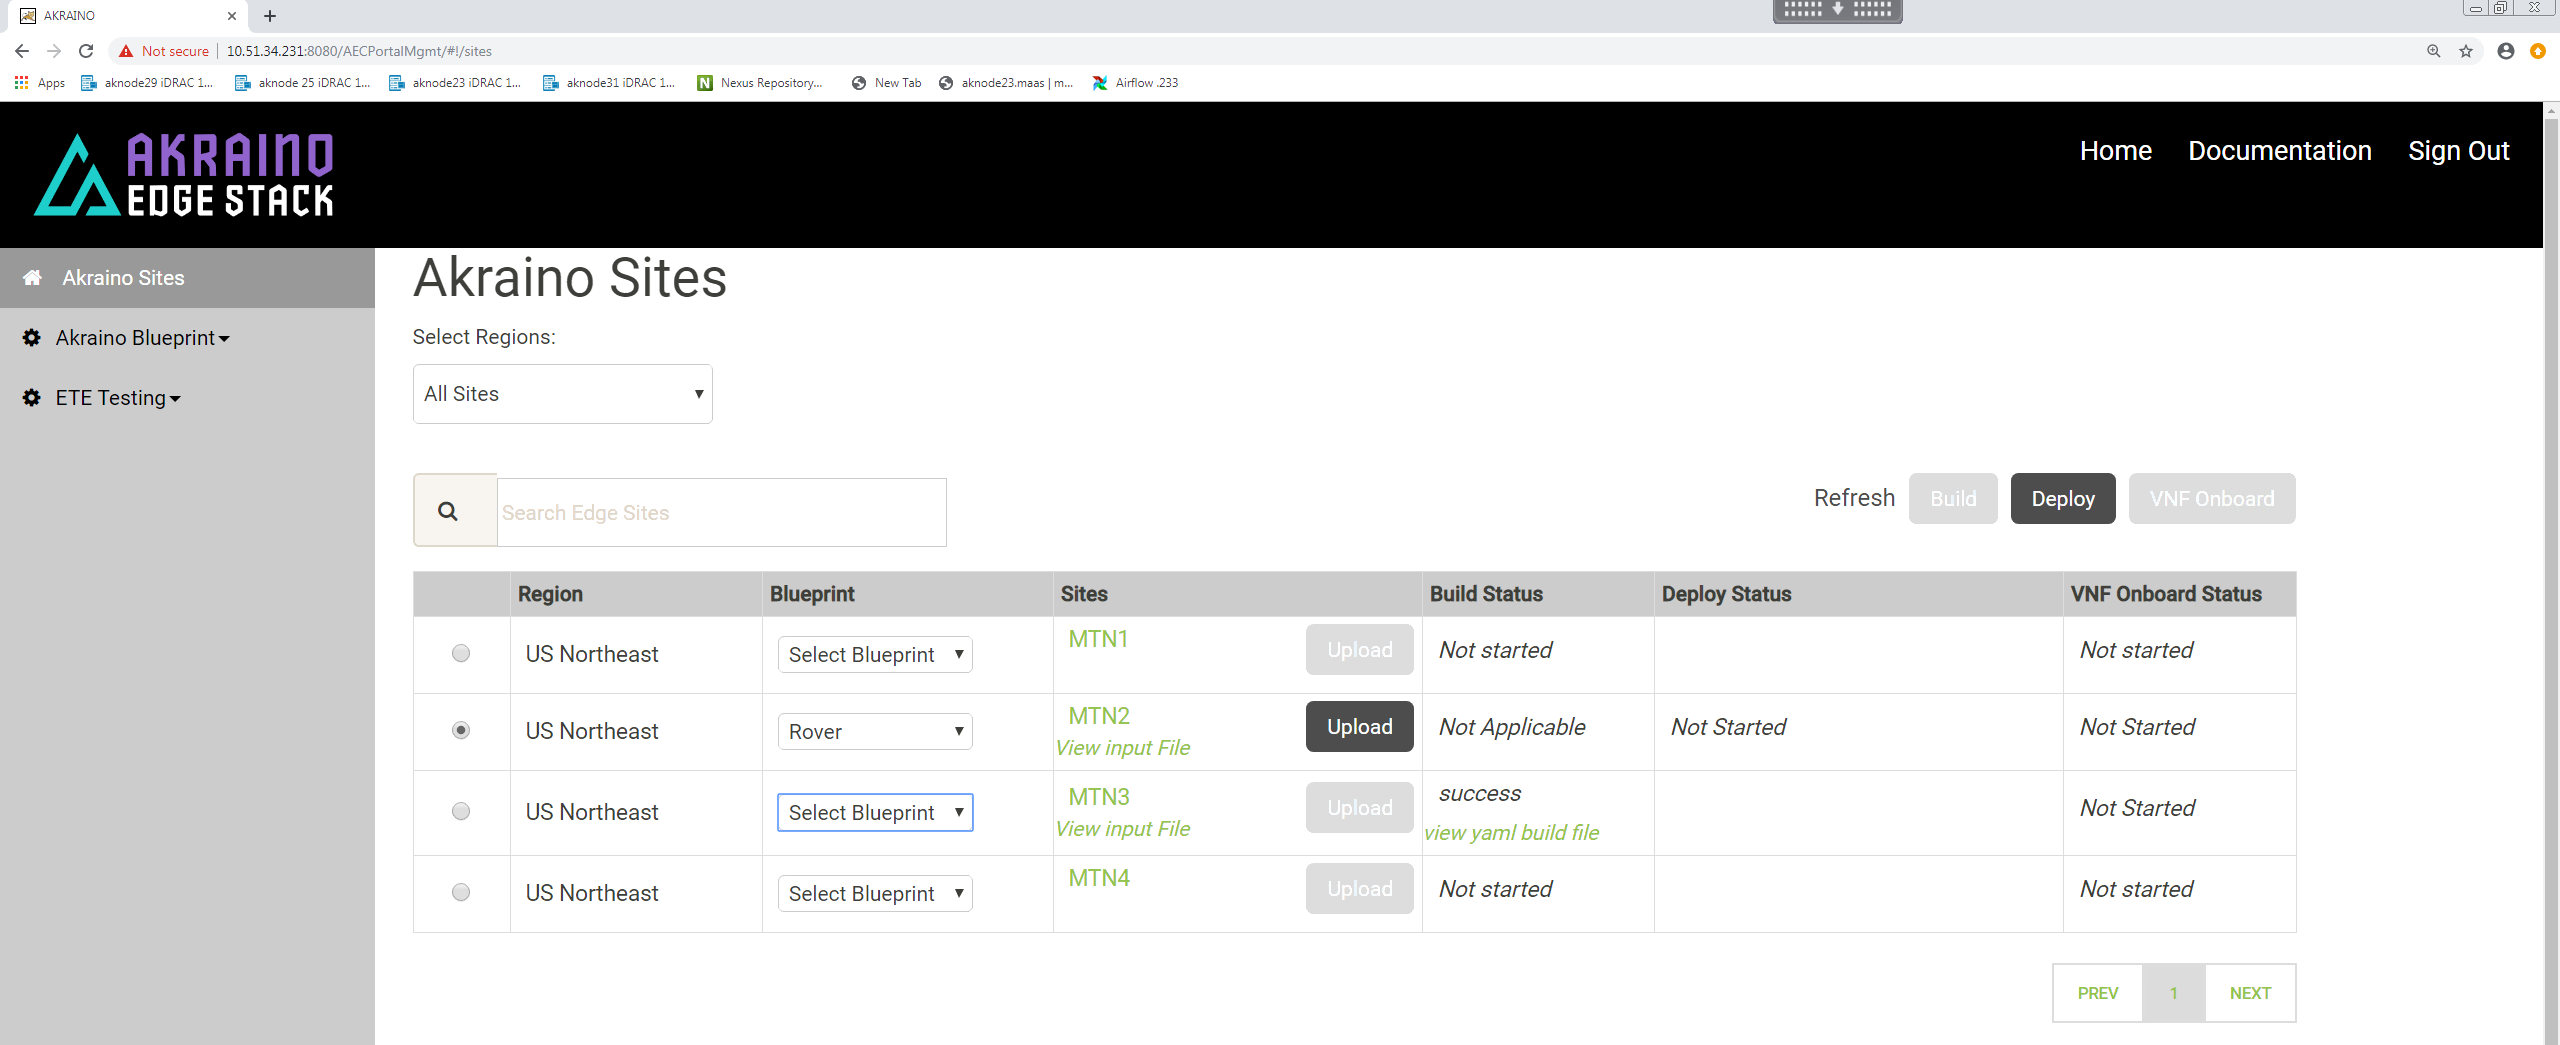
For Rover pod deployment there is no 'Build' step.
Make sure the pod you intend to deploy is still selected.
To initiate the automated deployment click 'Deploy'. You should see the status change to 'In Progress'.
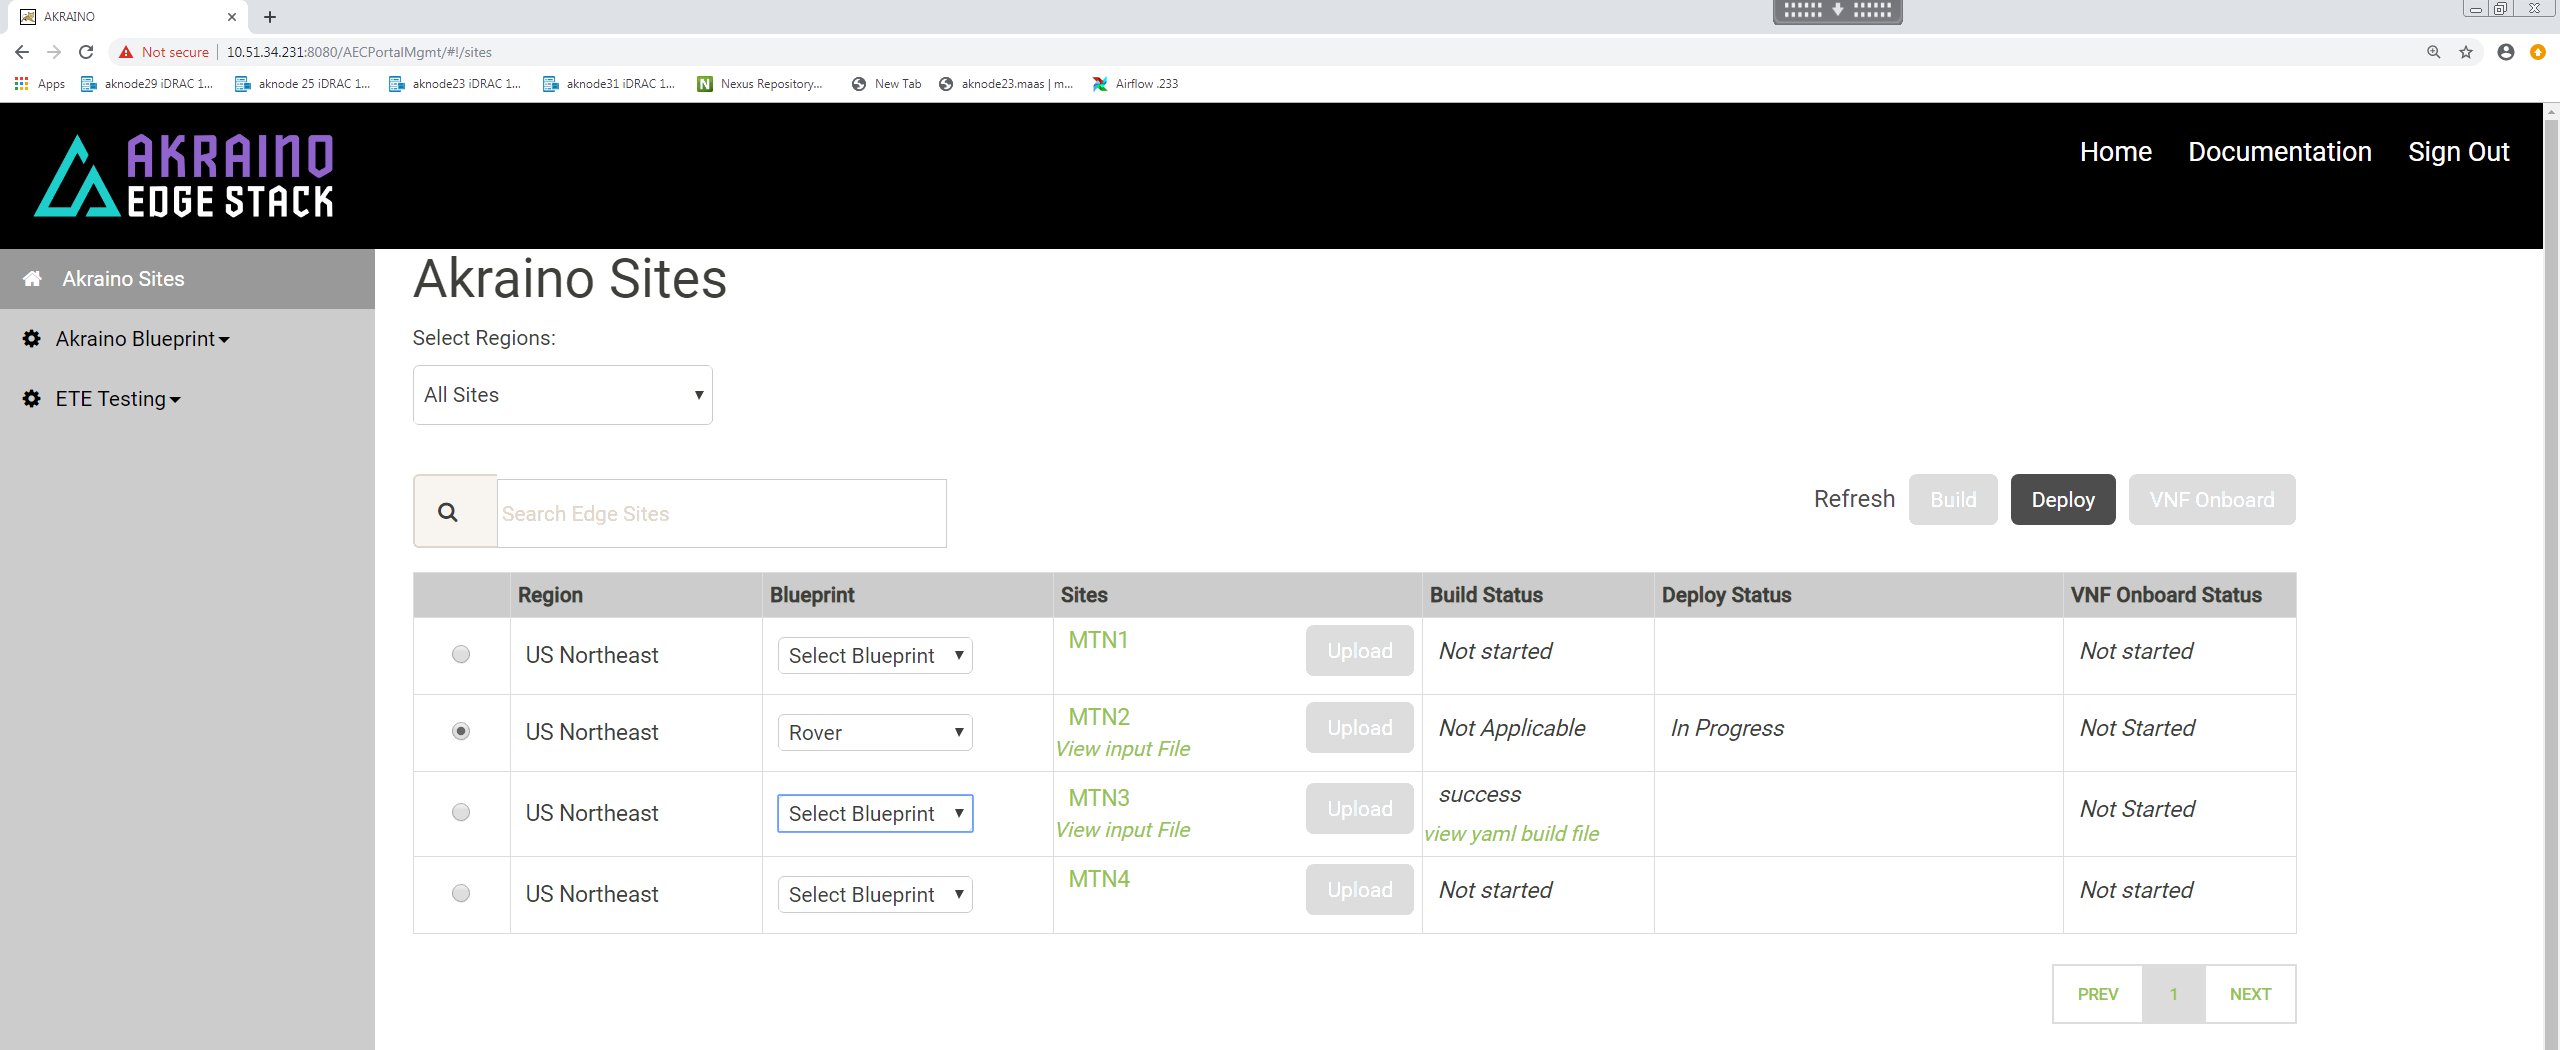
The deployment may take a couple of hours to complete.
It is also possible to follow the progress deployment in a number of ways including from the logs on the RC, monitoring the DHCP server on the RC and the virtual console of the iDRAC/iLO on the Rover server being deployed. Details are shown in the Deployment Walk-Throughs section of the release documentation.
One of the simplest and easiest approaches is to ssh into the RC's 'host' address and issue the following command:
root@regional_controller# tail -f /var/log/akraino/scriptexecutor.log

2019-05-29 18:35:50.902 DEBUG 18222 --- [SimpleAsyncTaskExecutor-34] .a.b.s.i.DeployResponseSenderServiceImpl : BuildResponse [siteName=MTN2, buildStatus=null, createTarStatus=null, genesisNodeStatus=null, deployToolsStatus=null, deployStatus=exception: problem while executing the script. exit code :1, onapStatus=null, vCDNStatus=null, tempestStatus=null]
2019-05-29 18:35:50.910 DEBUG 18222 --- [SimpleAsyncTaskExecutor-34] .a.b.s.i.DeployResponseSenderServiceImpl : Build response HttpResponseStatus :200
2019-05-29 18:38:21.965 DEBUG 18222 --- [http-nio-8073-exec-9] c.a.b.controller.CamundaRestController   : Request received for deploy Deploy [sitename=MTN2, blueprint=Rover, filepath=/opt/akraino/redfish/install_server_os.sh  , fileparams=--rc /opt/akraino/server-build/MTN2 --skip-confirm, winscpfilepa, port=22, username=root, password=akraino,d, destdir=/opt, remotefilename=akraino_airship_deploy.sh, remotefileparams=null, deploymentverifier=null, deploymentverifierfileparams=null, noofiterations=0, waittime=0, postverificationscript=null, postverificationScriptparams=null]
2019-05-29 18:38:21.968 DEBUG 18222 --- [SimpleAsyncTaskExecutor-35] c.a.b.d.DeployScriptExecutorTaskDelegate : task execution started  :/opt/akraino/redfish/install_server_os.sh    --rc /opt/akraino/server-build/MTN2 --skip-confirm
2019-05-29 18:38:21.968 DEBUG 18222 --- [SimpleAsyncTaskExecutor-35] c.a.b.s.impl.ScriptExecutionServiceImpl  : Executing the script.............
2019-05-29 18:38:21.972 DEBUG 18222 --- [SimpleAsyncTaskExecutor-35] c.a.b.s.impl.ScriptExecutionServiceImpl  : logging to /var/log/akraino/install_server_os_2019-05-29T18-38-21+0000
2019-05-29 18:38:21.973 DEBUG 18222 --- [SimpleAsyncTaskExecutor-35] c.a.b.s.impl.ScriptExecutionServiceImpl  : Beginning /opt/akraino/redfish/install_server_os.sh as user [root] in pwd [/opt/akraino/workflow] with home [/root]
2019-05-29 18:38:21.978 DEBUG 18222 --- [SimpleAsyncTaskExecutor-35] c.a.b.s.impl.ScriptExecutionServiceImpl  : Checking for known required packages
2019-05-29 18:38:22.266 DEBUG 18222 --- [SimpleAsyncTaskExecutor-35] c.a.b.s.impl.ScriptExecutionServiceImpl  : python/xenial-updates,now 2.7.12-1~16.04 amd64 [installed]
2019-05-29 18:38:22.540 DEBUG 18222 --- [SimpleAsyncTaskExecutor-35] c.a.b.s.impl.ScriptExecutionServiceImpl  : xorriso/xenial,now 1.4.2-4ubuntu1 amd64 [installed]
2019-05-29 18:38:22.816 DEBUG 18222 --- [SimpleAsyncTaskExecutor-35] c.a.b.s.impl.ScriptExecutionServiceImpl  : sshpass/xenial,now 1.05-1 amd64 [installed]
2019-05-29 18:38:23.094 DEBUG 18222 --- [SimpleAsyncTaskExecutor-35] c.a.b.s.impl.ScriptExecutionServiceImpl  : python-requests/xenial-updates,xenial-updates,now 2.9.1-3ubuntu0.1 all [installed]
2019-05-29 18:38:23.332 DEBUG 18222 --- [SimpleAsyncTaskExecutor-35] c.a.b.s.impl.ScriptExecutionServiceImpl  : python-pip/xenial-updates,xenial-updates,now 8.1.1-2ubuntu0.4 all [installed]
2019-05-29 18:38:23.579 DEBUG 18222 --- [SimpleAsyncTaskExecutor-35] c.a.b.s.impl.ScriptExecutionServiceImpl  : python-yaml/xenial,now 3.11-3build1 amd64 [installed]
2019-05-29 18:38:23.817 DEBUG 18222 --- [SimpleAsyncTaskExecutor-35] c.a.b.s.impl.ScriptExecutionServiceImpl  : python-jinja2/xenial,xenial,now 2.8-1 all [installed]
2019-05-29 18:38:24.080 DEBUG 18222 --- [SimpleAsyncTaskExecutor-35] c.a.b.s.impl.ScriptExecutionServiceImpl  : make/xenial,now 4.1-6 amd64 [installed,automatic]
2019-05-29 18:38:24.318 DEBUG 18222 --- [SimpleAsyncTaskExecutor-35] c.a.b.s.impl.ScriptExecutionServiceImpl  : gcc/xenial,now 4:5.3.1-1ubuntu1 amd64 [installed]
2019-05-29 18:38:24.556 DEBUG 18222 --- [SimpleAsyncTaskExecutor-35] c.a.b.s.impl.ScriptExecutionServiceImpl  : coreutils/xenial-updates,now 8.25-2ubuntu3~16.04 amd64 [installed]
2019-05-29 18:38:24.556 DEBUG 18222 --- [SimpleAsyncTaskExecutor-35] c.a.b.s.impl.ScriptExecutionServiceImpl  : Tools are ready in [/opt/akraino]
2019-05-29 18:38:24.560 DEBUG 18222 --- [SimpleAsyncTaskExecutor-35] c.a.b.s.impl.ScriptExecutionServiceImpl  : Using Build Web ip address [10.51.34.231]
2019-05-29 18:38:34.570 DEBUG 18222 --- [SimpleAsyncTaskExecutor-35] c.a.b.s.impl.ScriptExecutionServiceImpl  : WARNING:  Preparing to build server [aknode29] using oob ip [10.51.35.146].  Beginning in 10 seconds ..........
2019-05-29 18:38:34.572 DEBUG 18222 --- [SimpleAsyncTaskExecutor-35] c.a.b.s.impl.ScriptExecutionServiceImpl  : Beginning bare metal install of os at Wed May 29 18:38:34 UTC 2019
2019-05-29 18:38:34.606 DEBUG 18222 --- [SimpleAsyncTaskExecutor-35] c.a.b.s.impl.ScriptExecutionServiceImpl  : Found build web ip address [10.51.34.231] on this server!
2019-05-29 18:38:34.608 DEBUG 18222 --- [SimpleAsyncTaskExecutor-35] c.a.b.s.impl.ScriptExecutionServiceImpl  : bond0.408 Link encap:Ethernet  HWaddr 3c:fd:fe:d2:5b:21
2019-05-29 18:38:34.608 DEBUG 18222 --- [SimpleAsyncTaskExecutor-35] c.a.b.s.impl.ScriptExecutionServiceImpl  :           inet addr:10.51.34.231  Bcast:10.51.34.255  Mask:255.255.255.224
2019-05-29 18:38:34.608 DEBUG 18222 --- [SimpleAsyncTaskExecutor-35] c.a.b.s.impl.ScriptExecutionServiceImpl  : Checking access to server oob ip [10.51.35.146]
2019-05-29 18:38:36.647 DEBUG 18222 --- [SimpleAsyncTaskExecutor-35] c.a.b.s.impl.ScriptExecutionServiceImpl  : 64 bytes from 10.51.35.146: icmp_seq=1 ttl=63 time=0.539 ms
2019-05-29 18:38:36.647 DEBUG 18222 --- [SimpleAsyncTaskExecutor-35] c.a.b.s.impl.ScriptExecutionServiceImpl  : 64 bytes from 10.51.35.146: icmp_seq=2 ttl=63 time=0.504 ms
If the pod deploys successfully you will see the UI change to show a 'Success' message.
And the scriptexecutor.log file will show the process completed successfully.
Rover Pod Site Specific Configuration Input Files
This section contains links to the input files used to build the Rover pods in ATT's and Ericsson's validation labs for the R1 release. Being pods and site specific the enumerated values will differ. Full details of the relevant validation lab setup that should be referenced when looking at these files is contained in the Validation Labs section of this documentation.
Please note, superficially these files may appear very similar but they are all included as examination of the details shows the differences dues to HW differences such as vendor, slot location of NICs as well site specific differences due to VIDs, subnets etc.
This template should be used to create the deployment specific input file for the new Rover pod. The example below is for a file called aknode27 to create a Rover pod on a server called aknode27.