Table of Contents
Introduction
Licensing
This document outlines the steps to deploy Radio Edge Cloud (REC) cluster. It has a minimum of three controller nodes. Optionally it may include worker nodes if desired. REC was designed from the ground up to be a highly available, flexible, and cost-efficient system for the use and support of Cloud RAN and 5G networks. The production deployment of Radio Edge Cloud is intended to be done using the Akraino Regional Controller which has been significantly enhanced during the Akraino Release 1 timeframe, but for evaluation purposes, it is possible to deploy REC without the Regional Controller. Regardless of whether the Regional Controller is used, the installation process is cluster oriented. The Regional Controller or a human being initiates the process on the first controller in the cluster, then that controller automatically installs an image onto every other server in the cluster using IPMI and Ironic (from OpenStack) to perform a zero touch install.is Apache 2.0 licensed. The goal of the project is the packaging and installation of upstream Open Source projects. Each of those upstream projects is separately licensed. For a full list of packages included in REC you can refer to https://logs.akraino.org/production/vex-yul-akraino-jenkins-prod-1/ta-ci-build-amd64/313/work/results/rpmlists/rpmlist (the 313 in this URL is the Akraino REC/TA build number, see https://logs.akraino.org/production/vex-yul-akraino-jenkins-prod-1/ta-ci-build-amd64/ for the latest build.) All of the upstream projects that are packaged into the REC/TA build image are Open Source.
Introduction
This document outlines the steps to deploy Radio Edge Cloud (REC) cluster. It has a minimum of three controller nodes. Optionally it may include worker nodes if desired. REC was designed from the ground up to be a highly available, flexible, and cost-efficient system for the use and support of Cloud RAN and 5G networks. The production deployment of Radio Edge Cloud is intended to be done using the Akraino Regional Controller which has been significantly enhanced during the Akraino Release 1 timeframe, but for evaluation purposes, it is possible to deploy REC without the Regional Controller. Regardless of whether the Regional Controller is used, the installation process is cluster oriented. The Regional Controller or a human being initiates the process on the first controller in the cluster, then that controller automatically installs an image onto every other server in the cluster using IPMI and Ironic (from OpenStack) to perform a zero touch install.
In a Regional Controller based deployment, the Regional Controller API will be used to upload the REC Blueprint YAML (available from the REC repository) which informs the Regional Controller of where to obtain the REC ISO images, the REC workflows (executable code for creating, modifying and deleting REC sites) and the REC remote installer component (a container image which will be instantiated by the create workflow and which will then invoke the REC Deployer (which is located in the ISO DVD disc image file) which conducts the rest of the In a Regional Controller based deployment, the Regional Controller API will be used to upload the REC Blueprint YAML (available from the REC repository) which informs the Regional Controller of where to obtain the REC ISO images, the REC workflows (executable code for creating, modifying and deleting REC sites) and the REC remote installer component (a container image which will be instantiated by the create workflow and which will then invoke the REC Deployer (which is located in the ISO DVD disc image file) which conducts the rest of the installation.
The instructions below skip most of this and directly invoke the REC Deployer from the Baseboard Management Controller (BMC), integrated Lights Out (iLO) or integrated Dell Remote Access Controller (iDRAC) of a physical server. The basic workflow of the REC deployer is to copy a base image to the first controller in the cluster and then read the contents of a configuration file (typically called user_config.yaml) to deploy the base OS and all additional software to the rest of the nodes in the cluster.
...
Recent builds can be obtained from the Akraino Nexus server. Choose either "latest" or a specific build number from the old release images directory for builds prior to the AMD/ARM split or the AMD64 builds or the ARM64 builds and download the file install.iso.
| Akraino Release | REC or TA ISO Build | Build Date | Notes | |||||||||||||||||||||||
|---|---|---|---|---|---|---|---|---|---|---|---|---|---|---|---|---|---|---|---|---|---|---|---|---|---|---|
| 1 |
border | true | viewerToolbar | true | fitWindow | false | diagramDisplayName | Download Build 9 | lbox | true | revision | 3 | diagramName | Download | simpleViewer | true | width | links | auto | tbstyle | top | diagramWidth | 123Build 9. This build has been removed from Nexus (probably due to age) | 2019-05-30 | Build number 9 is known to NOT work on Dell servers or any of the ARM options listed below. If attempting to install on Dell servers, it is suggested to use builds from no earlier than June 10th | |
2| draw.io Diagram | | |||||||||||||||||||||||||
| border | true | |||||||||||||||||||||||||
| viewerToolbar | true | |||||||||||||||||||||||||
| fitWindow | false | |||||||||||||||||||||||||
| diagramDisplayName | Download Build 9 | |||||||||||||||||||||||||
| lbox | true | |||||||||||||||||||||||||
| revision | 3 | |||||||||||||||||||||||||
| diagramName | Download Build 237 | |||||||||||||||||||||||||
| simpleViewer | true | width | ||||||||||||||||||||||||
| links | auto | |||||||||||||||||||||||||
| tbstyle | top | |||||||||||||||||||||||||
| diagramWidth | 123 | 2019-11-18 | Build 237. This build has been removed from Nexus (probably due to age) | 2019-11-18 | It is possible It is possible that there may still be some issues on Dell servers. Most testing has been done on Open Edge. Some builds between June 10th and November 18th have been successfully used on Dell servers, but because of a current lack of Remote Installer support for Dell (or indeed anything other than Open Edge), the manual testing is not as frequent as the automated testing of REC on Open Edge. If you are interested in testing or deploying on platforms other than Open Edge, please join the Radio Edge Cloud Project Meetings. |
Options for booting the ISO on your target hardware include NFS, HTTP, or USB memory stick. You must place the ISO in a suitable location (e.g., NFS server, HTTP(S) server or USB memory stick before starting the boot process. The file bootcd.iso, which is also in the same directory, is used only when deploying via the Akraino Regional Controller using the Telco Appliance Remote Installer. You can ignore bootcd.iso when following the manual procedure below.
Preparing for Boot from ISO Image
| 3 - AMD64 | Build 237. This build has been removed from Nexus (probably due to age) | 2020-05-29 | This is a minor update to Akraino Release 2 of AMD64 based Radio Edge Cloud |
| 3 - ARM64 | Arm build 134. This build has been removed from Nexus (probably due to age) | 2020-04-13 | This is the first ARM based release of Radio Edge Cloud |
| 4 - AMD64 | 2020-11-03 | The ARM build is unchanged since Release 3 |
Options for booting the ISO on your target hardware include NFS, HTTP, or USB memory stick. You must place the ISO in a suitable location (e.g., NFS server, HTTP(S) server or USB memory stick before starting the boot process. The file bootcd.iso, which is also in the same directory, is used only when deploying via the Akraino Regional Controller using the Telco Appliance Remote Installer. You can ignore bootcd.iso when following the manual procedure below.
Preparing for Boot from ISO Image
| Section | ||||||||||||||||||||||||
|---|---|---|---|---|---|---|---|---|---|---|---|---|---|---|---|---|---|---|---|---|---|---|---|---|
| ||||||||||||||||||||||||
| ||||||||||||||||||||||||
| Section | ||||||||||||||||||||||||
| ||||||||||||||||||||||||
|
...
Booting from the ISO Image
| Section | ||||||||||||||||||||||||||||||||||
|---|---|---|---|---|---|---|---|---|---|---|---|---|---|---|---|---|---|---|---|---|---|---|---|---|---|---|---|---|---|---|---|---|---|---|
| ||||||||||||||||||||||||||||||||||
|
...
Note: When the deployment to all the nodes has completed, “controller-1” will reboot automatically.
| Note | ||
|---|---|---|
| ||
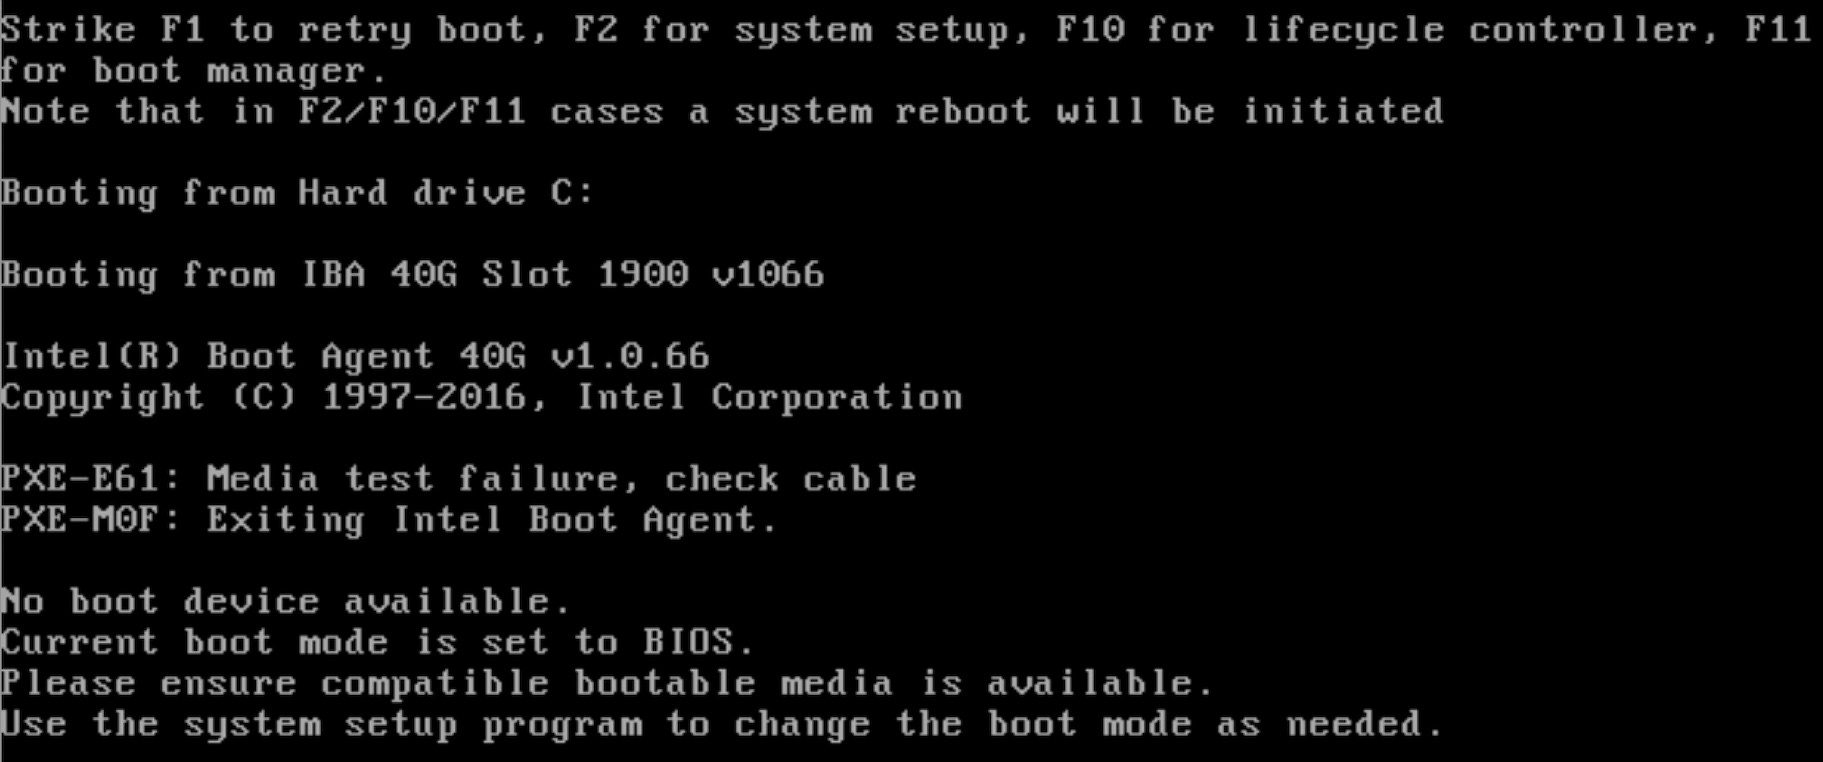
A Note on deploying on DELL severs: Currently, a manual step is required when doing an installation on Dell servers. After the networking has been set up and the deployment has started, the following message will be shown on the console screen on controller-2 and controller-3:
At this point, both controller-2 and controller-3 should be set to boot from virtual CD/DVD/ISO. To do this:
Again, this needs to be done for both controller-2 and controller-3. After this, the installation should continue normally. As a reference, during this time, viewing the file /srv/deployment/log/cm.log on controller-1 will show the following: FAILED - RETRYING: Verify node provisioning state. Waiting for 60mins max. (278 retries left). FAILED - RETRYING: Verify node provisioning state. Waiting for 60mins max. (277 retries left). FAILED - RETRYING: Verify node provisioning state. Waiting for 60mins max. (276 retries left). This will continue until the above manual step is completed or a timeout happens. After the manual step, the following messages will appear: ok: [controller-2 -> localhost] ok: [controller-3 -> localhost] |
Verifying Deployment
A post-installation verification is required to ensure that all nodes and services were properly deployed.
...