Contents
Introduction
This document describes the steps to create a single and multi-edge node. Edge Nodes are deployed at physical locations called Edge Nodes.
Edge Node Configuration
Rover (Single-Node Cluster)
This configuration file is written as a series of shell key/value assignments.
Key Name(s) | Notes | Example |
|---|---|---|
| Restricts DHCP to only bind to this interface (not required) | BUILD_INTERFACE=vlan41 |
| IP and port to use when creating the web server | BUILD_WEBIP=192.168.2.44 |
| Server hostname | SRV_NAME=aknode42 |
| Out-of-band interface information for the server (iDRAC, ilo, etc.) | SRV_OOB_IP=192.168.41.42 |
| MAC address of the server used during the build | SRV_MAC=3c:fd:fe:b8:02:90 |
| Server OEM: Dell or HPE (case sensitive) | SRV_OEM=Dell |
| Network interface used during the build when ipxe.efi and the OS are booted | SRV_IPXE_INF=net4 |
| ipxe script based on the OS version and target kernel. Valid values are | SRV_BLD_SCRIPT=script-hwe-16.04.4-amd64.ipxe |
| XML template used to set BIOS and RAID configuration. | SRV_BIOS_TEMPLATE=dell_r740_g14_uefi_base.xml.template |
| VLAN to use during the build and final network configuration | SRV_VLAN=41 |
| Basic network information for DHCP configuration and final server network settings | SRV_MTU=9000 |
| Root password for the server being built | SRV_PWD=XXXXXXXX |
| Network bond information | SRV_BOND=bond0 |
Unicycle (Three-Node Cluster)
This configuration file is written in YAML.
Key Name | Notes | Example |
|---|---|---|
site_name | Site Name | site_name: hp_akraino |
ipmi_admin_password | The Password required to allow the bare metal server to instantiate via IPMI | ipmi_admin_password: XXXXXXXX |
networks | There are six networks:
| networks: |
sriovnets | sriovnets: | |
storage | NOTE: | storage: |
genesis | The genesis or “seed" node refers to a short-lived node used to launch a new deployment. It is he first node built in a new deployment environment. | genesis: |
masters | The nodes that make up the control plane | masters: |
workers | The nodes that make up the data plane | workers: |
servers | servers: | |
hardware |
| hardware: |
disks |
| disks: |
genesis_ssh_public_key | genesis_ssh_public_key: "ssh-rsa ..." | |
kubernetes |
| kubernetes: |
regional_server | regional_server: |
Populating PostgreSQL
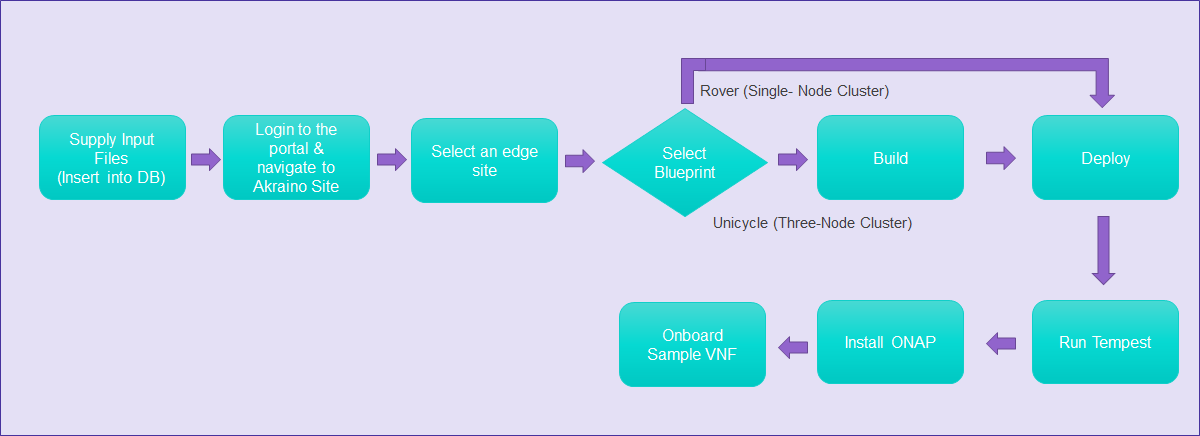
To deploy a Unicycle (Three-Node Cluster) or a Rover (Single-Node Cluster) Edge Node, perform the following steps:
- Check if the Akraino (Docker Containers) packages are stood up.
- Connect to PostgreSQL database providing the host IP (name).
user name = admin
password = abc123
- Locate the directory from which Postgres loads any required files:
> show data_directory
- Copy the configuration file to this directory on the appropriate Edge Node.
- Execute the following SQL insert, bearing in mind these value substitutions:
edge_site_id: Any unique increment value. This is usually 1 but does not have to be.edge_site_name: Human-readable Edge Node name.region_id: Edge Node region number. Useselect * from akraino.Region;to determine the appropriate value. Observe the region number associations returned from the query: Use 1 for US East, 2 for US West, and so on.edge_site_ip:IP address of the node where the deployment is doneedge_site_user:User name of the node (for edge_site_ip)edge_site_pwd:Password of the node (for edge_site_ip)
> insert into akraino.edge_site(edge_site_id, edge_site_name, edge_site_ip, edge_site_user, edge_site_pwd, input_file,
  crt_login_id, crt_dt, upd_login_id, upd_dt, region_id)
  values( 1, 'Atlanta', 'ip-address', 'user', '****', bytea(pg_read_file('input-file-name')), user, now(), user, now(),1);
Akraino Portal Operations
Portal Pre-configuration
- In the Tomcat (Portal) container, navigate to
/usr/local/tomcat/webapps/AECPortalMgmt/App.Config.js
.constant('hostUrl','127.0.0.1:8080')
.constant('camundaUrl',’127.0.0.1:8073')
- In the Tomcat (Portal) container, navigate to
/usr/local/tomcat/webapps/AECPortalMgmt/WEB-INF/classes/app.properties
apacheds.ldap.url = ldap://127.0.0.1:10389/dc=akraino,dc=com
postgres.db.url = jdbc:postgresql://127.0.0.1:6432/postgres
Login
Visit the portal URL http://REGIONAL_NODE_IP:8080/AECPortalMgmt/ where REGIONAL_NODE_IP is the Portal IP.
Use the following credentials:
- Username: akadmin
- Password: akraino
Upon successful login, the Akraino Portal home page will appear.
Build or Deploy an Edge Node
From the Portal home page:
- Select one Edge Node.
- For the selected Edge Node, select a Blueprint (Rover or Unicycle) from the drop down menu.
- When using the Unicycle blueprint, the Build button is enabled.
- Select Build to begin the build process.
- The Build status is updated to Build Complete, once the process is finished.
- Observe that the Deploy button is enabled.
- Select Deploy to begin the deploy process.
- The Deploy status is updated to Completed once the process is finished.
- When using the Rover blueprint, the Deploy button is enabled.
- Select Deploy to begin the deploy process.
Tempest Tests
Prerequisites
Specifics around OpenStack are beyond the scope of this guide.
- Validate all OpenStack settings as needed.
- Ensure all necessary OpenStack services are up and running for a particular site.
- Use appropriate values for the OpenStack username, password, region, and desired timeout.
Running Tempest
- Navigate to ETE testing page using the side menu in the portal.
- Select a deployed site in the Run Tests page.
- Click on Run Tempest to trigger tempest test
- Test status gets updated to 'Complete', once the job gets completed.
Installing ONAP
Prerequisites
Specifics around ONAP are beyond the scope of this guide.
- Verify that a VLAN is created and can be used for OpenStack tenant VM
- The VLAN ID
- An IP (or a range of IP) that can be accessed from this VLAN
- Gateway, DNS, for the IP
- A public private key pair for accessing ONAP VM
- If the Edge Node is behind proxy, the proxy URL
- Obtain the OpenStack keystone admin password
Configuration
This configuration file is written as a YAML dictionary named parameters.
This dictionary will be selectively inserted into the ONAP VM environment file, depending on overall configuration.
Key Name | Notes | Example |
|---|---|---|
public_net_name | The name assigned to the OpenStack network that will be created and used by the ONAP VM. An existing network may be used by referencing its name here. | public_net_name: public |
public_physical_net_provider_name | The physical provider network name for the public network. CAUTION: If the physical provider network cannot be found, the automated deployment process will terminate with an error. | # Assume vlan50 is the VLAN created |
provider_segmentation_id | The VLAN tag of the physical provider network | # Assume vlan50 |
public_physical_net_type | The physical network type. Specify VLAN or flat. NOTE:When flat is in use, provider_segmentation_id will be ignored. | public_physical_net_type: vlan |
public_subnet_name | The subnet name. An existing subnet may be used by referencing its name here. | public_subnet_name: public-subnet |
public_subnet_cidr | The subnet’s CIDR. The ONAP VM will be assigned an IP within this subnet. | public_subnet_cidr: 192.168.102.0/24 |
public_subnet_allocation_start | The allocation start of the IP pool. Together with public_subnet_allocation_end it defines the range of IPs assigned to VMs. | public_subnet_allocation_start: 192.168.102.100 |
public_subnet_allocation_end | The allocation end of the IP pool. Together with public_subnet_allocation_start it defines the range of IPs assigned to VMs. | public_subnet_allocation_end: 192.168.102.200 |
public_subnet_dns_nameserver | The subnet's DNS server | public_subnet_dns_nameserver: 8.8.8.8 |
public_subnet_gateway_ip | The subnet's Gateway IP | public_subnet_gateway_ip: 192.168.102.1 |
flavor_name | VM flavor for the ONAP VM. The installation creates m1.onap, x1.onap, xx1.onap flavors, all of which are recommended for use. | flavor_name: x1.onap |
onap_vm_public_key | The public key used to access the ONAP VM. A URL pointing to the key may be used here. | onap_vm_public_key: PUBLIC_KEY |
http_proxy | Optional http proxy URL including port. If the network is accessible without a proxy, please leave empty. | http_proxy: http://proxy.yourdomain.com:8888 |
https_proxy | Optional https proxy URL including the port. If the network is accessible without a proxy, please leave empty. | https_proxy: https://proxy.yourdomain.com:8888 |
no_proxy | Optional list of domains, IPs, and CIDRs that do not require a proxy, separated by commas. Do not use spaces. If the network is accessible without a proxy, please leave empty. | no_proxy: 127.0.0.1 |
keystone_admin_password | The keystone admin password. | keystone_admin_password: XXXXXXXX |
onap_tenant_password | The keystone password for the ONAP project (formerly known as a tenant in OpenStack parlance). | onap_tenant_password: XXXXXXXX |
onap_artifacts_http_repo | Optional HTTP repository URL for ONAP artifacts. When deploying a self-contained Edge Node without Internet access, all ONAP artifacts must be downloaded from ONAP Nexus to a HTTP server, using this URL. If HTTP is not being used to download artifacts, please leave empty. | onap_artifacts_http_repo: http://192.168.102.220/onap |
Installation
- Navigate to the add-ons page via the sidebar menu.
- Select a deployed site on the Install ONAP page.
- Choose Install ONAP to begin installation.
- The ONAP status changes to Complete once the job is finished.
- ONAP VM will be created successfully after the job is finished. It takes several hours until ONAP becomes operational.
Onboarding a Sample VNF
- Navigate to the Akraino Sites page.
- Select a deployed site. The VNF Onboard button becomes enabled.
- Choose VNF Onboard and supply the VNF Type.
- Choose Onboard to begin the sample VNF installation.