Contents
Introduction
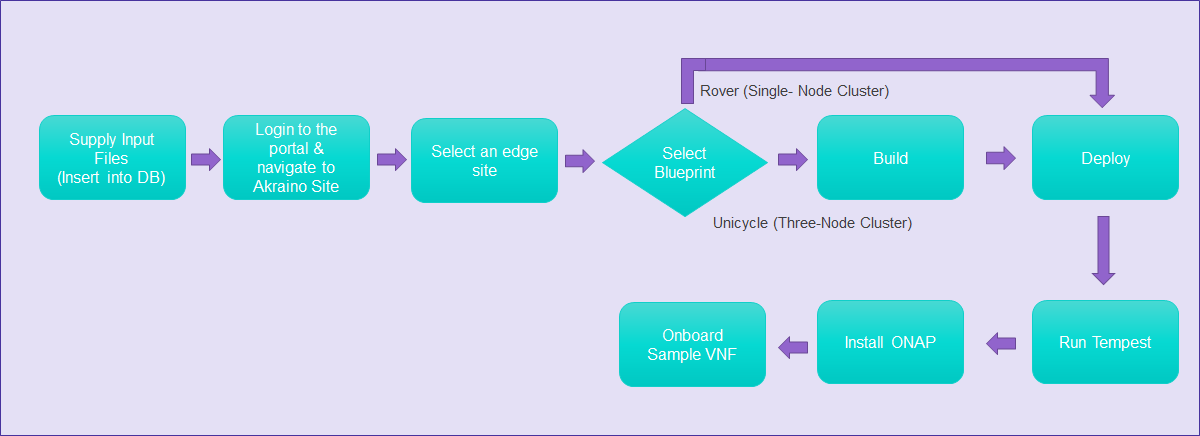
This document describes the steps to create a single and multi-edge node. Edge Nodes are deployed at physical locations called Edge Nodes.
Unicycle (Three-Node Cluster) - Supported in the future release
Edge Node Configuration
Rover (Single-Node Cluster)
This configuration file is written as a series of shell key/value assignments.
Sample input file template with all required parameters are provided in the ‘Build or Deploy an Edge Node' section.
Key Name(s) | Notes | Example |
|---|---|---|
| Server hostname | SRV_NAME=aknode42 |
| Out-of-band interface information for the server (iDRAC, ilo, etc.) | SRV_OOB_IP=192.168.41.42 |
| MAC address of the server used during the build | SRV_MAC=3c:fd:fe:b8:02:90 |
| Server OEM: Dell or HPE (case sensitive) | SRV_OEM=Dell |
| Network interface used during the build when ipxe.efi and the OS are booted | SRV_IPXE_INF=net4 |
| ipxe script based on the OS version and target kernel. Valid values are | SRV_BLD_SCRIPT=script-hwe-16.04.4-amd64.ipxe |
| XML template used to set BIOS and RAID configuration. | SRV_BIOS_TEMPLATE=dell_r740_g14_uefi_base.xml.template |
SRV_FIRSTBOOT_TEMPLATE | Template for script to run on first boot to setup the server. Current options are:
| SRV_FIRSTBOOT_TEMPLATE=firstboot-airship-iab.sh.template |
| VLAN to use during the build and final network configuration | SRV_VLAN=41 |
| Basic network information for DHCP configuration and final server network settings | SRV_MTU=9000 |
| Root password for the server being built | SRV_PWD=XXXXXXXX |
| Network bond information | SRV_BOND=bond0 |
Populating PostgreSQL
The Akraino seed code comes with default two sites: MTN1, MTN2 representing two lab sites in Middletown, NJ. This step of connecting to the database and creating edge_site records are only required if the user wishes to deploy on other sites.
To deploy a Rover (Single-Node Cluster) Edge Node, perform the following steps:
- Check if the Akraino (Docker Containers) packages are stood up.
- Connect to PostgreSQL database providing the host IP (name).
jdbc:postgresql://<IP-address-of-DB-host>:6432/postgres
user name = admin
password = abc123
- Execute the following SQL insert, bearing in mind these value substitutions:
edge_site_id: Any unique increment value. This is usually 1 but does not have to be.edge_site_name: Human-readable Edge Node name.region_id: Edge Node region number. Useselect * from akraino.Region;to determine the appropriate value. Observe the region number associations returned from the query: Use 1 for US East, 2 for US West, and so on.
> insert into akraino.edge_site(edge_site_id, edge_site_name, crt_login_id, crt_dt, upd_login_id, upd_dt, region_id)
  values( 1, 'Atlanta', user, now(), user, now(),1);
Akraino Portal Operations
Login
Visit the portal URL http://REGIONAL_NODE_IP:8080/AECPortalMgmt/ where REGIONAL_NODE_IP is the Portal IP.
Use the following credentials:
- Username: akadmin
- Password: akraino
Upon successful login, the Akraino Portal home page will appear.
Build or Deploy an Edge Node
From the Portal home page:
- Select one Edge Node.
- For the selected Edge Node, select a Blueprint (Rover or Unicycle) from the drop-down menu.
- Click on Upload button (in the Blueprint column), this will open a pop-up dialog
- Provide the edge site-specific details such as IP address, user, password.
- Click on Browse button, select the input file that supplies the input parameters as defined in ‘Edge Node Configuration - Rover (Single-Node Cluster)’ the input file is a property file that stores information in key-value format. Sample input file used for ‘Rover’ deploy: Rover.txt
- Click on Submit. This will save the input file and site details.
- When using the Unicycle blueprint, the Build button is enabled.
- Select Build to begin the build process.
- The Build status is updated to Build Complete, once the process is finished.
- Observe that the Deploy button is enabled.
- Select Deploy to begin the deploy process.
- The Deploy status is updated to Completed once the process is finished.
- When using the Rover Blueprint, the Deploy button is enabled.
- Click on Deploy to begin the deploy process.
- This process takes about an hour.
- User can click on Refresh (link) to update the status of the deploy on the portal.
- The deploy status changes from ‘Not started’ to ‘In progress’ to ‘Complete’
Tempest Tests
Prerequisites
Specifics around OpenStack are beyond the scope of this guide.
- Validate all OpenStack settings as needed.
- Ensure all necessary OpenStack services are up and running for a particular site.
- Use appropriate values for the OpenStack username, password, region, and desired timeout.
Running Tempest
- Navigate to ETE testing page using the side menu in the portal.
- Select a deployed site in the Run Tests page.
- Click on Run Tempest to trigger tempest test
- Test status gets updated to 'Complete', once the job gets completed.
Installing ONAP
Prerequisites
Specifics around ONAP are beyond the scope of this guide.
- Verify that a VLAN is created and can be used for OpenStack tenant VM
- The VLAN ID
- An IP (or a range of IP) that can be accessed from this VLAN
- Gateway, DNS, for the IP
- A public private key pair for accessing ONAP VM
- If the Edge Node is behind proxy, the proxy URL
- Obtain the OpenStack keystone admin password
Configuration
This configuration file is written as a YAML dictionary named parameters.
This dictionary will be selectively inserted into the ONAP VM environment file, depending on overall configuration.
Key Name | Notes | Example |
|---|---|---|
public_net_name | The name assigned to the OpenStack network that will be created and used by the ONAP VM. An existing network may be used by referencing its name here. | public_net_name: public |
public_physical_net_provider_name | The physical provider network name for the public network. CAUTION: If the physical provider network cannot be found, the automated deployment process will terminate with an error. | # Assume vlan50 is the VLAN created |
provider_segmentation_id | The VLAN tag of the physical provider network | # Assume vlan50 |
public_physical_net_type | The physical network type. Specify VLAN or flat. NOTE:When flat is in use, provider_segmentation_id will be ignored. | public_physical_net_type: vlan |
public_subnet_name | The subnet name. An existing subnet may be used by referencing its name here. | public_subnet_name: public-subnet |
public_subnet_cidr | The subnet’s CIDR. The ONAP VM will be assigned an IP within this subnet. | public_subnet_cidr: 192.168.102.0/24 |
public_subnet_allocation_start | The allocation start of the IP pool. Together with public_subnet_allocation_end it defines the range of IPs assigned to VMs. | public_subnet_allocation_start: 192.168.102.100 |
public_subnet_allocation_end | The allocation end of the IP pool. Together with public_subnet_allocation_start it defines the range of IPs assigned to VMs. | public_subnet_allocation_end: 192.168.102.200 |
public_subnet_dns_nameserver | The subnet's DNS server | public_subnet_dns_nameserver: 8.8.8.8 |
public_subnet_gateway_ip | The subnet's Gateway IP | public_subnet_gateway_ip: 192.168.102.1 |
flavor_name | VM flavor for the ONAP VM. The installation creates m1.onap, x1.onap, xx1.onap flavors, all of which are recommended for use. | flavor_name: x1.onap |
onap_vm_public_key | The public key used to access the ONAP VM. A URL pointing to the key may be used here. | onap_vm_public_key: PUBLIC_KEY |
http_proxy | Optional http proxy URL including port. If the network is accessible without a proxy, please leave empty. | http_proxy: http://proxy.yourdomain.com:8888 |
https_proxy | Optional https proxy URL including the port. If the network is accessible without a proxy, please leave empty. | https_proxy: https://proxy.yourdomain.com:8888 |
no_proxy | Optional list of domains, IPs, and CIDRs that do not require a proxy, separated by commas. Do not use spaces. If the network is accessible without a proxy, please leave empty. | no_proxy: 127.0.0.1 |
keystone_admin_password | The keystone admin password. | keystone_admin_password: XXXXXXXX |
onap_tenant_password | The keystone password for the ONAP project (formerly known as a tenant in OpenStack parlance). | onap_tenant_password: XXXXXXXX |
onap_artifacts_http_repo | Optional HTTP repository URL for ONAP artifacts. When deploying a self-contained Edge Node without Internet access, all ONAP artifacts must be downloaded from ONAP Nexus to a HTTP server, using this URL. If HTTP is not being used to download artifacts, please leave empty. | onap_artifacts_http_repo: http://192.168.102.220/onap |
Installation
- Navigate to the add-ons page via the sidebar menu.
- Select a deployed site on the Install ONAP page.
- Choose Install ONAP to begin installation.
- The ONAP status changes to Complete once the job is finished.
- ONAP VM will be created successfully after the job is finished. It takes several hours until ONAP becomes operational.
Onboarding a Sample VNF
- Navigate to the Akraino Sites page.
- Select a deployed site. The VNF Onboard button becomes enabled.
- Choose VNF Onboard and supply the VNF Type.
- Choose Onboard to begin the sample VNF installation.
The Sample VNF creates an Apache Traffic Server cache instance and a Locust load generator client instance in the OpenStack environment for the selected site. By default, the Sample VNF will create a heat stack name ats-demo. The heat stack will contain two instances named ats-demo-client and ats-demo-server. The default configuration of the server instance is to cache the Big Buck Bunny videos from the internet server and then serve the video to the client from its ramdisk. The heat stack will output the client and server URLs. The client URL will display the Locust load generator dashboard. The server URL will allow you to play the video in a browser.
OpenStack stack output show ats-demo --all
Field | Value |
|---|---|
| client_url | { "output_value": "http://192.168.48.223:8089/", } |
| client_ip | { "output_value": "192.168.48.223", } |
| server_url | { "output_value": "http://192.168.48.226:8080/bbb_sunflower_1080p_30fps_normal.mp4", } |
| server_ip | { "output_value": "192.168.48.226", } |