License
Deployment Architecture
Pre-Installation Requirements
Hardware Requirements
Network Requirements
Bare Metal Node Requirements
- Software Requirements
Installation High-Level Overview
Install Local Controller
Creating CRDs for Bare Metal Hosts
Running
Virtual Deployment Guide
Standard Deployment Overview
Snapshot Deployment Overview
Special Requirements for Virtual Deployments
Install Jump Host
Verifying the Setup - VMs
Upstream Deployment Guide
Upstream Deployment Key Features
Special Requirements for Upstream Deployments
Scenarios and Deploy Settings for Upstream Deployments
Including Upstream Patches with Deployment
Running
Interacting with Containerized Overcloud
Verifying the Setup as defined in the Akraino validation feature project plus any additional testing specific to the blue print
Developer Guide and Troubleshooting
Utilization of Images
Post-deployment Configuration
Debugging Failures
Reporting a Bug
Uninstall Guide
Troubleshooting
Error Message Guide
Maintenance
Blue Print Package Maintenance
- Software maintenance
- Hardware maintenance
- Blue Print Deployment Maintenance
Frequently Asked Questions
License
References
Definitions, acronyms and abbreviations
Introduction
ICN strives to automate the process of installing the local cluster controller to the greatest degree possible–"zero touch installation". Most of the work is done simply by booting up the jump host (Local Controller) from the ISO image. Once booted, the controller is fully provisioned and begins to inspect and provision baremetal servers, until the cluster is entirely configured.
License
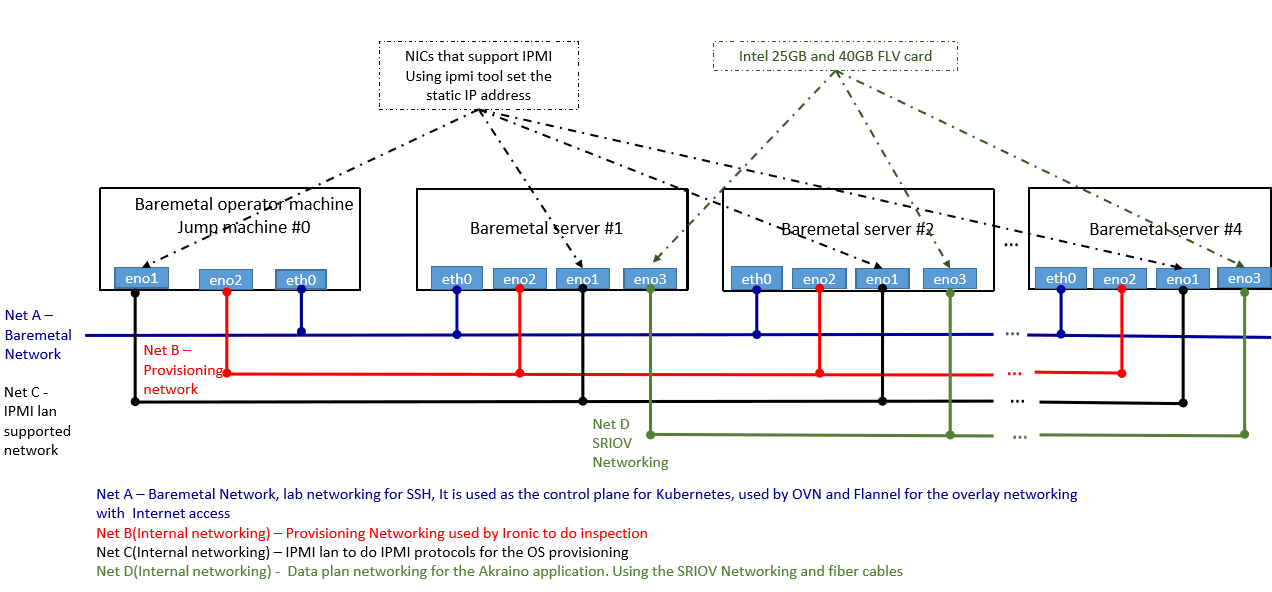
Deployment Architecture
The local controller is provisioned with the Metal3 Baremetal Operator and Ironic, which enable provisioning of Baremetal servers. The controller has three network connections to the baremetal servers: network A connects baremetal servers (to internet?), network B is a private network used for provisioning the baremetal servers, and network C is the IPMI network, used for control during provisioning. In addition, the baremetal hosts connect to the network D, the SRIOV network.
Pre-installation Requirements
Hardware Requirements
(add cpu/memory requirement)
Local controller: at least three network interfaces.
Baremetal hosts: four network interfaces, including one IPMI interface.US
Four or more hubs, with cabling, to connect four networks.
Software Requirements:
ICN ISO (on bootable device, e.g., USB flash drive)
Images for provisioning bare metal hosts
Installation High-Level Overview
Connect Local Controller to baremetal hosts as described in Deployment Architecture section.
Install software for Local Controller, by booting from ICN ISO device.
Virtual Deployment
Kubernetes Dashboard
Kubernetes Dashboard runs on the Local Controller. It is accessed via a web browser. kubectl proxy should be running. The Dashboard is brought up by with the dashboard-deployment yaml file. This file must refer to the images in the local Docker repository (see "spec: container: image:"). There should also be a K8S service account created for an admin-user. The token for Dashboard login is created from the admin-user secrets.
To re-create a token for Dashboard authentication:
Authentication/authorization is provided through the admin-user ServiceAccount permissions, which has a ClusterRoleBinding to cluster-admin. The token can be extracted from the admin-user secret with the kubectl command, i.e., find the admin-user secret and describe it:
kubectl describe secret -n kube-system $(kubectl get secrets -n kube-system | grep admin-user | cut -d " " -f1)
Then copy the string following "token: " into the login input on the Dashboard.
Logging in to Dashboard:
Copy the token from the Dashboard directory into the logon screen to log in. Once logged in, all resources can be viewed by clicking on the links on the left-hand panel.
In order to create resources, for example, click the '+' in the top panel, select 'create from file', and navigate to the location of the yaml of the resource to create. BareMetalHosts can be provisioned in this way.
Remote Access:
If accessing the Dashboard from a location other than the Local Controller, the pkcs12 certificate must be imported into the browser. The Dashboard is accessed via the following URL (note–if the namespace or name of the dashboard is changed, the URL must match):
To re-create a certificate for browser remote access:
The pkcs12 certificate is created from the certificate and key data in the kubeadm config file on the Local Controller (/root/.kube/config). To create a certificate, run:
grep 'client-certificate-data' ~/.kube/config | head -n 1 | awk '{print $2}' | base64 -d >> kubecfg.crt
grep 'client-key-data' ~/.kube/config | head -n 1 | awk '{print $2}' | base64 -d >> kubecfg.key
openssl pkcs12 -export -clcerts -inkey kubecfg.key -in kubecfg.crt -out kubecfg.p12 -name "kubernetes-client"
The kubecfg.p12 file is then imported into the browser on the remote machine.
Local Access:
On the Local Controller, the Dashboard is available at localhost:8001/api/v1/namespaces/kube-system/services/https:kubernetes-dashboard:/proxy/
(is a browser installed?)