Introduction
This document describes the construction, compilation and use of anbox Android container environment. Describes the environment configuration, code download, build and how to use it.
How to use this document
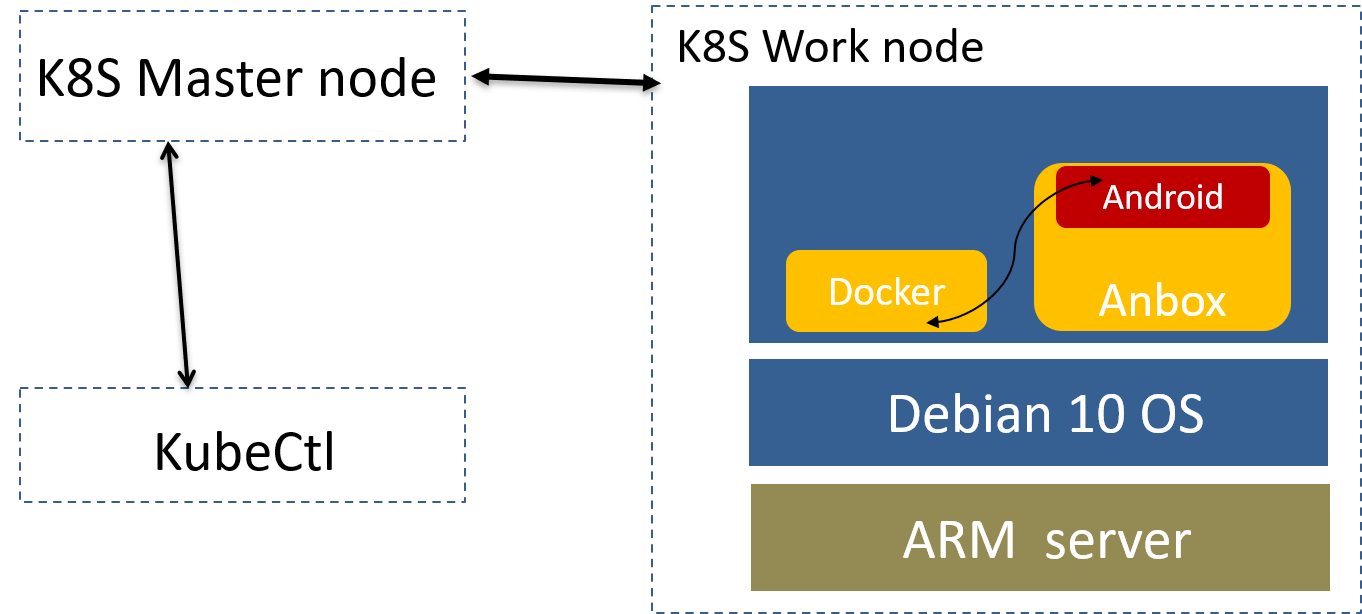
Deployment Architecture
Pre-Installation Requirements
Hardware Requirements
Processor model | 2*Kunpeng 920 processor |
RAM | 16*DDR4-2933 |
Storage | 10*2.5 inch SAS/SATA/SSD or 8*2.5 inch NVMe SSD |
Network | 1 onboard network card, each card supports 4*GE port or 4*10GE port or 4*25GE port |
Power Supply | Power 100~240V AC,240V DC |
Scale | 447 mm x 490 mm x 86.1 mm |
ARM Server satisfies the Arm Server Ready certified.
- Software Perequisites
N/A
- Database Perequisites
schema scripts: N/A
- Other Installation Requirements
- Jump Host Requirements:N/A
- Network Requirements: N/A
- Bare Metal Node Requirements :N/A
- Execution Requirements (Bare Metal Only) :N/A
Installation High-Level Overview
Bare Metal Deployment Guide
Install Bare Metal Jump Host : N/A
Creating a Node Inventory File: N/A
Creating the Settings Files: N/A
Running: N/A
Virtual Deployment Guide
- Install Debian 10 OS on Server
Get Os Image from https://cdimage.debian.org/debian-cd/current/arm64/iso-cd/
- Install kubectl on Linux
Install kubectl binary with curl on Linux
- Download the latest release with the command:
To download a specific version, replace thecurl -LO https://storage.googleapis.com/kubernetes-release/release/`curl -s https://storage.googleapis.com/kubernetes-release/release/stable.txt`/bin/linux/amd64/kubectl$(curl -s https://storage.googleapis.com/kubernetes-release/release/stable.txt)portion of the command with the specific version.For example, to download version v1.18.0 on Linux, type:curl -LO https://storage.googleapis.com/kubernetes-release/release/v1.18.0/bin/linux/amd64/kubectl - Make the kubectl binary executable.
chmod +x ./kubectl - Move the binary in to your PATH.
sudo mv ./kubectl /usr/local/bin/kubectl - Test to ensure the version you installed is up-to-date:
kubectl version --client Install Anbox
Anbox is a free and open-source compatibility layer that aims to allow mobile applications and mobile games developed for Android to run on GNU/Linux distributions.
To install Anbox your system need to support snaps. We do not officially support any other distribution method of Anbox at the moment but there are community made packages for various distributions (e.g. Arch Linux). However please keep in mind that the Anbox project can give not support them and its solely in the responsibility of the community packager to keep up with upstream development and update the packaging to any new changes. Please feel free to report still any bugs you encounter as they may not be related to the packaging.If you don’t know about snaps yet head over to snapcraft.io to get an introduction of what snaps are, how to install support for them on your distribution and how to use them.The installation of Anbox consists of two steps.
- Install necessary kernel modules
- Install the Anbox snap
1、Install kernel modules
To install the necessary kernel modules, please read Install Kernel Modules.
After correct installation you should have two new nodes in your systems /dev directory:
$ ls -1 /dev/{ashmem,binder}
/dev/ashmem
/dev/binder
2、Install the Anbox snap
The second step will install the Anbox snap from the store and will give you everything you need to run the full Anbox experience.
Installing the Anbox snap is very simple:
$ snap install --devmode --beta anbox
If you didn’t logged into the Ubuntu Store yet, the snap command will ask you to use sudo snap … in order to install the snap:
$ sudo snap install --devmode --beta anbox
At the moment we require the use of –devmode as the Anbox snap is not yet fully confined. Work has started with the upstream snapd project to get support for full confinement.
As a side effect of using –devmode the snap will not automatically update. In order to update to a newer version you can run:
$ snap refresh --beta --devmode anbox
Information about the currently available versions of the snap is available via:
$ snap info anbox
- Standard Deployment Overview :N/A
- Snapshot Deployment Overview:N/A
- Special Requirements for Virtual Deployments
- Install Jump Host: N/A
- Verifying the Setup - VMs:N/A
Upstream Deployment Guide
- Upstream Deployment Key Features :N/A
- Special Requirements for Upstream Deployments :N/A
- Scenarios and Deploy Settings for Upstream Deployments :N/A
- Including Upstream Patches with Deployment:N/A
- Running: N/A
- Interacting with Containerized Overcloud: N/A
Verifying the Setup as defined the Akraino validation feature project plus any additional testing specific to the blue print
Developer Guide and Troubleshooting
- Utilization of Images
N/A
- Post-deployment Configuration
N/A
- Debugging Failures
N/A
- Reporting a Bug
N/A
Uninstall Guide
The following method only uses snap to install Anbox. If you want to delete Anbox from the system, you must first delete snap.
Attention:Remove all data stored in the snapshot from the system:
$ snap remove anbox
After deleting the snapshot, you must also delete the installed kernel modules (if installed):
$ sudo apt install ppa-purge
$ sudo ppa-purge ppa:morphis/anbox-support
Upon completion, Anbox will be removed from your system.
Troubleshooting
If kernels modules successfully loaded, service is running fine, and yet Anbox won't launch with
Application manager service is not running yet. Check for the messageNo space left on device - Failed to enter cgroupin/var/lib/anbox/logs/container.log, you may be running into see this issue: https://github.com/lxc/lxd/issues/6257
Maintenance
Blue Print Package Maintenance
- Software maintenance: N/A
- Hardware maintenance:N/A
Blue Print Deployment Maintenance :N/A
Frequently Asked Questions
N/A
License
N/A
References
N/A
Definitions, acronyms and abbreviations
N/A