Introduction
This document describes steps required to deploy a sample environment for the Public Cloud Edge Interface (PCEI) Blueprint.
License
TBD
Deployment Architecture
The deployment architecture is shown below. All Addressing and naming shown are for example purposes only.
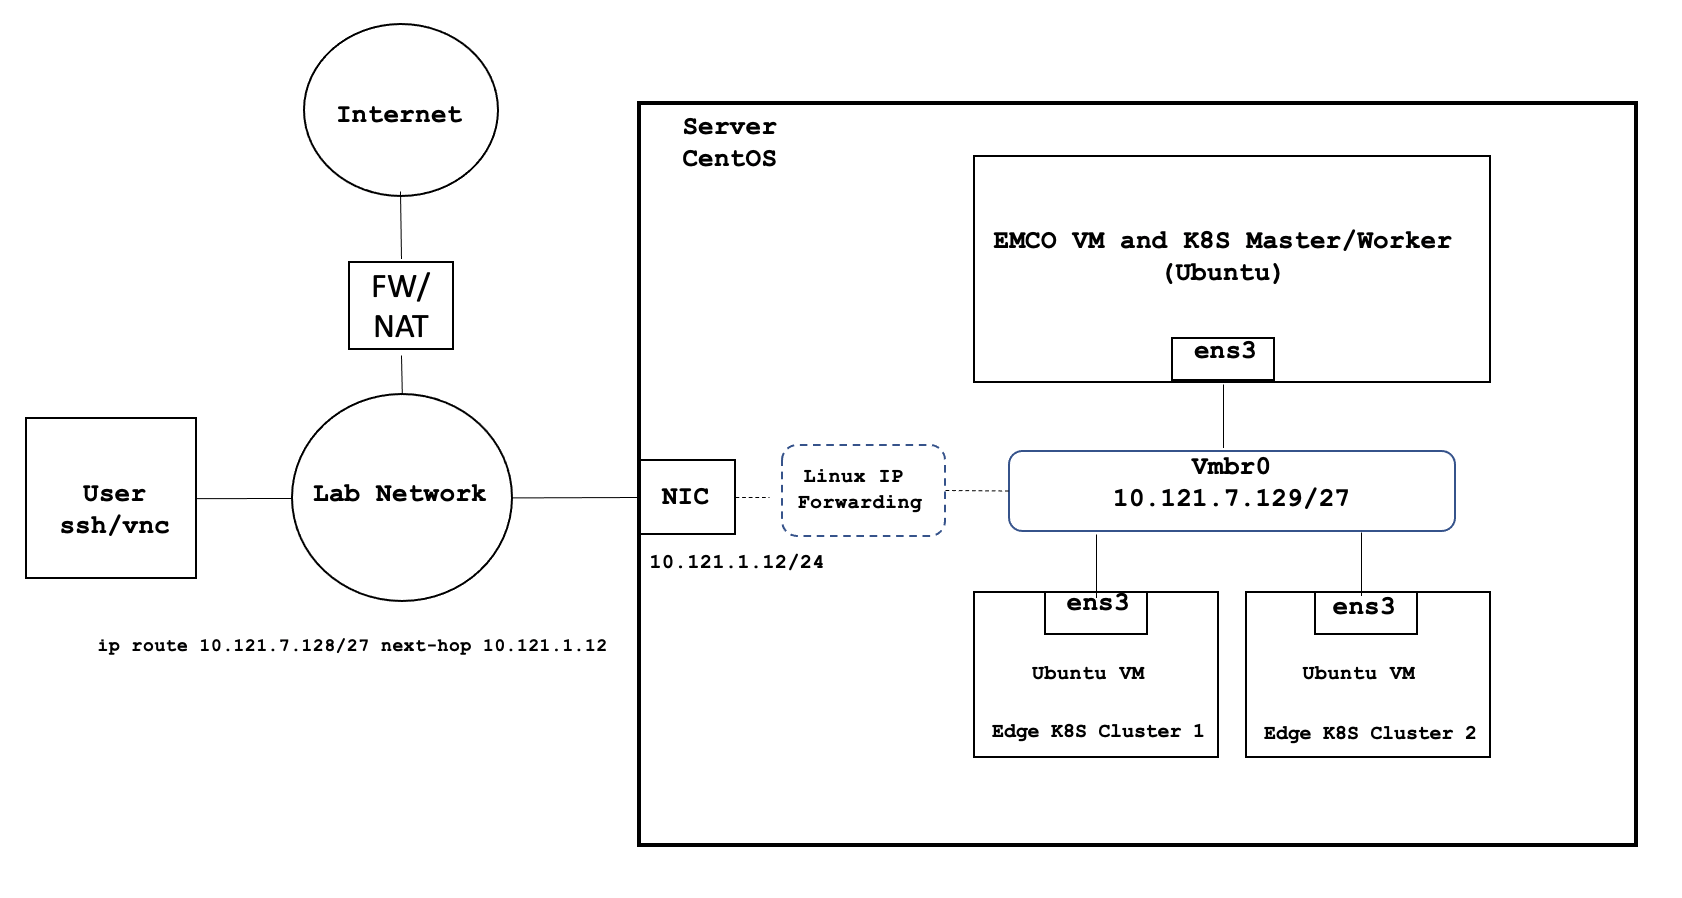
Deployment environment components:
- One Host Server
- One Edge Multi-Cluster Orchestrator VM
- Two Edge K8S Cluster VMs
- Internal network connectivity to the Host Server and to the VMs
Pre-Installation Requirements
Recommended Hardware Requirements
| Requirement | Value |
|---|---|
| CPU | 18 Core / 36 vCPU |
| RAM | 128 GB |
| DISK | 500 GB |
| NETWORK | 1Gbps NIC Port |
Network Requirements
- Internal Lab Network (RFC 1918 space)
- Internet access (NAT'd)
- IP routing in the Lab Network to reach VM interfaces
Software Prerequisites
| Requirement | Value |
|---|---|
| Server OS | CentOS 7.x or above |
| VM OS | Ubuntu 18.04 |
| Upstream SW | Refer to Deployment Guide Section |
Installation High-Level Overview
The installation/deployment process consists of the following steps:
- Install CentOS on Host Server.
- Prepare Host Server for EMCO Deployment.
- Deploy EMCO.
Deployment Guide
Install CentOS on Host Server
- Connect to Host Server iLO interface.
- Start Virtual Console.
- Mount Virtual Media with CentOS 7 ISO.
- Install CentOS
- Assign correct IP address, Subnet, Gateway and DNS to the NIC.
- Include OpenSSH Server.
- Install KVM/virtualization.
Prepare Host Server for EMCO Deployment
Step 1. Enable sudo without entering sudo password
sudo -i
visudo
# Uncomment the line below
%wheel  ALL=(ALL)       NOPASSWD: ALL
Step 2. Add sudo user to wheel group:
usermod –aG wheel onaplab
Step 3. Enable nested virtualization
# Login as super user
sudo -i

# Check for the following parameter
cat /sys/module/kvm_intel/parameters/nested
N
# If it is Y, there is nothing else to be done. It is already enabled!

# If it is N, do the following:
# Edit /etc/default/grub file, and include kvm-intel.nested=1
GRUB_CMDLINE_LINUX parameter
GRUB_CMDLINE_LINUX="crashkernel=auto
console=ttyS0,38400n8,kvm-intel.nested=1"

# Rebuild your GRUB configuration
sudo grub2-mkconfig -o /boot/grub2/grub.cfg

# Enable nested KVM capabilities in /etc/modprobe.d/kvm.conf
# By uncommenting the below line

options kvm_intel nested=1

### Reboot the server
reboot

# Now, we should have the nested KVM capabilities enabled
cat /sys/module/kvm_intel/parameters/nested
Y
Step 4. Install VNC Server
Follow instructions at:
https://www.tecmint.com/install-and-configure-vnc-server-in-centos-7/
Step 5. Modify libvirt bridge IP and route mode
This will allow connecting to VMs and pods directly from the Lab Network. Please replace the sample IPs with your IP addresses.
cat <<\EOF >> netdefault.xml
<network>
  <name>default</name>
  <bridge name="vmbr0"/>
  <forward mode='route' dev='eno24'/>
 # <forward/>
  <ip address="10.121.7.129" netmask="255.255.255.224">
    <dhcp>
      <range start="10.121.7.144" end="10.121.7.158"/>
    </dhcp>
  </ip>
</network>
EOF

sudo virsh net-list
sudo virsh net-destroy default
sudo virsh net-undefine default
sudo virsh net-define netdefault.xml
sudo virsh net-start default
sudo virsh net-autostart default
Add necessary routes to your Lab Network routers. The example below assumes the the Host Server IP address is 10.121.1.12:
ip route 10.121.7.128 255.255.255.224 10.121.1.12