Introduction
This document describes steps required to deploy a sample environment for the Public Cloud Edge Interface (PCEI) Blueprint.
License
TBD
Deployment Architecture
The deployment architecture is shown below. All Addressing and naming shown are for example purposes only.
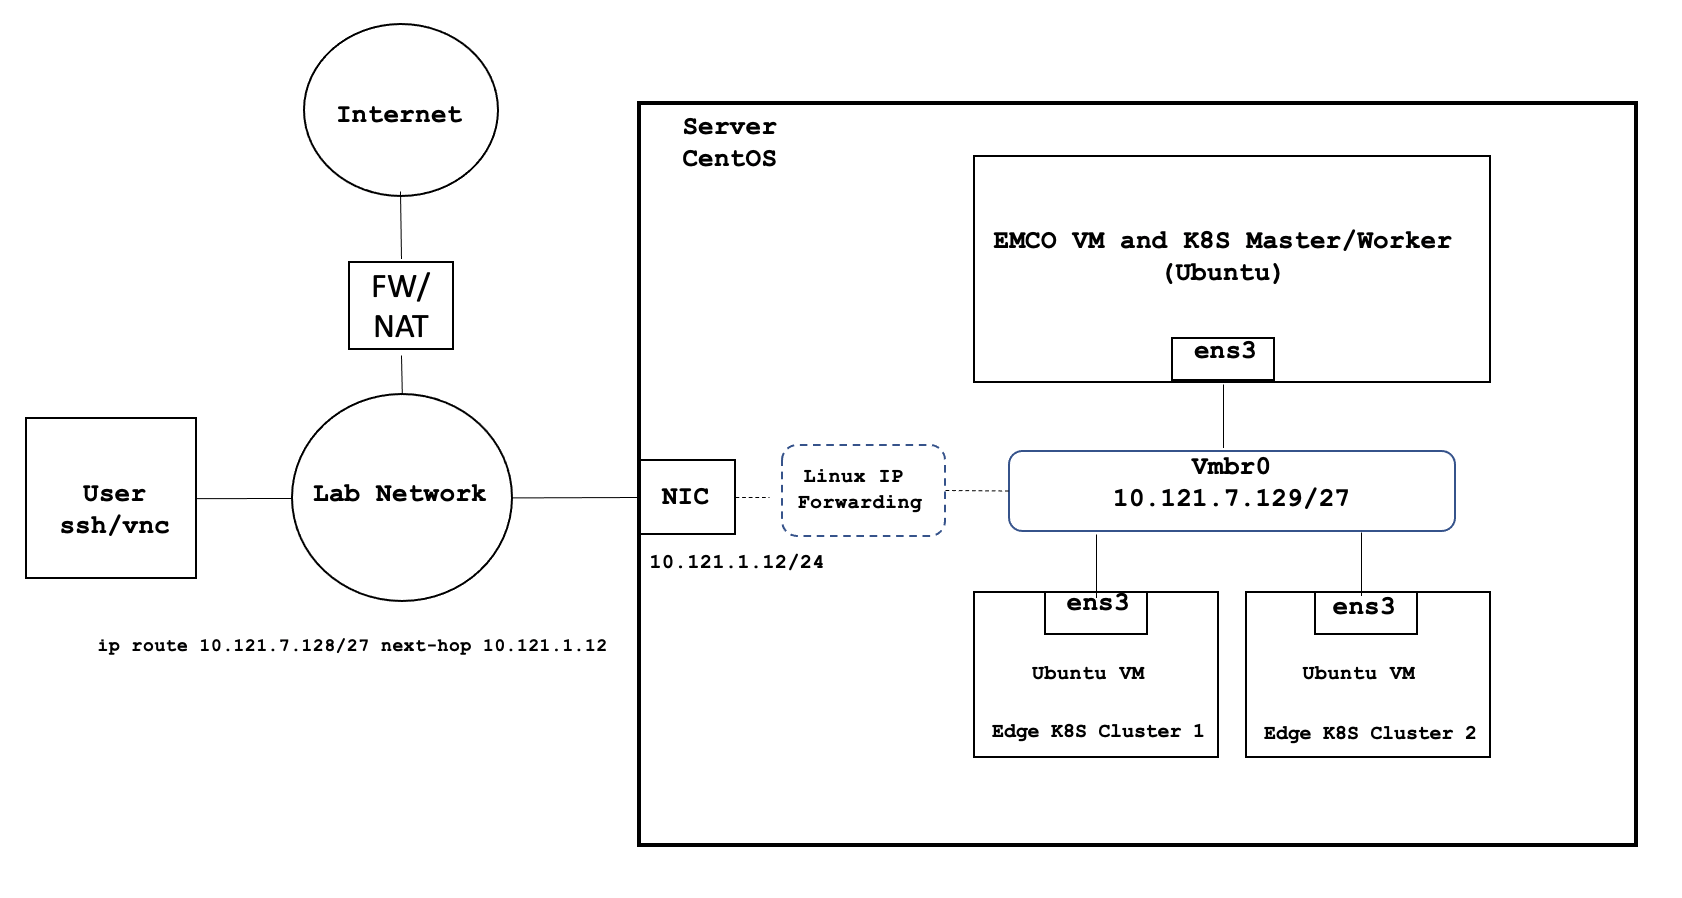
Deployment environment components:
- One Host Server
- One Edge Multi-Cluster Orchestrator VM
- Two Edge K8S Cluster VMs
- Internal network connectivity to the Host Server and to the VMs
Pre-Installation Requirements
Recommended Hardware Requirements
| Requirement | Value |
|---|---|
| CPU | 18 Core / 36 vCPU |
| RAM | 128 GB |
| DISK | 500 GB |
| NETWORK | 1Gbps NIC Port |
Network Requirements
- Internal Lab Network (RFC 1918 space)
- Internet access (NAT'd)
- IP routing in the Lab Network to reach VM interfaces
Software Prerequisites
| Requirement | Value |
|---|---|
| Server OS | CentOS 7.x or above |
| VM OS | Ubuntu 18.04 |
| Upstream SW | Refer to Deployment Guide Section |
Installation High-Level Overview
The installation/deployment process consists of the following steps:
- Install CentOS on Host Server.
- Prepare Host Server for EMCO Deployment.
- Deploy EMCO.
Deployment Guide
Install CentOS on Host Server
- Connect to Host Server iLO interface.
- Start Virtual Console.
- Mount Virtual Media with CentOS 7 ISO.
- Install CentOS
- Assign correct IP address, Subnet, Gateway and DNS to the NIC.
- Include OpenSSH Server.
- Install KVM/virtualization.
- Add a user with admin privileges: onaplab user is used in this guide.
Prepare Host Server for EMCO Deployment
Step 1. Enable sudo without entering sudo password
sudo -i
visudo
# Uncomment the line below
%wheel  ALL=(ALL)       NOPASSWD: ALL
Step 2. Add sudo user to wheel group:
usermod –aG wheel onaplab
Step 3. Enable nested virtualization
# Login as super user
sudo -i

# Check for the following parameter
cat /sys/module/kvm_intel/parameters/nested
N
# If it is Y, there is nothing else to be done. It is already enabled!

# If it is N, do the following:
# Edit /etc/default/grub file, and include kvm-intel.nested=1
GRUB_CMDLINE_LINUX parameter
GRUB_CMDLINE_LINUX="crashkernel=auto
console=ttyS0,38400n8,kvm-intel.nested=1"

# Rebuild your GRUB configuration
sudo grub2-mkconfig -o /boot/grub2/grub.cfg

# Enable nested KVM capabilities in /etc/modprobe.d/kvm.conf
# By uncommenting the below line

options kvm_intel nested=1

### Reboot the server
reboot

# Now, we should have the nested KVM capabilities enabled
cat /sys/module/kvm_intel/parameters/nested
Y
Step 4. Install VNC Server
Follow instructions at:
https://www.tecmint.com/install-and-configure-vnc-server-in-centos-7/
Step 5. Modify libvirt bridge IP and route mode
This will allow connecting to VMs and pods directly from the Lab Network. Please replace the sample IPs with your IP addresses.
cat <<\EOF >> netdefault.xml
<network>
  <name>default</name>
  <bridge name="vmbr0"/>
  <forward mode='route' dev='eno24'/>
 # <forward/>
  <ip address="10.121.7.129" netmask="255.255.255.224">
    <dhcp>
      <range start="10.121.7.144" end="10.121.7.158"/>
    </dhcp>
  </ip>
</network>
EOF

sudo virsh net-list
sudo virsh net-destroy default
sudo virsh net-undefine default
sudo virsh net-define netdefault.xml
sudo virsh net-start default
sudo virsh net-autostart default
Add necessary routes to your Lab Network routers. The example below assumes the the Host Server IP address is 10.121.1.12:
ip route 10.121.7.128 255.255.255.224 10.121.1.12
Deploy EMCO
Step 1. Generate SSH Keys
# Run commands below on the Host Server
ssh-keygen
cd ~/.ssh
chmod 600 id_rsa
chmod 600 id_rsa.pub
chmod 700 config
chmod 600 known_hosts

cat id_rsa.pub >> authorized_keys
chmod 600 authorized_keys
Step 2. Download software and install EMCO
Note that the install process will:
- Deploy a VM amcop-vm-01
- Create a K8S cluster inside the VM
- Deploy EMCO components on the K8S cluster
- Deploy ONAP components on the K8S cluster
#### On the Host Server

sudo yum install -y git deltarpm
mkdir -p amcop_deploy
cd amcop_deploy

## Download zip file from
https://drive.google.com/file/d/1aFtChA454uAMuoEyV4m-jWiRDrZGyYgx/view?usp=sharing

unzip amcop_install_v1.0.zip

cd ~/amcop_deploy/aarna-stream/util-scripts
./prep_baremetal_centos.sh


####### Install EMCO/AMCOP
# Edit inventory.ini file. Use IP address of Host Server and the username.

cd ~/amcop_deploy/aarna-stream/anod_lite/ansible/deployment
vi inventory.ini
[deployment_host]
10.121.1.12 ansible_user=onaplab


nohup ansible-playbook ./main.yml -i inventory.ini -e deployment_env=on-prem -e jump_host_user=onaplab --private-key=/home/onaplab/.ssh/id_rsa -e vm_user=onaplab &
Step 3. Monitor the installation
# On the Host Server

cd /home/onaplab/aarna-stream/anod_lite/logs
[onaplab@os12 logs]$ ls -l
total 1980
-rw-r--r--. 1 root    root     510417 Nov 24 07:06 cluster_setup.log
-rw-r--r--. 1 root    root       2019 Nov 24 06:54 create_vm.log
-rw-r--r--. 1 root    root    1366779 Nov 24 07:15 deploy_emco_components.log
-rw-r--r--. 1 root    root     138233 Nov 24 07:35 deploy_onap.log
-rw-rw-r--. 1 onaplab onaplab      83 Nov 24 06:53 README.md

tail -f create_vm.log

tail -f cluster_setup.log

tail -f deploy_emco_components.log

tail -f deploy_onap.log
If Install fails and you need to restart, please do the cleanup steps below on the Host Server.
sudo virsh destroy amcop-vm-01
sudo virsh undefine amcop-vm-01
sudo virsh pool-destroy amcop-vm-01
sudo virsh pool-undefine amcop-vm-01
sudo rm /var/lib/libvirt/images/amcop-vm-01/amcop-vm-01-cidata.iso
sudo rm /var/lib/libvirt/images/amcop-vm-01/amcop-vm-01.qcow2
Deploy Edge Clusters
Step 1. Edit VM creation script.
# On the Host Server
cd /home/onaplab/amcop_deploy/aarna-stream/util-scripts

# Add "-cpu host" option to the end of the below line
vi create_qem_vm.sh

virt-install --connect qemu:///system --name $vm_name --ram $(($mem << 10)) --vcpus=$vCPU --os-type linux --os-variant $os_variant --disk path=/var/lib/libvirt/images/$vm_name/"$vm_name".qcow2,format=qcow2 --disk /var/lib/libvirt/images/$vm_name/$vm_name-cidata.iso,device=cdrom --import --network network=default --noautoconsole —cpu host

# Save the file
Step 2. Deploy two Edge Cluster VMs.
These commands will create two Ubuntu 18.04 VMs with 100G Disk, 8 vcpu and 16G RAM and will copy the contents of the ~/.ssh/id_rsa.pub key file from the Host Server to the VMs' ~/.ssh/authorized_keys file.
sudo ./create_qem_vm.sh 2 edge_k8s-1 100 8 16 ubuntu18.04 $HOME/.ssh/id_rsa.pub onaplab
sudo ./create_qem_vm.sh 2 edge_k8s-2 100 8 16 ubuntu18.04 $HOME/.ssh/id_rsa.pub onaplab
Step 3. Setup worker clusters inside VMs
# Find VM's IP addresses. On the Host Server run:
[onaplab@os12 ~]$ sudo virsh list --all
 Id    Name                           State
----------------------------------------------------
 6     amcop-vm-01                    running
 9     edge_k8s-1                     running
 10    edge_k8s-2                     running

[onaplab@os12 ~]$ sudo virsh domifaddr edge_k8s-1
 Name       MAC address          Protocol     Address
-------------------------------------------------------------------------------
 vnet1      52:54:00:19:96:72    ipv4         10.121.7.152/27

[onaplab@os12 ~]$
[onaplab@os12 ~]$ sudo virsh domifaddr edge_k8s-2
 Name       MAC address          Protocol     Address
-------------------------------------------------------------------------------
 vnet2      52:54:00:c0:47:8b    ipv4         10.121.7.146/27

# ssh to each VM from the Host Server:
ssh -i ~/.ssh/id_rsa.pub onaplab@10.121.7.152
ssh -i ~/.ssh/id_rsa.pub onaplab@10.121.7.146

# Perform the following tasks in each VM:
sudo apt-get update -y
sudo apt-get upgrade -y

sudo apt-get install -y python-pip

git clone https://git.onap.org/multicloud/k8s/
# Run script to setup KUD clusters

nohup k8s/kud/hosting_providers/baremetal/aio.sh
If the edge cluster deployment fails for any reason, please do the clean up steps below before you retry:
### Cleanup
sudo virsh destroy  edge_k8s-1
sudo virsh undefine  edge_k8s-1
sudo virsh pool-destroy  edge_k8s-1
sudo virsh pool-undefine  edge_k8s-1
sudo rm /var/lib/libvirt/images/edge_k8s-1/edge_k8s-1-cidata.iso
sudo rm /var/lib/libvirt/images/edge_k8s-1/edge_k8s-1.qcow2

sudo virsh destroy  edge_k8s-2
sudo virsh undefine  edge_k8s-2
sudo virsh pool-destroy  edge_k8s-2
sudo virsh pool-undefine  edge_k8s-2
sudo rm /var/lib/libvirt/images/edge_k8s-2/edge_k8s-2-cidata.iso
sudo rm /var/lib/libvirt/images/edge_k8s-2/edge_k8s-2.qcow2