PLEASE REFER TO R1 NETWORK CLOUD RELEASE DOCUMENTATION
NC Family Documentation - Release 1
THIS DOCUMENTATION WILL BE ARCHIVED
Contents
Introduction
This document describes the steps to create a single and multi-node edge sites.
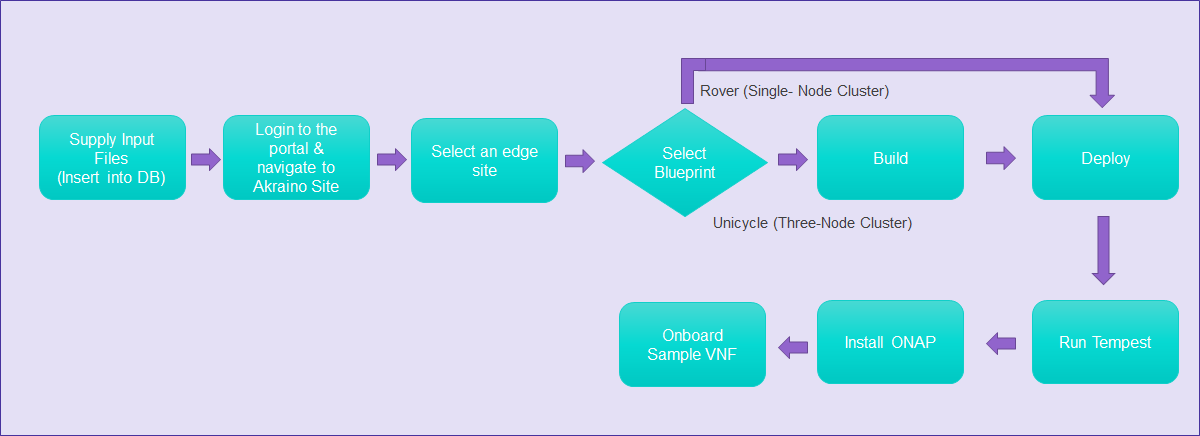
Unicycle (Three-Node Cluster) - Supported in the future release
Akraino Portal Operations
Login
Visit the portal URL http://REGIONAL_NODE_IP:8080/AECPortalMgmt/ where REGIONAL_NODE_IP is the Portal IP.
Use the following credentials:
- Username: akadmin
- Password: akraino
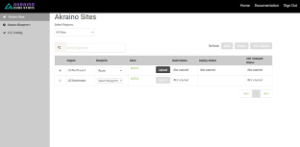
Upon successful login, the Akraino Portal home page will appear.
Deploy an Edge Site Based on a Rover Blueprint
From the Portal home page:
- Select an Edge Site MTN1 or MTN2 (these are the two default lab sites hosted in middle town NJ) by clicking on radio button provided in the first column of the table.
- For the selected Edge Site, select a Rover Blueprint from the drop-down menu.
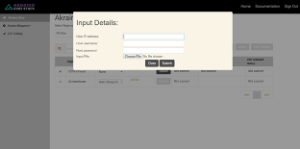
- Click on Upload button (in the Sites column), this will open a pop-up dialog
- Provide the edge site-specific details such as:
- Host IP address
Host username
Host password.
Click on Browse button, select the input file for Blueprint - Rover (Single-Node Cluster).
The input file is a property file that stores information inkey-valueformat. Sample input file used for ‘Rover’ deploy:Copy and paste the below contents in to a file, and save it as rover.txt. Use this file for uploading as mentioned in step 4.d above.
Verify the configuration details as applicable to your environment. For more details refer to Appendix - Edge Site Configuration
rover.txt# Copyright 2018 AT&T Intellectual Property. All other rights reserved. # # Licensed under the Apache License, Version 2.0 (the "License"); # you may not use this file except in compliance with the License. # You may obtain a copy of the License at # # http://www.apache.org/licenses/LICENSE-2.0 # # Unless required by applicable law or agreed to in writing, software # distributed under the License is distributed on an "AS IS" BASIS, # WITHOUT WARRANTIES OR CONDITIONS OF ANY KIND, either express or implied. # See the License for the specific language governing permissions and # limitations under the License. # Add proxy settings if required for your environment # export http_proxy=http://your.proxy.com:8080/ # export https_proxy=http://your.proxy.com:8080/ # # host name for server SRV_NAME=aknode45 # server oem - Dell or HPE (case sensitive) SRV_OEM=Dell # out of band interface information for server (idrac/ilo/etc) SRV_OOB_IP=192.168.41.45 SRV_OOB_USR=root SRV_OOB_PWD=calvin # mac address of server to be used during the build - not required for Dell servers # SRV_MAC=3c:fd:fe:b8:10:60 # name of network interface used during build when ipxe.efi is booted and when os is booted # ipxe numbers ports from 0-n in pci bus order. # the netx value will depend on how many nics are in the server # and which pci device number is assigned to the slot SRV_IPXE_INF=net8 # the build interface is the nic used by the Ubuntu installed to load the OS SRV_BLD_INF=enp135s0f0 # the boot device is the device name on which the OS will be loaded SRV_BOOT_DEVICE=sdg # ipxe script to use - based on the os version and kernel to install # valid options are script-hwe-16.04.5-amd64.ipxe or script-16.04.5-amd64.ipxe SRV_BLD_SCRIPT=script-hwe-16.04.5-amd64.ipxe # template xml file to set bios and raid configuration settings SRV_BIOS_TEMPLATE=dell_r740_g14_uefi_base.xml.template SRV_BOOT_TEMPLATE=dell_r740_g14_uefi_httpboot.xml.template SRV_HTTP_BOOT_DEV=NIC.Slot.7-1-1 # tempalte to run to configure OS after first boot # current options are: firstboot.sh.template, firstboot-genesis.sh.tempate or firstboot-airship-iab.sh.template SRV_FIRSTBOOT_TEMPLATE=firstboot.sh.template # VLAN to use during build and for final network configuration SRV_VLAN=41 # basic network information for dhcp config and final server network settings SRV_MTU=9000 SRV_IP=192.168.2.45 SRV_SUBNET=192.168.2.0 SRV_NETMASK=255.255.255.0 SRV_GATEWAY=192.168.2.200 SRV_DNS=192.168.2.85 SRV_DOMAIN=lab.akraino.org SRV_DNSSEARCH=lab.akraino.org SRV_NTP=ntp.ubuntu.org # root password for server being built SRV_PWD=akraino,d # network bond information SRV_BOND=bond0 SRV_SLAVE1=enp135s0f0 SRV_SLAVE2=enp135s0f1
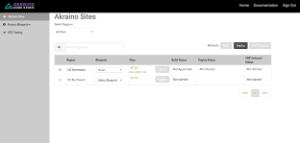
5. Click on Submit. This will upload the input file and the site details into the portal.
6. User will see the file uploaded successfully message in the sites column then Deploy button is enabled.
a. Click on Deploy to begin the deploy process.
b. This process takes about an hour.
c. User can click on Refresh (link) to update the status of the deploy on the portal.
d. The deploy status changes from ‘Not started’ to ‘In progress’ to ‘Complete’
7. User can additionally check the log files to track the progress of edge site installation, by logging into the regional_node_ip via ssh, and running this command: tail -f /var/log/akraino/scriptexecutor.log
Tempest Tests
Prerequisites
Specifics around OpenStack are beyond the scope of this guide.
- Validate all OpenStack settings as needed.
- Ensure all necessary OpenStack services are up and running for a particular site.
- Use appropriate values for the OpenStack username, password, region, and desired timeout.
Running Tempest
- Navigate to ETE testing page using the left navigation menu in the portal.
- Select a deployed edge site in the Run Tests page, by clicking the radio button in the GUI table displayed. This will enable the "Run Tempest" button.
- Click on "Run Tempest" to trigger the tempest test on the deployed edge site.
- Test status shows "In Progress" upon successful invocation.
- Test status gets updated to 'Complete', once the job gets completed.
Installing ONAP
Prerequisites
Specifics around ONAP are beyond the scope of this guide.
- Verify that a VLAN is created and can be used for OpenStack tenant VM
- The VLAN ID
- An IP (or a range of IP) that can be accessed from this VLAN
- Gateway, DNS, for the IP
- A public private key pair for accessing ONAP VM
- If the Edge Node is behind proxy, the proxy URL
- Obtain the OpenStack keystone admin password
Installation
- Navigate to the Akraino Blueprint > Add-Ons page via the left navigation menu.
- Select a deployed edge site on the Install ONAP page.
- Click on Upload button (in the sites column), this will open a pop-up dialog
Click on Browse button, select the input file for ONAP (parameters.env file).
The input file is a property file that stores information inkey=valueformat. Sample input file used for ONAP:Copy and paste the below contents in to a file, and save it as parameters.env. Use this file for uploading as mentioned in step 4 above.
Verify the configuration details as applicable to your environment. For more details refer to Appendix - ONAP Configuration
parameters.env# Parameters that will be populated by camunda engine parameters: public_net_name: public public_physical_net_provider_name: bond0 provider_segmentation_id: 50 public_physical_net_type: vlan public_subnet_name: public public_subnet_cidr: 172.24.8.0/24 public_subnet_allocation_start: 172.24.8.221 public_subnet_allocation_end: 172.24.8.225 public_subnet_dns_nameserver: 8.8.8.8 public_subnet_gateway_ip: 172.24.8.1 flavor_name: m1.onap onap_vm_public_key: ssh-rsa AAAAB3NzaC1yc2EAAAADAQABAAABAQCWcbAk6SJxvYf4CM75JGWsQ38149Fhu4dUXUmnmASFWuvPJ6sCpoGyMPQdEMEt3wITCFGfS4gw6eQO39NUaS4JqWYjNN6sejernldwyqGwz42H/rn7CL0xhbCql9upWF+2bm5X46UgSwZBYcLxW0BrOh+0lxkON+2qOGZFbtEcOUeOVmRSJdBuxczyGD5i6zusITJ00scqfNTCyRLm8JiHlW9SY43iyj3Lq0cDxYQ97fKX2F+0D/JfnWPu/2v+HaJWDpfpNG/Mo/SVzNAwE997DMY1ZD9jJsoYPr8UWypQQJUMldn3P+ERaswNTXnGbmCnwRGlj7IANnmGCc7koi6t root@csoaiclab01-85 http_proxy: https_proxy: no_proxy: keystone_admin_password: password onap_tenant_password: amsterdam onap_artifacts_http_repo:
- User will see the "file uploaded successfully" message in the sites column. Then, "Install ONAP" button gets enabled.
- Click "Install ONAP" to begin the installation.
- The ONAP status changes from ‘Not started’ to ‘In progress’ to ‘Complete’.
- ONAP VM will be created successfully after the job completes. It may take several hours for ONAP to become operational.
Onboarding a Sample VNF
- Navigate to the Akraino Sites page via the left navigation menu.
- Select a deployed edge site in the GUI table displayed. The VNF Onboard button becomes enabled.
- Click VNF Onboard This will open a Pop up dialog. Choose VNF as vCDN (Sample VNF) from the drop-down
- Verify all the default entries as applicable to your environment.
- Click Onboard to begin the sample VNF installation. This process may take few minutes to complete.
- The VNF Onboard status changes from ‘Not started’ to ‘In progress’ to ‘Complete’.
The Sample VNF creates an Apache Traffic Server cache instance and a Locust load generator client instance in the OpenStack environment for the selected site. By default, the Sample VNF will create a heat stack name ats-demo. The heat stack will contain two instances named ats-demo-client and ats-demo-server. The default configuration of the server instance is to cache the Big Buck Bunny videos from the internet server and then serve the video to the client from its ramdisk. The heat stack will output the client and server URLs. The client URL will display the Locust load generator dashboard. The server URL will allow you to play the video in a browser.
OpenStack stack output show ats-demo --all
Field | Value |
|---|---|
| client_url | { "output_value": "http://192.168.48.223:8089/", } |
| client_ip | { "output_value": "192.168.48.223", } |
| server_url | { "output_value": "http://192.168.48.226:8080/bbb_sunflower_1080p_30fps_normal.mp4", } |
| server_ip | { "output_value": "192.168.48.226", } |
VNF can also be on-boarded using ONAP. Refer the documentation.
Appendix
Edge Site Configuration - Rover (Single-Node Cluster)
This configuration file is written as a series of shell key/value assignments.
Sample input file template with all required parameters are provided in the ‘Build or Deploy an Edge Node' section.
Key Name(s) | Notes | Example |
|---|---|---|
| Server hostname | SRV_NAME=aknode45 |
| Out-of-band interface information for the server (iDRAC, ilo, etc.) | SRV_OOB_IP=192.168.41.45 |
| MAC address of the server used during the build | SRV_MAC=3c:fd:fe:b8:02:90 |
| Server OEM: Dell or HPE (case sensitive) | SRV_OEM=Dell |
| Network interface used during the build when ipxe.efi and the OS are booted | SRV_IPXE_INF=net8 |
| ipxe script based on the OS version and target kernel. Valid values are | SRV_BLD_SCRIPT=script-hwe-16.04.5-amd64.ipxe |
| XML template used to set BIOS and RAID configuration. | SRV_BIOS_TEMPLATE=dell_r740_g14_uefi_base.xml.template |
SRV_FIRSTBOOT_TEMPLATE | Template for script to run on first boot to setup the server. Current options are:
| SRV_FIRSTBOOT_TEMPLATE=firstboot.sh.template |
| VLAN to use during the build and final network configuration | SRV_VLAN=41 |
| Basic network information for DHCP configuration and final server network settings | SRV_MTU=9000 |
| Root password for the server being built | SRV_PWD=XXXXXXXX |
| Network bond information | SRV_BOND=bond0 |
Create New Edge Site locations
The Akraino seed code comes with default two sites: MTN1, MTN2 representing two lab sites in Middletown, NJ. This step of connecting to the database and creating edge_site records are only required if the user wishes to deploy on other sites.
To deploy a Rover (Single-Node Cluster) Edge Node, perform the following steps:
- Check if the Akraino (Docker Containers) packages are stood up.
- Connect to PostgreSQL database providing the host IP (name).
jdbc:postgresql://<IP-address-of-DB-host>:6432/postgres
user name = admin
password = abc123
- Execute the following SQL insert, bearing in mind these value substitutions:
edge_site_id: Any unique increment value. This is usually 1 but does not have to be.edge_site_name: Human-readable Edge Node name.region_id: Edge Node region number. Useselect * from akraino.Region;to determine the appropriate value. Observe the region number associations returned from the query: Use 1 for US East, 2 for US West, and so on.
> insert into akraino.edge_site(edge_site_id, edge_site_name, crt_login_id, crt_dt, upd_login_id, upd_dt, region_id)
  values( 1, 'Atlanta', user, now(), user, now(),1);
ONAP Configuration
This configuration file is written as a YAML dictionary named parameters.
This dictionary will be selectively inserted into the ONAP VM environment file, depending on overall configuration.
Key Name | Notes | Example |
|---|---|---|
public_net_name | The name assigned to the OpenStack network that will be created and used by the ONAP VM. An existing network may be used by referencing its name here. | public_net_name: public |
public_physical_net_provider_name | The physical provider network name for the public network. CAUTION: If the physical provider network cannot be found, the automated deployment process will terminate with an error. | # Assume vlan50 is the VLAN created |
provider_segmentation_id | The VLAN tag of the physical provider network | # Assume vlan50 |
public_physical_net_type | The physical network type. Specify VLAN or flat. NOTE:When flat is in use, provider_segmentation_id will be ignored. | public_physical_net_type: vlan |
public_subnet_name | The subnet name. An existing subnet may be used by referencing its name here. | public_subnet_name: public-subnet |
public_subnet_cidr | The subnet’s CIDR. The ONAP VM will be assigned an IP within this subnet. | public_subnet_cidr: 192.168.102.0/24 |
public_subnet_allocation_start | The allocation start of the IP pool. Together with public_subnet_allocation_end it defines the range of IPs assigned to VMs. | public_subnet_allocation_start: 192.168.102.100 |
public_subnet_allocation_end | The allocation end of the IP pool. Together with public_subnet_allocation_start it defines the range of IPs assigned to VMs. | public_subnet_allocation_end: 192.168.102.200 |
public_subnet_dns_nameserver | The subnet's DNS server | public_subnet_dns_nameserver: 8.8.8.8 |
public_subnet_gateway_ip | The subnet's Gateway IP | public_subnet_gateway_ip: 192.168.102.1 |
flavor_name | VM flavor for the ONAP VM. The installation creates m1.onap, x1.onap, xx1.onap flavors, all of which are recommended for use. | flavor_name: x1.onap |
onap_vm_public_key | The public key used to access the ONAP VM. A URL pointing to the key may be used here. | onap_vm_public_key: PUBLIC_KEY |
http_proxy | Optional http proxy URL including port. If the network is accessible without a proxy, please leave empty. | http_proxy: http://proxy.yourdomain.com:8888 |
https_proxy | Optional https proxy URL including the port. If the network is accessible without a proxy, please leave empty. | https_proxy: https://proxy.yourdomain.com:8888 |
no_proxy | Optional list of domains, IPs, and CIDRs that do not require a proxy, separated by commas. Do not use spaces. If the network is accessible without a proxy, please leave empty. | no_proxy: 127.0.0.1 |
keystone_admin_password | The keystone admin password. | keystone_admin_password: XXXXXXXX |
onap_tenant_password | The keystone password for the ONAP project (formerly known as a tenant in OpenStack parlance). | onap_tenant_password: XXXXXXXX |
onap_artifacts_http_repo | Optional HTTP repository URL for ONAP artifacts. When deploying a self-contained Edge Node without Internet access, all ONAP artifacts must be downloaded from ONAP Nexus to a HTTP server, using this URL. If HTTP is not being used to download artifacts, please leave empty. | onap_artifacts_http_repo: http://192.168.102.220/onap |
12 Comments
Jingzhao Ni
I am trying to manually deploy the Akraino edge site on x86 platform. I found that the web site in yaml_build project can not reach. Could you please check it?
https://codecloud.web.att.com/projects/ST_CCP/repos/aic-clcp-manifests/browse/docs/source/deployment_blueprint.md ------------> In yaml_build project’s README.md file
Thanks
Michael Hunter
That doesn't look right...checking into this now., Will reply when I have an answer.
Michael Hunter
This has been corrected now and pushed to the repository, please try again. Thanks for the report!
Jingzhao Ni
I am trying to generate the edge site configuration file by using generate_yamls.sh. But there is an error when i running the script. Could you please check it?
+ echo SITE=aknode_23
SITE=aknode_23
+ cd /opt/akraino/yaml_builds/
+ python ./scripts/jcopy.py aknode_23.yaml ./templates /opt/akraino/yaml_builds//site/aknode_23
Traceback (most recent call last):
File "./scripts/jcopy.py", line 81, in <module>
with open(sys.argv[1]) as f:
IOError: [Errno 2] No such file or directory: 'aknode_23.yaml'
In addition, in my opinion, do we need add this line "# -*- coding: utf-8 -*-" in python files for supporting utf8 ?
Thank you very much.
Naga Sugguna
It is clearly saying aknode_23.yaml is missing. You are supposed to have this file at /opt/akraino/yaml_builds/
Andrew Wilkinson
Q. The "Rover.txt" file - which server is this defining? - Is it defining the remote edge Rover site or the regional controller server?
Rover.txt defines the SRV_NAME=aknode42 which is the same as the name used for the Regional Controller.
Similarly the IP addressing in the Rover.txt seems to have the same values as the Regional Controller configuration.
Could someone clarify.
Michael Hunter
The Rover.txt file is only used when deploying a POD based on the rover blueprint. It is leveraged after the regional controller is built and running. The IP address is for the actual target node itself and not the regional controller. I hope that helps.
Andrew Wilkinson
Thanks - So in that case why is the SRV_NAME=aknode42 in Rover.txt above? "aknode42" is the name of the regional controller. Why call the edge node the same as the regional controller?
Also likewise for SRV_OOB_IP=192.168.41.42 - this is the iDRAC interface IP address of the Regional Controller.
So it seems the Rover.txt above is incorrect for a new edge site since it contains the parameterization values that have already been used for the Regional Controller node?
Michael Hunter
That must have been an error that has since been corrected. The rover.txt file above is not labeled with
SRV_NAME=aknode45 andSRV_OOB_IP=192.168.41.45It could be that the example that was previously shown was pulled from some tests we did and, since they were just examples, the proper care was not taken to ensure there was not IP address overlaps in the other examples.
I've installed rover over a dozen times, the regional controller and the node that airship in a bottle goes on are always separate. Sorry for the confusion
Jose Gerardo Pineda Galindo
Hi,
I am trying to deploy Akraino. I am using Snapshot0.0.2. I have followed every step but I get a Java error. After I hit deploy, the edge site files are copied properly, but I see that there is a missing parameter that camunda is expecting:
2018-11-19 16:52:45.701 DEBUG 17069 --- [SimpleAsyncTaskExecutor-4] d.DeployRemoteScriptExecutorTaskDelegate : task execution started remotserver 10.10.230.35 , portnumner 22,username root, password pines13,filename : null ,fileparams=/opt/akraino/redfish/install_server_os.sh --rc /opt/akraino/server-build/MTN1 --no-confirm,src dir=null,dest dir=/opt
2018-11-19 16:52:45.702 DEBUG 17069 --- [SimpleAsyncTaskExecutor-4] d.DeployRemoteScriptExecutorTaskDelegate : Execution command sh /opt/null /opt/akraino/redfish/install_server_os.sh --rc /opt/akraino/server-build/MTN1 --no-confirm
2018-11-19 16:52:45.703 DEBUG 17069 --- [SimpleAsyncTaskExecutor-4] a.b.s.i.RemoteScriptExecutionServiceImpl : executing the script sh /opt/null /opt/akraino/redfish/install_server_os.sh --rc /opt/akraino/server-build/MTN1 --no-confirm
2018-11-19 16:52:45.997 DEBUG 17069 --- [SimpleAsyncTaskExecutor-4] a.b.s.i.RemoteScriptExecutionServiceImpl : Script output......................
2018-11-19 16:52:45.997 DEBUG 17069 --- [SimpleAsyncTaskExecutor-4] a.b.s.i.RemoteScriptExecutionServiceImpl : sh: 0: Can't open /opt/null
2018-11-19 16:52:45.997 DEBUG 17069 --- [SimpleAsyncTaskExecutor-4] a.b.s.i.RemoteScriptExecutionServiceImpl : Script exit code :127
2018-11-19 16:52:45.998 ERROR 17069 --- [SimpleAsyncTaskExecutor-4] org.camunda.bpm.engine.context : ENGINE-16006 BPMN Stack Trace:
DeployRemoteexecutor (activity-execute, ProcessInstance[2782])
DeployRemoteexecutor, name=Deploy Remote Script ecutor
^
|
Task_1jo0y1o, name=WinSCPScriptExecutortask
^
|
Task_19usii1, name=ScriptExecutorTask
^
|
StartEvent_1, name=ScriptExecutionStartingPoint
2018-11-19 16:52:46.007 ERROR 17069 --- [SimpleAsyncTaskExecutor-4] org.camunda.bpm.engine.context : ENGINE-16004 Exception while closing command context: Problem while executing scriptproblem while executing the script . exist code :127
After reviewing the code the parameter should be remotefilename and note filename, which in portal is exacty the informaiton we send in akraino-portal: webapps/AECPortalMgmt/resources/js/AECSitesController.js – line 311
An the script in camunda that gets the informaiton is here: ./akraino/src/main/java/com/akraino/bpm/delegate/RemoteScriptExecutorTaskDelegate.java
As you may see, the code states that it takes the variable "filename", that doesn't exist.
I added a new variable named "filename" in the akraino portal file (AECSitesController.js ), but it kept failing. I assumed that Camunda is not receiving that parameter. After reviewing the Camunda seed code I can see the "filename" variable is passed in the apache service, but not in the "executeDeployService" so probably the error can be changed if instead of remotefilename you use filename in the camundsa java code (in the file "camunda_workflow/akraino/src/main/java/com/akraino/bpm/service/impl/AsyncProcessExecutorServiceImpl.java")
Is there any new Java camunda jar file version without this bug? Because in SNAPSHOT.0.0.1 it didn't have this error.
Deepak Kataria
Hi Jose Gerardo Pineda Galindo,
I have attached the logs from a successful run of the CD for Rover using version=0.0.2-SNAPSHOT last night. Please compare with your logs.
Also, please note there is a key attribute “portnuner” which is wrong, the right attribute is "port 22", other attributes like remotefilename, winscpfilepath, winscpdir, winscpfileparams, etc., are missing (see your excerpt below)
"2018-11-19 16:52:45.701 DEBUG 17069 --- [SimpleAsyncTaskExecutor-4] d.DeployRemoteScriptExecutorTaskDelegate : task execution started remotserver 10.10.230.35 , portnumner 22,username root, password nexlan13,filename : null ,fileparams=/opt/akraino/redfish/install_server_os.sh --rc /opt/akraino/server-build/MTN1 --no-confirm,src dir=null,dest dir=/opt "
The correct request from portal to camunda is as follows (excerpted from Akraino CD run)
"2018-11-19 09:03:02.733 INFO 13967 --- [http-nio-8073-exec-1] o.a.c.c.C.[Tomcat].[localhost].[/] : Initializing Spring FrameworkServlet 'dispatcherServlet'
2018-11-19 09:03:02.799 DEBUG 13967 --- [http-nio-8073-exec-1] c.a.b.controller.CamundaRestController : Request received for airship Airship [sitename=site80 , filepath=/opt/akraino/redfish/install_server_os.sh , fileparams=--rc /opt/akraino/server-build/aknode34rc --skip-confirm, winscpdir=/opt/akraino/airshipinabottle_deploy, winscpfilepath=mv.sh, winscpfileparams=192.168.2.34, remotserver=192.168.2.34, port=22, username=root, password=akraino,d, destdir=/opt , remotefilename=akraino_airship_deploy.sh, remotefileparams=null]
2018-11-19 09:03:02.830 DEBUG 13967 --- [SimpleAsyncTaskExecutor-1] .a.b.d.AirshipScriptExecutorTaskDelegate : task execution started :/opt/akraino/redfish/install_server_os.sh --rc /opt/akraino/server-build/aknode34rc --skip-confirm"
Hope this helps.
Best Regards,
Deepak Kataria
Jose Gerardo Pineda Galindo
Thanks for your response. I have not been able to test with the changes you say. I will try to do it later and let you know if it works. So far I was able to run the remaining steps (basically the
akraino_airship_deploy.sh manually and it deployed Openstack with no problem, I just faced the issue in that part of the camunda flow to run the scripts remotely.