This document covers Integrated Edge Cloud(IEC) Type 2.
Integrated Edge Cloud(IEC) is an Akraino approved blueprint family and part of Akraino Edge Stack, which intends to develop a fully integrated edge infrastructure solution, and the project is completely focused towards Edge Computing. This open source software stack provides critical infrastructure to enable high performance, reduce latency, improve availability, lower operational overhead, provide scalability, address security needs, and improve fault management. The IEC project will address multiple edge use cases and industry, not just Telco Industry. IEC intends to develop solution and support of carrier, provider, and the IoT networks.
Use Case
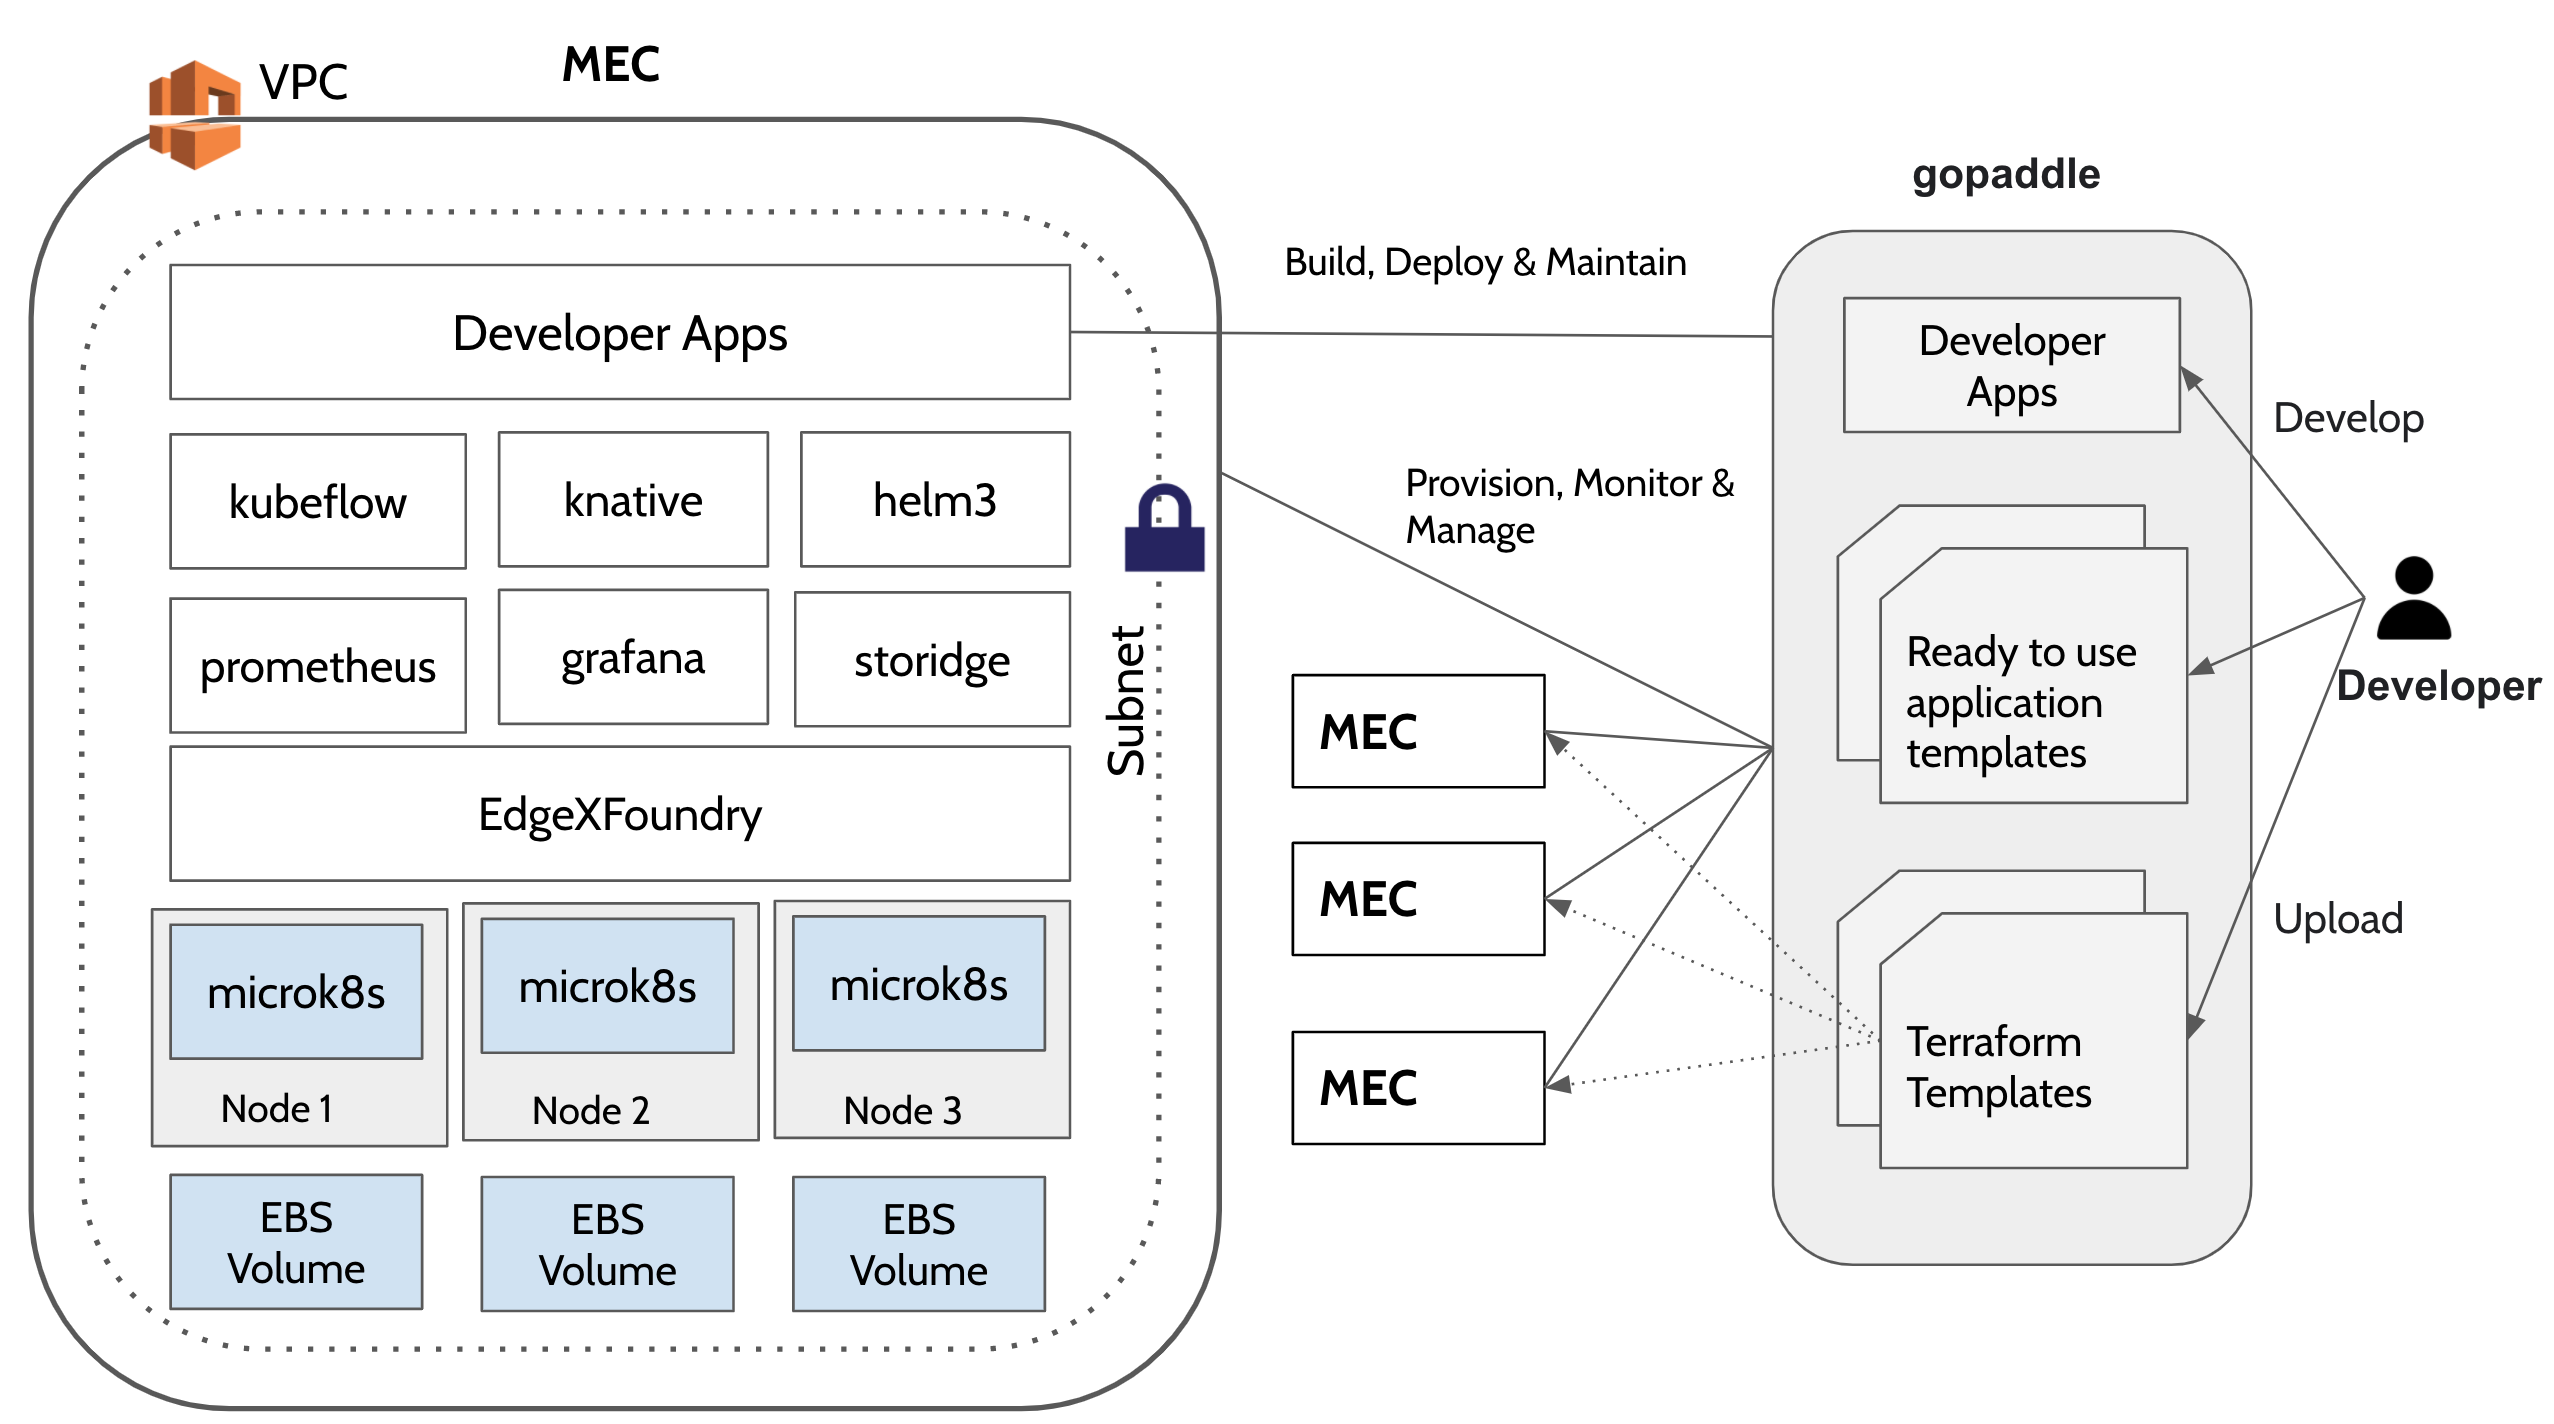
The purpose of this release is to automate the provisioning of ultra low latency light weight MEC (MEC) environment on AWS cloud and centrally manage multiple MECs from a single dashboard. MEC run on low foot print hardware and can cater to mission critical workloads. It takes an opinionated approach to spinning up an environment with pre-built configuration that are ready to use. It is cost effective compared to a fully configurable MEC environment as the and can be setup quickly.
Overall Architecture
Microk8s
Microk8s is a lightweight Kubernetes distribution from Canonical that delivers a complete Kubernetes experience for IoT and micro cloud environments. Its zero-ops capability offers all the Kubernetes networking and storage configurations out of the box with built-in add ons for serverless (knative) and machine learning workloads (kubeflow) etc. More info: https://ubuntu.com/engage/micro-clouds
Installing and configuring microk8s leverages Canonical’s Snap package manager which can stand up a Kubernetes cluster through a single command under a minute. As of microk8s version 1.21, a snap installer consumes as little as 192 MB RAM and the Kubernetes distribution consumes as little as 540 MB, making it an attractive solution to run on edge devices that are less than 1GM of RAM.
Terraform
Terraform is an Infrastructure as Code (IaaC) tool by Hashicorp that automates the provisioning of data centre or cloud infrastructure. Using terraform AWS provider plugin one can programatically build, configure and manage the lifecycle of a micro cloud on AWS.
gopaddle
gopaddle is a No Code platform for managing Cloud Native Workloads. Using gopaddle, Terraform templates can be managed centrally and reused to provision multiple decentralized microclouds across different AWS regions. Due to the low code nature of the platform, developers can build cloud native workloads with ease and deploy much faster. gopaddle offers pre-built templates for monitoring and logging like Prometheus, Grafana and EFK stack.
Storidge
Storidge is a highly available persistent storage for K8s with auto-failover & recovery. Storidge automates storage infrastructure as code, delivering a persistent storage platform for Docker Swarm and Kubernetes. Storidge’s software enables automated storage orchestration including provisioning, application performance, data consistency and data protection via software. Storidge’s storage orchestrator enables stress-free storage administration for modern DevOps workflows.
EdgeX Foundry
EdgeX Foundry is a Middleware for dual processing of data to/from edge devices. It takes the sensor input from the devices and delivers it to the applications over the network to the end-users. Edgex Foundry has the microservices packed as docker images. EdgeX can be installed using the docker-compose file or from the snap store in a Linux environment.
A Note on AWS Wavelength
AWS Wavelength provides a consistent AWS experience across cloud and edge environments by extending a the AWS resources like EC2, VPC services to the 5G Edge Network. An AWS VPC can be extended to a wavelength zone that embed elastic compute and storage at the 5G edge network. Data intensive workloads, AI, and real time applications can now offer an immersive experience. Currently, Wavelength zones are limited to US, Japan and South Korea. Release 5 blueprint under consideration does not make use of Wavelength, however it can be extended to spin up a light weight MEC on Wavelength zones with additional Carrier Gateway configurations.
Blueprint System Requirements
| Item | Capacity |
|---|---|
| Number of nodes | 3 |
| Node Size | t4g.medium - 2vCPUs - 4 GiB Memory |
Disks in Storidge HA Clustering mode NOT YET SUPPORTED | 3 Disks per node - 100 GB each. |
| VPC | Pre-existing VPC |
| Subnet | Public (for now). Will switch to private subnet with Gateway configuration in future releases. |
| AMI | Ubuntu Server 18.04 LTS |
| Terraform | terraform_0.14. |
Kubernetes Environment Provisioned
| Item | Version |
|---|---|
| microk8s | 1.21 |
Automation
Terraform Automation
Terraform takes two input files to automate the infrastructure provisioning and produces a state file at the end of the automation.
Variables file (variable.tf) - Input file : Run time tunables that helps to customize the infrastructure configuration. The provider and the resource blocks in the main.tf file can be configured by changing the values of the exported 'TF' variables.For example, if you want to change the aws_instace type from t2.small to t2.micro, set the TF_VAR with the appropriate values. Other resource-specific values like aws_region, aws_ami, vpc_id and the subnet can also be changed the same way by editing the respective TF_VAR environment variables. List of variables taken from the variable.tf file and the list of ENVs read are listed below:
- TF_VAR_aws_region - AWS Region where the cluster needs to be provisioned
- TF_VAR_aws_ami - Image to bring up the master and worker node EC2 instances. Based on the region, the AMI corresponding to Ubuntu Server 18.04 LTS needs to be configured.
- TF_VAR_aws_instance - AWS Instance type eg. t4g.medium
- TF_VAR_vpc_id - VPC ID of a pre-existing VPC
- TF_VAR_aws_subnet_id - Subnet ID of a pre-existing subnet.
- TF_VAR_access_key - AWS IAM User Access Key
- TF_VAR_secret_key - AWS IAM User Secret Key
- TF_LOG - Log level while execute terraform templates. Supported values - TRACE, DEBUG, INFO, WARN, or ERROR.
- TF_LOG_PATH - Path of the file to redirect the terraform execution logs.
- terraform configuration file (main.tf) - Input file : The Terraform configuration file contains the workflow and automation scripts to create the microk8s cluster.
- worker_user_data.tmpl - user data for the worker nodes : This file maintained by the blueprint internally to dynamically configure the join token on the worker nodes.
- terraform state file: Terraform maintains the current state of the infrastructure in the state file. The state file remains empty until the first terraform initialization. The stateful is used for further updates or tear down of the cluster.
AWS Infrastructure
The below graph shows the infrastructure resources and their dependencies while provisioning the stack using terraform.
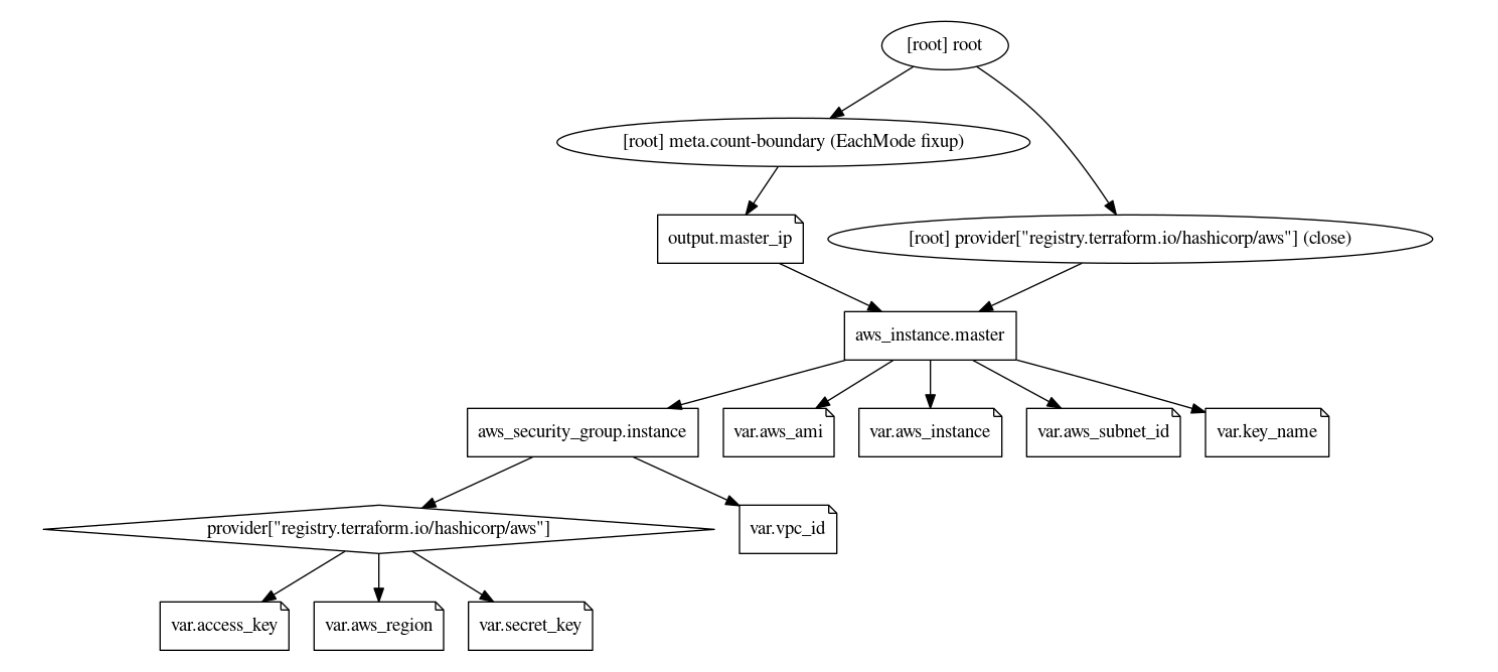
- The user provides the VPC ID, region, instance type, ami, subnet ID and the IAM access/secret as the input in the variable.tf file. The values are configurable at the time of applying the template.
- The variable ‘count’ indicates the number of worker nodes to be provisioned. A count of 2 brings up a 2 node cluster.
- We also need the private key file to remote SSH into the EC2 instances. This file needs to be present in the same location as the main.tf and vairable.tf files.
- The security group is automatically provisioned based on the VPC and the Subnet ID provided.
- Currently, load balancer is not provisioned. Any workloads deployed in the cluster can be accessed via the Kubernetes Node port.
Workflow
Master and Worker nodes are provisioned in this order:
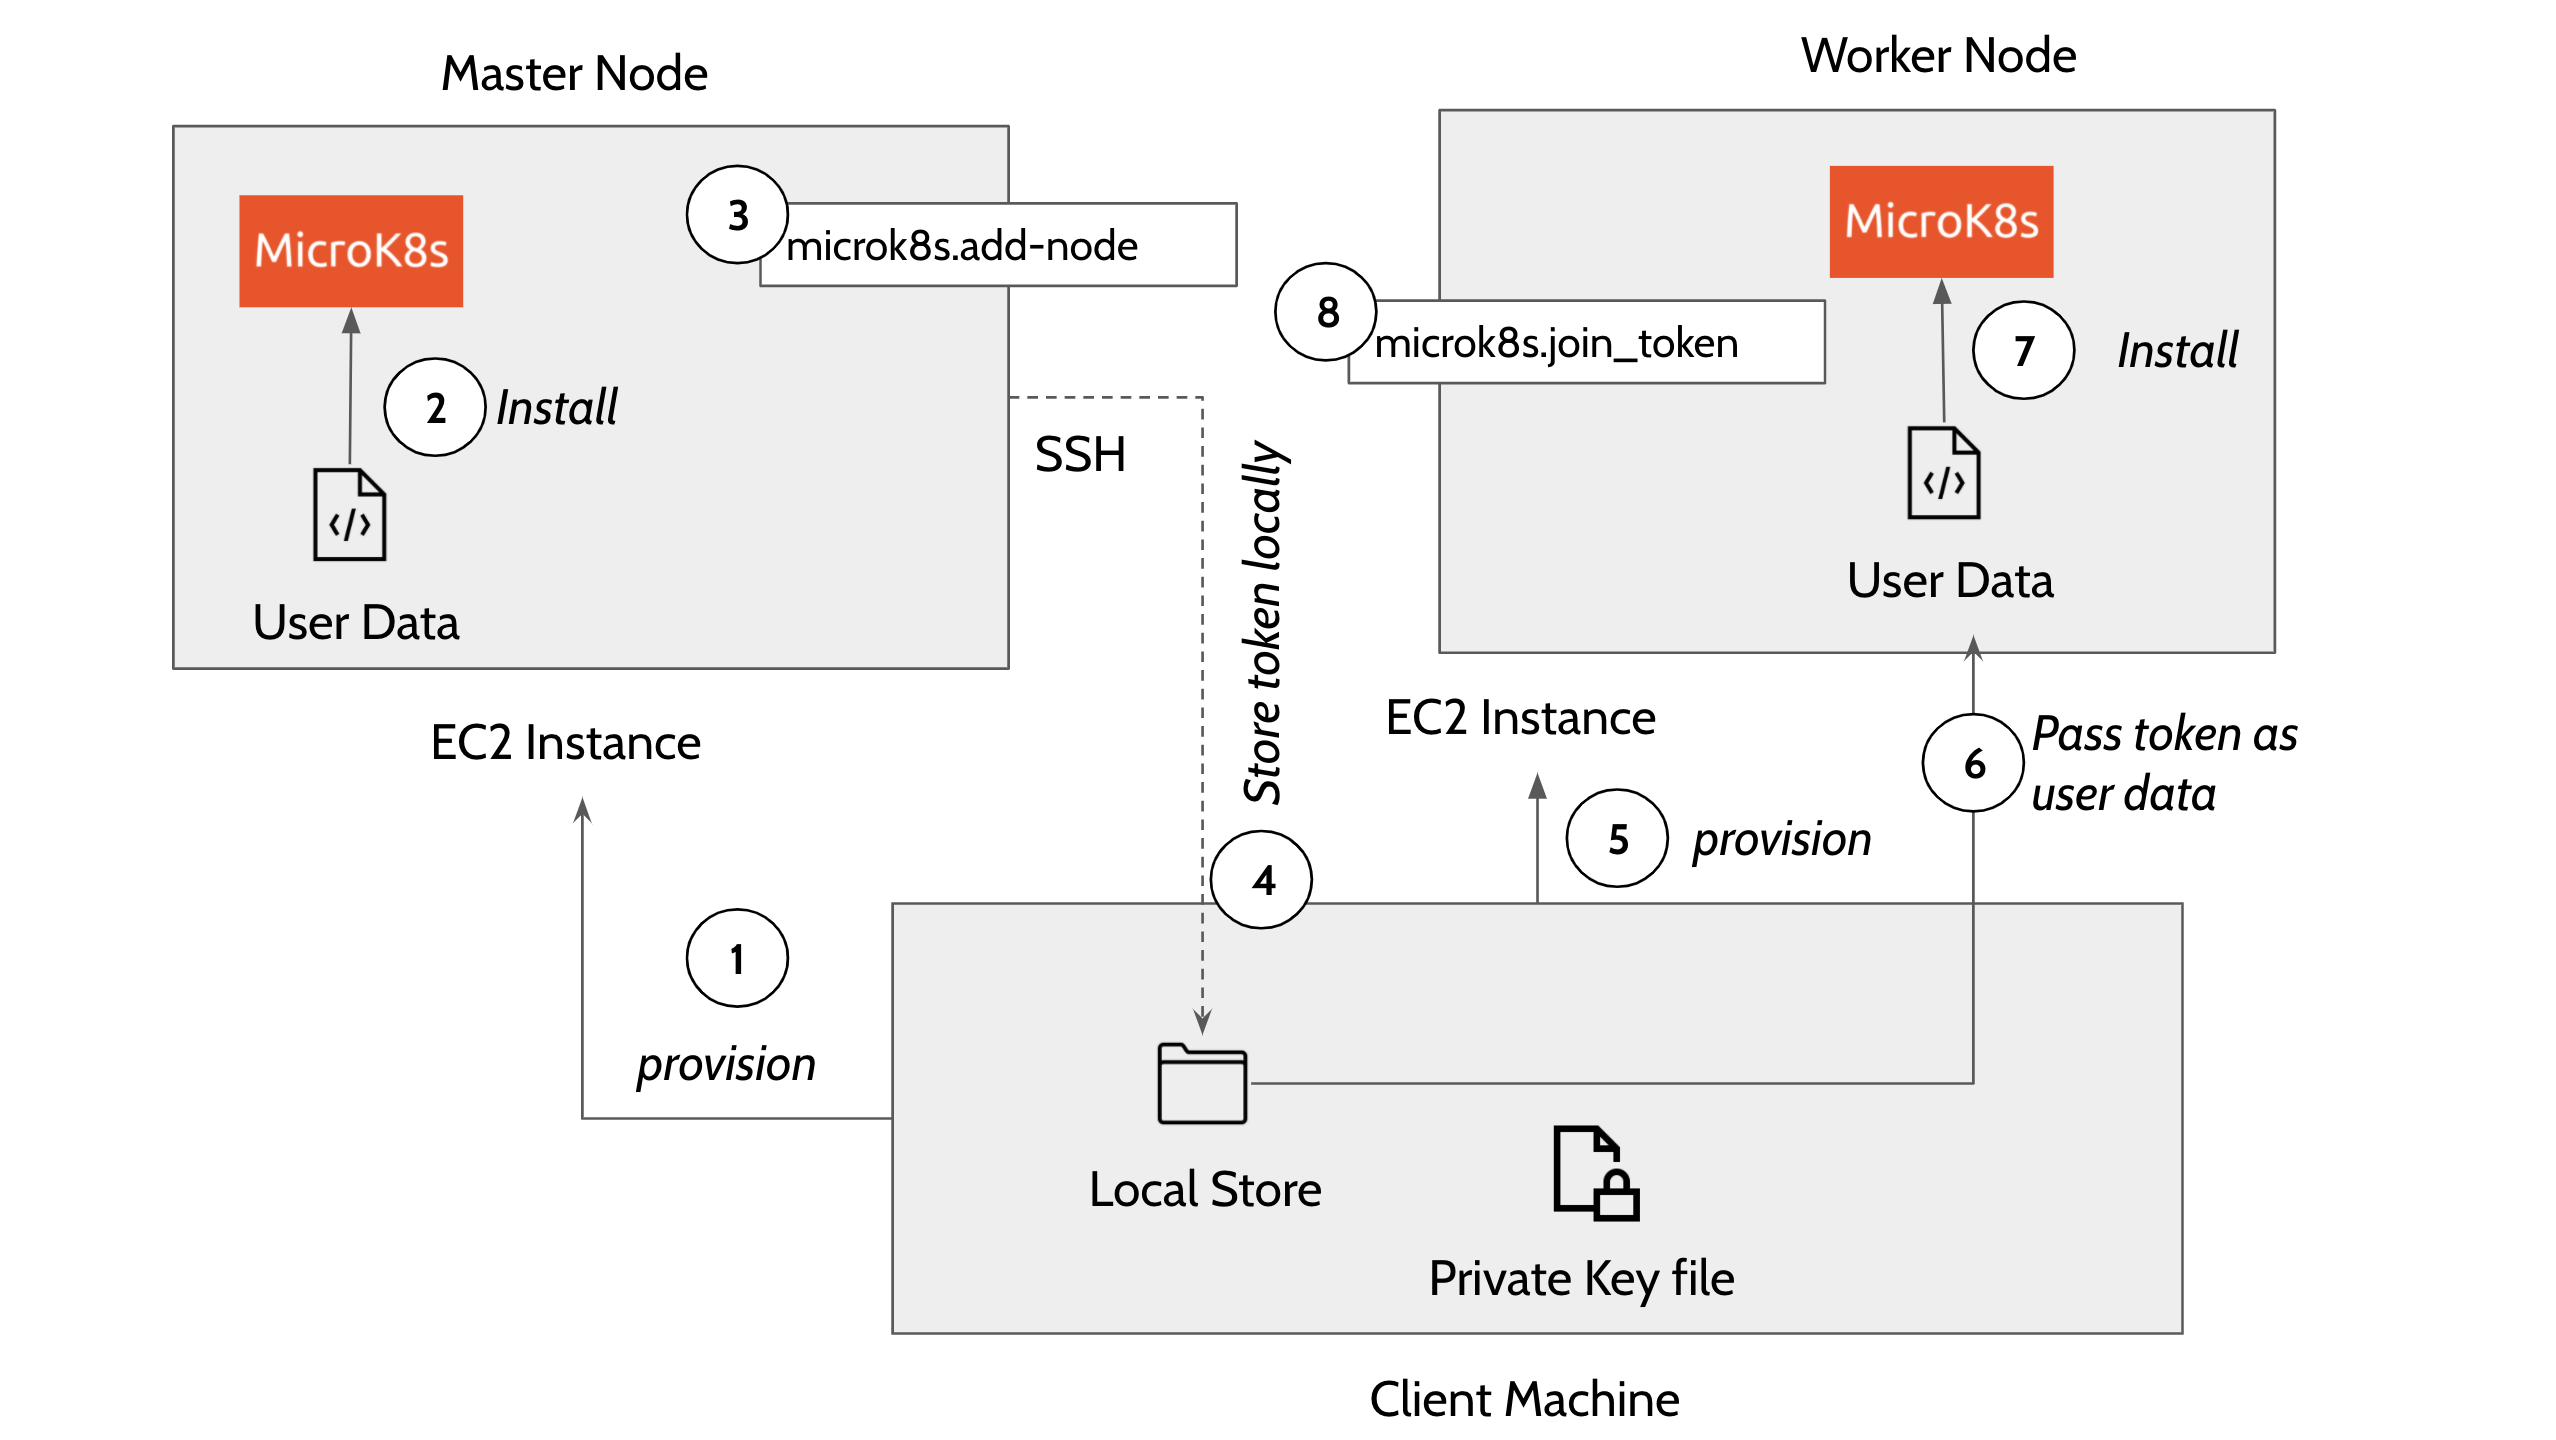
- Provision master node. The template executes EC2 user_data on the master node that uses snap package manager to install microk8s.
The user_data in the main.tf file installs the microk8s inside the EC2 instance.
#!/bin/bash
sudo su
apt update -y >> microk8s_install.log
apt install snapd -y >> microk8s_install.log
snap install core >> microk8s_install.log
export PATH=$PATH:/snap/bin
snap install microk8s --classic --channel=1.20/stable >> microk8s_install.log
microk8s status --wait-ready
microk8s enable dns >> microk8s_install.log
microk8s add-node > microk8s.join_token
microk8s config > configFile-master
Once the microk8s master is installed on the first node, the template then does a remote SSH command to the master node and generates a token by executing the command - ‘microk8s.add-node’ This makes use of the private key file in the local directory to execute the remote SSH command. The token generated in this step is used to join the remaining nodes to the cluster. The following describes how a connection block is configured in main.tf file to perform a remote exec to the master node. terrform.pem is the private file in the local client system to remote exec to the master or worker nodes.
connection { host = self.public_ip type = "ssh" user = "ubuntu" password = "" private_key = "${file("terraform.pem")}" } .... .... provisioner "remote-exec" { inline = ["until [ -f /microk8s.join_token ]; do sleep 5; done; cat /microk8s.join_token", "sudo sed -i 's/#MOREIPS/IP.7 = ${self.public_ip}\\n#MOREIPS/g' /var/snap/microk8s/current/certs/csr.conf.template", "sudo sleep 1m", "sudo microk8s stop", "sudo microk8s start" ] }- Copy the generated token on the remote machine to the local machine using the terraform ‘datasource’ plugin.
- Now provision the worker nodes and install microk8s on the remaining nodes
Use the local datasource to read the join token and add the worker nodes to the master node using the command ''microk8s.join_token". Following code block explains how a worker node is added to the cluster using remote exec.
provisioner "remote-exec" {
inline = ["until [ -f /microk8s.join_token ]; do sleep 5; done; cat /microk8s.join_token"]
}
Security Considerations
We create an 'ALLOW ALL' ingress and egress rule security group. In the future releases, this will be configured dynamically based on user inputs.
ingress  {
from_port = 0
to_port = 0
protocol = "-1"
cidr_blocks = ["0.0.0.0/0"]
}
egress  {
from_port = 0
to_port = 0
protocol = "-1"
cidr_blocks = ["0.0.0.0/0"]
}