Installation
Overview
This installation will be based on a 3-host setup: One as master node, the other hosts serve as worker nodes. Kubernetes will be installed directly on bare metal servers. Each host has Ubuntu 20.04 as the server OS.
Please see diagram below for deployment details:

Facial emotion detection app is installed on worker node 1…….
A cell phone is used to send inference request to edge node. The request includes original image and the model type. Request is sent in REST API format. See reference here:……
There are xxx containers running on worker node.
Pre-requisitions
Hardware requirement
Minimum hardware system requirements can be found here: For this setup, the hardware used are as follows:
- Ubunti 20.04 LTS
- Intel Xeon Gold 6252 CPU @2.10GHz, 24 Cores/CPU, 4 CPUs
- 196GB RAM
- 1.8TB SSD
There are 3 servers with the same specification in the setup. This is a high-end setup from the open source community lab.
Installation flow
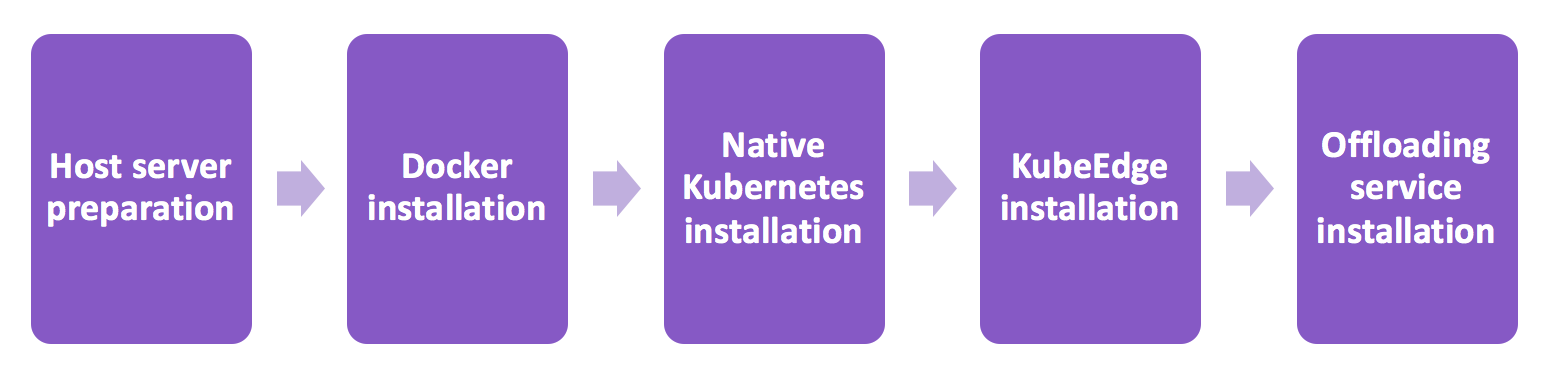
Host server OS installation
The following installation steps are required for all 3 servers have Ubuntu 20.04 installed. The OS .iso image can be downloaded from: ubuntu-20.04.1-live-server-amd64.iso
Installation configurations take most default settings except for the following:
- Turn off swap memory
$ sudo swapoff -a
To make the above change persistent, edit the fstab file: comment out the line starting with swap.img
$ sudo vi /etc/fstab
In fstab file, comment out the line starting with swap.img.

- Set hostnames for all 3 servers
3 servers are used as 3 kubernetes nodes. Each node should have a unique hostname. For easy identification, we use k-master,k-worker1 and k-worker2 as hostnames for 3 servers respectively.
On master server:
$ sudo hostnamectl set-hostname k-master
On worker node 1:
$ sudo hostnamectl set-hostname k-worker1
On worker node 2:
$ sudo hostnamectl set-hostname k-worker2
Hostname changes do not take effect in your current terminal windows. Reopen a new terminal window should show the new hostname.
- Date and time are in sync
Make sure that all 3 servers(nodes) have accurate time and date. Otherwise you will run into trouble with invalid TLS certificates.
Docker installation
All kubernetes nodes use at least one type of container runtime. In our setup, we use Docker. To install docker on all 3 servers(nodes), run the following on each server:
$ sudo apt update
$ sudo apt install docker.io
Grant permissions to yourself:
$sudo usermod -aG docker $(whoami)
Verify docker is running:
$ docker --version

Docker installation should have automatically started docker. If not, manually start the docker by:
$ sudo systemctl start docker
Run command below to make sure that docker will automatically start after each reboot:
$ sudo systemctl enable docker
Again, please remember to run above commands on each server.
Native Kubernetes installation
KubeEdge is deployed on native Kubernetes clusters. Before installing KubeEdge, the native Kubernetes environment should be installed and configure properly. On master node, the following modules will be installed:
- kubeadm
- kubectl
- kube-apiserver
- kube-controller-manager
- kube-scheduler
- Add Kubernetes key and repository to local apt cache
$ curl -s https://packages.cloud.google.com/apt/doc/apt-key.gpg | sudo apt-key add
$ sudo apt-add-repository “deb http://apt.kubernetes.io/ kubernetes-xenial main”
- Install kubeadm, kubectl and kubelet modules.
$ sudp apt update
$ sudo apt install -qy kubeadm kubectl kubelet
- On master node, run following command to configure and initialize Kubernetes clusters:
$ sudo kubeadm init --pod-network.cidr=10.244.0.0/16 --apiserver-advertise-address=10.11.20.11
Please note 10.11.20.11 should be replaced by your master node IP on interfaces where all nodes communicate over. pod-network.cidr=10.244.0.0/16 is required by flannel. See “Pod network installation” section.
$ sudo cp -i /etc/kubernetes/admin.conf $HOME/.kube/config
$ sudo chown $(id -u):$(id -g) $HOME/.kube/config
- Pod network installation (optional) On master node, run following commands:
$ kubectl apply -f https://raw.githubusercontent.com/coreos/flannel/master/Documentation/kube-flannel.yml
$ kubectl apply -f https://raw.githubusercontent.com/coreos/flannel/master/Documentation/k8s-manifests/kube-flannel-rbac.yml
KubeEdge uses websocket as its management layer network which is not open to KubeEdge users for application level network communication. It was designed as such since the beginning of KubeEdge as many deployments prefer (IoT flavored) their own network choices. However, with the expansion of KubeEdge, a pre-packaged network layer is of interest. In this installation, we include the optional network installation for reference. Flannel is selected based on its simplicity and popularity.
- Verify master node installation By now, all installation on master node is completed. You can run following commands to verify:
$ kubectl get pods --all-namespaces
You should see the following:
jshen@k-master:~$ kubectl get pods -n kube-system
NAME                               READY   STATUS    RESTARTS   AGE
coredns-66bff467f8-6fxrq           1/1     Running   0          22d
coredns-66bff467f8-cs2qw           1/1     Running   0          22d
etcd-k-master                      1/1     Running   0          22d
kube-apiserver-k-master            1/1     Running   0          22d
kube-controller-manager-k-master   1/1     Running   0          22d
kube-flannel-ds-lzcrp              1/1     Running   0          22d
kube-proxy-qdv9t                   1/1     Running   0          21d
kube-proxy-rhpcq                   1/1     Running   0          22d
kube-scheduler-k-master            1/1     Running   0          22d
jshen@k-master:~$
If all pods displayed with “Running” status, the master node Kubernetes native installation is completed.
- Worker node There is no worker node installation at this stage. The KubeEdge worker node installation only requires KubeEdge components. No native Kubernetes components are required. However, for operational convinience, kubectl etc. can be installed on worker nodes.
KubeEdge installation
KubeEdge installation consists of 2 types:“Cloud” and “Edge”. This maps well to native Kubernetes “Master” and “Worker” concept. In this installation, “Cloud” will refer to Kubernetes For release 1.4 and after, “keadm” is an one-click KubeEdge installer which simplifies the installation process.
Before installation, please refer to “Kubernetes-compatibility” to select proper versions of Kubernetes and KubeEdge. In this installation, the following combination is selected.
keadm:
- In release 1.4, keadm only supports Ubuntu and CentOS
- keadm execution requires root privilige. In Ubuntu please use “sudo” to execute.
- On both “cloud” and “edge” nodes, download and unzip keadm (amd64 for this installation): https://github.com/kubeedge/kubeedge/releases/download/v1.4.0/keadm-v1.4.0-linux-amd64.tar.gz
Cloud side (Cloudcore) installation
On Kubernetes master node, run
$ keadm init --advertise-address=10.11.20.11
This will install cloudcore, generate certificates and install CRDs. kubeEdge version can also be specified as a parameter.
“10.11.20.11” is the IP address for KubeEdge management network. It should be replaced by the master node management IP in your installation. This IP should be reachable from the “Edge side” node.
Get token for “Edge side” installation:
$ keadm gettoken
You can run keadm reset to stop cloudcore service. It will not remove
Edge side (edgecore) installation
Use the token from “Cloud side” to join the cluster:
$ keadm join --cloudcore-ipport=10.11.20.11:10000 --token=[TOKEN]
These are mandatory parameters for keadm join. The “Edge side” and “Cloud side” should have the same KubeEdge version.
Debug
Offloading service installation
Offloading service is provided via a container running on worker node 1. The offloading container is prepared separately from this installation.
First we need to create a configuration yaml file for the installation:
$ vi ke_inference_offloading.yaml
Below is the content of the finished yaml file:
apiVersion: v1
kind: Pod
metadata:
  name: ke-mloffload
  labels:
    app: ke-mloffload
spec:
  containers:
  - name: ke-mloffload
    image: tensorflow/serving:latest
    env:
    - name: MODEL_NAME
      value: "model_emotion"
    - name: TF_CPP_MIN_VLOG_LEVEL
      value: "3"
    volumeMounts:
    - name: tfmodels
      mountPath: /models/model_emotion
    ports:
    - containerPort: 8501
      hostPort: 8501
  volumes:
  - name: tfmodels
    hostPath:
      path: /home/jshen/kubeedge/models/model_emotion
Note:
- Parameters to fill in:
- mountPath: #This should be the path where model file is located
- hostPath/path: #This should be the absolute path of the model file
- All other parameters can stay unchanged.
To deploy offloading container, run the following kubectl command on master node:
$ kubectl run --image=
Verification after installation
There are 2 ways to verify the offloading service. One uses a local ML inference requester. The other uses an android phone simulator. Both will send an image to offloading service for inference. The offloading service will respond with the result.
Android phone simulator
In this test setup, the android phone simulator is VPNed into a private network with worker 1. Since there aren’t too many worker nodes involved, a simple docker network is used between worker1 and the simulator.
$ docker network create testNetwork
$ docker network connect testNetwork testerContainer
$ docker network connect testNetwork ke_inference_offloading
After the network is created and connected with 2 containers, an inspection of the testNetwork should return this:
$ docker network inspect testNetwork
[
    {
        "Name": "testNetwork",
        "Id": "103b9ba8c59b2c621e24e6135a5abdaeeb80fcba1fb123b4a79e6e603185ee7c",
        "Created": "2020-10-01T23:31:53.8374055Z",
        "Scope": "local",
        "Driver": "bridge",ml" 25L, 514C                                                                             10,36         All
        "EnableIPv6": false,
        "IPAM": {
            "Driver": "default",
            "Options": {},
            "Config": [
                {
                    "Subnet": "172.20.0.0/16",
                    "Gateway": "172.20.0.1"
                }
            ]
        },
        "Internal": false,
        "Attachable": false,
        "Ingress": false,
        "ConfigFrom": {
            "Network": ""
        },
        "ConfigOnly": false,
        "Containers": {},
        "Options": {},
        "Labels": {}
    }
]
4 Comments
Tina Tsou
“
Installation flow
Not able to open
Tina Tsou
"Please see diagram below for deployment details: Facial emotion detection app is installed on worker node 1……."
This alt_text doesn't display.
Tina Tsou
"
Please see diagram below for deployment details: Facial emotion detection app is installed on worker node 1…….
A cell phone is used to send inference request to edge node. The request includes original image and the model type. Request is sent in REST API format. See reference here:……
There are xxx containers running on worker node.
"
"..." "xxx" need to be filled.
Jane Shen
Images uploaded.