...
Node-2: Deploy Tars Slave(Node) and the connected vehicle applications.
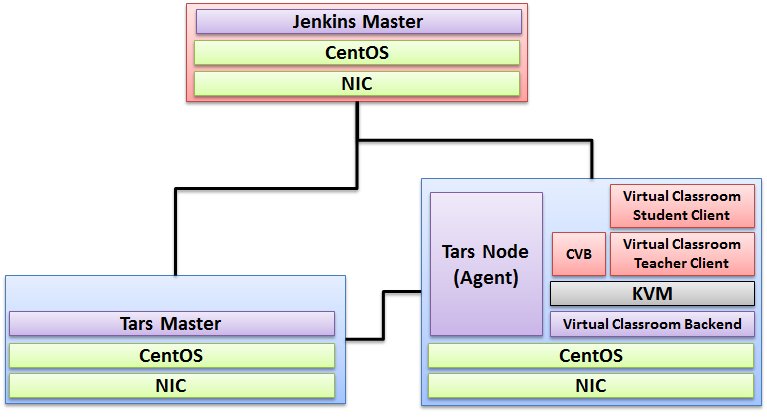
Installation Hardware
Hostname | Core | RAM | HDD | NIC | Role |
Node-0 | 8 | 40GB | 3TB | 1GB | Jenkins Master |
Node-1 | 8 | 96GB | 3TB | 1GB | Tars Framework |
Node-2 | 8 | 96GB | 3TB | 1GB | Tars Node (CVB + Type4 Application + Virtual Classroom Teacher Client + Virtual Classroom Student Client) |
Installation Software
- CentOS 8
- mysql Ver 14.14 Distrib 5.6.26
- OpenStack: Rocky
- k8s:1.15.0
...
Refer to the following link for installing Tarsframework.
https://tarscloud.github.io/TarsDocs_en/installation/source.html
1. Dependency install
yum install -y glibc-devel gcc gcc-c++ bison flex make cmake psmisc ncurses-devel zlib-devel openssl openssl-devel
## install mysql
wget -i -c http://dev.mysql.com/get/mysql57-community-release-el7-10.noarch.rpm
yum -y install mysql57-community-release-el7-10.noarch.rpm
yum -y install mysql-community-server
yum -y install mysql-devel
If you have problems to install mysql with the above step, add the new mysql repository to local server with this yum command and then re-run the previous commands.
sudo yum localinstall https://dev.mysql.com/get/mysql57-community-release-el7-10.noarch.rpm
yum install mariadb-server -y
## Configure mysql
systemctl start mariadb.service
systemctl enable mariadb.service
systemctl status mariadb.service
mysql -u root -p
grep "password" /var/log/mariadb/mariadb.log
ALTER USER 'root'@'localhost' IDENTIFIED BY '${your passwd}';
flush privileges;
2. Install develop environment for Tars
yum install -y npm
npm i -g pm2
wget -qO- https://raw.githubusercontent.com/creationix/nvm/v0.33.11/install.sh | bash
source ~/.bashrc
nvm install v8.11.3
npm install -g pm2 --registry=https://registry.npm.taobao.org
mkdir Tars
cd Tars
git clone https://github.com
...
/TarsCloud/TarsFramework.git --recursive
cd TarsFramework/build
chmod u+x build.sh
./build.sh prepare
./build.sh all
###Recompile if needed.###
./build.sh cleanall
./build.sh all
Change to user root and create the installation directory.
cd /usr/local
mkdir tars
mkdir app
chown ${normal user}:${normal user} ./tars/
chown ${normal user}:${normal user} ./app/
cd
cd Tars/TarsFramework/build/
./build.sh install or make install
The default install path is /usr/local/tars/cpp。
If you want to install on different path:
**modify tarscpp/CMakeLists.txt**
**modify TARS_PATH in tarscpp/servant/makefile/makefile.tars**
**modify DEMO_PATH in tarscpp/servant/script/create_tars_server.sh**
3.Tars framework Installation
3.0 Firewall setup
firewall-cmd --zone=public --permanent --add-service=http
firewall-cmd --add-port 3000/tcp
firewall-cmd --add-port 3001/tcp
firewall-cmd --add-port 3306/tcp
3.1. Add user
mysql -u root -p
grant all on *.* to 'tarsAdmin'@'%' identified by 'Tars@2019' with grant option;
grant all on *.* to 'tarsAdmin'@'172.22.195.10' identified by 'Tars@2019' with grant option;
grant all on *.* to 'tarsAdmin'@'Node-1' identified by 'Tars@2019' with grant option;
flush privileges;
3.2 setup mysql privileges
mysql -u root -p
>use mysql
>select Host from user where User='root';
if shown as “localhost”,we can update as follwing command:
>update user set host = '%' where user ='root';
>FLUSH PRIVILEGES;
'%'update to the host IP,and then use mysql -u root -p --host '%ip' change back'%'
cd /Tars
git clone https://github.com/TarsCloud/TarsWeb.git
mv TarsWeb web
cp -rf web /usr/local/tars/cpp/deploy/
cd /usr/local/tars/cpp/deploy
chmod a+x linux-install.sh
./linux-install.sh MYSQL_HOST MYSQL_ROOT_PASSWORD INET REBUILD(false[default]/true) SLAVE(false[default]/true)
./linux-install.sh 192.168.1.10 our_PW eno1 false false admin 3306
The following is the picture for Tars Framework website.
...
Refer to the following link for installing Tarsnode and connect Tarsnode to Tarsframework.
https://tarscloud.github.comio/qiuxinTarsDocs_en/Tars/blob/arm/Install.mdinstallation/source.html
Step4: Launch CI jobs
Create CI jobs and launch CI jobs in the following way.
...