| Table of Contents |
|---|
Introduction
License
How to use this document
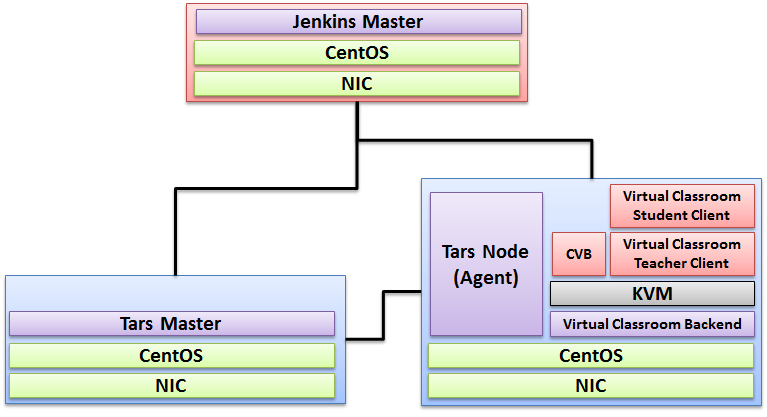
Deploy Architecture
To make the system deploy, the minimum deployment architecture is shown below, which consist of:
...
Pre-Installation Requirements
Hardware Requirements
- Wearable Glass (Optional)
- Teacher Client-Side — Personal Computer with Camera
- Student Client-Side — Personal Computer with Camera
- Server Side — 8 Core 16G Virtual Machine on ARM or x86 Platform
Software Prerequisites
- Teacher Side: Windows 10 with a Web Browser that supports WebSockets.
- Student Side: Windows 10 with a Web Browser that supports WebSockets.
- Server Side: CentOS 8
- Virtual Classroom (OpenVidu 2.13.0)
- Tars 2.1.0
- IEC 3.0
...
Database Prerequisites
Other Installation Requirements
Installation on the Client PC side(Teacher/Student Client)
Note well: No special software to access the application. The general software is itemized below:
- Install Windows 10
- Install camera driver
- Install Firefox browser
Installation High-Level Overview
Upstream Deployment Guide
Installation for Tars Master
- Install CentOS 8, refer to https://phoenixnap.com/kb/how-to-install-centos-8
- Install IEC, refer to IEC Type1&2 Installation Guide for R2
- Install Tars, refer to https://tarscloud.github.io/TarsDocs_en/installation/source.html
...
cd /Tars
git clone https://github.com/TarsCloud/TarsWeb.git
mv TarsWeb web
cp -rf web /usr/local/tars/cpp/deploy/
cd /usr/local/tars/cpp/deploy
chmod a+x linux-install.sh
./linux-install.sh MYSQL_HOST MYSQL_ROOT_PASSWORD INET REBUILD(false[default]/true) SLAVE(false[default]/true)
./linux-install.sh 192.168.1.10 our_PW eno1 false false admin 3306
Installation for Tars Agent(Jenkins Slave)
- Install CentOS 8, refer to https://phoenixnap.com/kb/how-to-install-centos-8
- Install IEC, refer to IEC Type1&2 Installation Guide for R2
- Install Tars, refer to https://github.com/TarsCloud/Tars/blob/master/Install.md
Install Virtual Classroom BackEnd
...
| Code Block |
|---|
0. prepare : firewall firewall-cmd --add-port 22/tcp firewall-cmd --add-port 80/tcp firewall-cmd --add-port 443/tcp firewall-cmd --add-port 3478/tcp firewall-cmd --add-port 3478/udp firewall-cmd --add-port 40000-57000/tcp firewall-cmd --add-port 40000-57000/udp firewall-cmd --add-port 57001-65535/tcp firewall-cmd --add-port 57001-65535/udp firewall-cmd --list-all 1. deployment cd /opt yum install docker-ce --nobest --allowerasing systemctl enable --now docker curl -L https://github.com/docker/compose/releases/download/1.25.0/docker-compose-`uname -s`-`uname -m` -o /usr/local/bin/docker-compose chmod +x /usr/local/bin/docker-compose docker-compose --version curl https://s3-eu-west-1.amazonaws.com/aws.openvidu.io/install_openvidu_2.13.0.sh | bash 2. Configuration vi /opt/openvidu/.env # add IP and admin PW OPENVIDU_DOMAIN_OR_PUBLIC_IP= $your_host_IP OPENVIDU_SECRET= $admin_PW 3. Execution cd /opt/openvidu/ ./openvidu start Available services Consume OpenVidu REST API through https://$your_host_IP/ If the application is enabled, it will also be available at https://$your_host_IP/ You can open OpenVidu Dashboard to verify everything is working as expected at https://$your_host_IP/dashboard/ with credentials: user: OPENVIDUAPP pass: $admin_PW 4. Install Java for Jenkins Slave For Slave Mode, install Java will be ok. sudo yum install -y java-1.8.0-openjdk-devel |
Install Virtual Classroom Frontend
| Code Block |
|---|
##http-server install
npm install -g http-server-ssl

## Virtual Classroom front-end setup
git clone https://github.com/OpenVidu/openvidu-vr.git
cd openvidu-vr/openvidu-vr-room
vi app.js
modify line 163
var OPENVIDU_SERVER_URL = 'https://demos.openvidu.io'; //backend IP
var OPENVIDU_SERVER_SECRET = 'MY_SECRET'; //backend password

http-server-ssl -S &


Run Testing: https://$your_host_IP:8080 |
Installation on VM2(Jenkins Master)
Jenkins is a Java application, so the first step is to install Java. Run the following command to install the OpenJDK 8 package:
...
Visit Website: 
Jenkins is ready: 
...