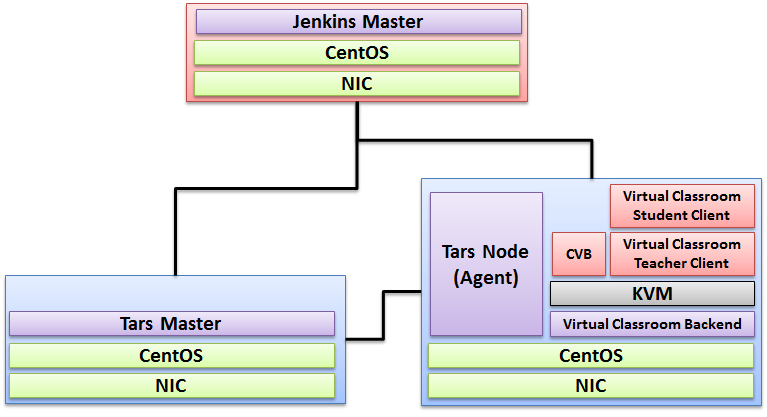
Deploy Architecture
To make the system deploy, the minimum deployment architecture is shown below, which consist of:
Hardware
- Wearable Glass (Optional)
- Teacher Client-Side — Personal Computer with Camera
- Student Client-Side — Personal Computer with Camera
- Server Side — 8 Core 16G Virtual Machine on ARM or x86 Platform
Software
- Teacher Side: Windows 10 with a Web Browser that supports WebSockets.
- Student Side: Windows 10 with a Web Browser that supports WebSockets.
- Server Side: CentOS 8
- Virtual Classroom (OpenVidu 2.13.0)
- Tars 2.1.0
- IEC 3.0
Installation on the Client PC side(Teacher/Student Client)
Note well: No special software to access the application. The general software is itemized below:
- Install Windows 10
- Install camera driver
- Install Firefox browser
Installation for Tars Master
- Install CentOS 8, refer to https://phoenixnap.com/kb/how-to-install-centos-8
- Install IEC, refer to IEC Type1&2 Installation Guide for R2
- Install Tars, refer to https://tarscloud.github.io/TarsDocs_en/installation/source.html
1. Dependency install
yum install -y glibc-devel gcc gcc-c++ bison flex make cmake psmisc ncurses-devel zlib-devel openssl openssl-devel
## install mysql
wget -i -c http://dev.mysql.com/get/mysql57-community-release-el7-10.noarch.rpm
yum -y install mysql57-community-release-el7-10.noarch.rpm
yum -y install mysql-community-server
yum -y install mysql-devel
If you have problems to install mysql with the above step, add the new mysql repository to local server with this yum command and then re-run the previous commands.
sudo yum localinstall https://dev.mysql.com/get/mysql57-community-release-el7-10.noarch.rpm
yum install mariadb-server -y
## Configure mysql
systemctl start mariadb.service
systemctl enable mariadb.service
systemctl status mariadb.service
mysql -u root -p
grep "password" /var/log/mariadb/mariadb.log
ALTER USER 'root'@'localhost' IDENTIFIED BY '${your passwd}';
flush privileges;
2. Install develop environment for Tars
yum install -y npm
npm i -g pm2
wget -qO- https://raw.githubusercontent.com/creationix/nvm/v0.33.11/install.sh | bash
source ~/.bashrc
nvm install v8.11.3
npm install -g pm2 --registry=https://registry.npm.taobao.org
mkdir Tars
cd Tars
git clone https://github.com/TarsCloud/TarsFramework.git --recursive
cd TarsFramework/build
chmod u+x build.sh
./build.sh prepare
./build.sh all
###Recompile if needed.###
./build.sh cleanall
./build.sh all
Change to user root and create the installation directory.
cd /usr/local
mkdir tars
mkdir app
chown ${normal user}:${normal user} ./tars/
chown ${normal user}:${normal user} ./app/
cd
cd Tars/TarsFramework/build/
./build.sh install or make install
The default install path is /usr/local/tars/cpp。
If you want to install on different path:
**modify tarscpp/CMakeLists.txt**
**modify TARS_PATH in tarscpp/servant/makefile/makefile.tars**
**modify DEMO_PATH in tarscpp/servant/script/create_tars_server.sh**
3.Tars framework Installation
3.0 Firewall setup
firewall-cmd --zone=public --permanent --add-service=http
firewall-cmd --add-port 3000/tcp
firewall-cmd --add-port 3001/tcp
firewall-cmd --add-port 3306/tcp
3.1. Add user
mysql -u root -p
grant all on *.* to 'tarsAdmin'@'%' identified by 'Tars@2019' with grant option;
grant all on *.* to 'tarsAdmin'@'172.22.195.10' identified by 'Tars@2019' with grant option;
grant all on *.* to 'tarsAdmin'@'Node-1' identified by 'Tars@2019' with grant option;
flush privileges;
3.2 setup mysql privileges
mysql -u root -p
>use mysql
>select Host from user where User='root';
if shown as “localhost”,we can update as follwing command:
>update user set host = '%' where user ='root';
>FLUSH PRIVILEGES;
'%'update to the host IP,and then use mysql -u root -p --host '%ip' change back'%'
cd /Tars
git clone https://github.com/TarsCloud/TarsWeb.git
mv TarsWeb web
cp -rf web /usr/local/tars/cpp/deploy/
cd /usr/local/tars/cpp/deploy
chmod a+x linux-install.sh
./linux-install.sh MYSQL_HOST MYSQL_ROOT_PASSWORD INET REBUILD(false[default]/true) SLAVE(false[default]/true)
./linux-install.sh 192.168.1.10 our_PW eno1 false false admin 3306
Installation for Tars Agent(Jenkins Slave)
- Install CentOS 8, refer to https://phoenixnap.com/kb/how-to-install-centos-8
- Install IEC, refer to IEC Type1&2 Installation Guide for R2
- Install Tars, refer to https://github.com/TarsCloud/Tars/blob/master/Install.md
Install Virtual Classroom BackEnd
0. prepare : firewall

firewall-cmd --add-port 22/tcp
firewall-cmd --add-port 80/tcp
firewall-cmd --add-port 443/tcp
firewall-cmd --add-port 3478/tcp
firewall-cmd --add-port 3478/udp
firewall-cmd --add-port 40000-57000/tcp
firewall-cmd --add-port 40000-57000/udp
firewall-cmd --add-port 57001-65535/tcp
firewall-cmd --add-port 57001-65535/udp
firewall-cmd --list-all

1. deployment
cd /opt
yum install docker-ce --nobest --allowerasing
systemctl enable --now docker
curl -L https://github.com/docker/compose/releases/download/1.25.0/docker-compose-`uname -s`-`uname -m` -o /usr/local/bin/docker-compose
chmod +x /usr/local/bin/docker-compose
docker-compose --version

curl https://s3-eu-west-1.amazonaws.com/aws.openvidu.io/install_openvidu_2.13.0.sh | bash

2. Configuration
vi /opt/openvidu/.env

# add IP and admin PW
OPENVIDU_DOMAIN_OR_PUBLIC_IP= $your_host_IP

OPENVIDU_SECRET= $admin_PW

3. Execution
cd /opt/openvidu/
./openvidu start

Available services
Consume OpenVidu REST API through https://$your_host_IP/
If the application is enabled, it will also be available at https://$your_host_IP/
You can open OpenVidu Dashboard to verify everything is working as expected at https://$your_host_IP/dashboard/ with credentials:
user: OPENVIDUAPP
pass: $admin_PW

4. Install Java for Jenkins Slave

For Slave Mode, install Java will be ok.

sudo yum install -y java-1.8.0-openjdk-devel
Install Virtual Classroom Frontend
##http-server install
npm install -g http-server-ssl

## Virtual Classroom front-end setup
git clone https://github.com/OpenVidu/openvidu-vr.git
cd openvidu-vr/openvidu-vr-room
vi app.js
modify line 163
var OPENVIDU_SERVER_URL = 'https://demos.openvidu.io'; //backend IP
var OPENVIDU_SERVER_SECRET = 'MY_SECRET'; //backend password

http-server-ssl -S &


Run Testing: https://$your_host_IP:8080
Installation on VM2(Jenkins Master)
Jenkins is a Java application, so the first step is to install Java. Run the following command to install the OpenJDK 8 package:
sudo yum install -y java-1.8.0-openjdk-devel
The next step is to enable the Jenkins repository. To do that, import the GPG key using the following curl command:
curl --silent --location http://pkg.jenkins-ci.org/redhat-stable/jenkins.repo | sudo tee /etc/yum.repos.d/jenkins.repo
And add the repository to your system with:
sudo rpm --import https://jenkins-ci.org/redhat/jenkins-ci.org.key
Once the repository is enabled, install the latest stable version of Jenkins by typing:
sudo yum install -y jenkins
After the installation process is completed, start the Jenkins service with:
sudo systemctl start jenkins
To check whether it started successfully run:
systemctl status jenkins
You should see something similar to this:
# systemctl status jenkins
* jenkins.service - LSB: Jenkins Automation Server
   Loaded: loaded (/etc/rc.d/init.d/jenkins; bad; vendor preset: disabled)
   Active: active (running) since Tue 2019-10-15 11:16:26 CST; 1min 15s ago
     Docs: man:systemd-sysv-generator(8)
  Process: 489 ExecStart=/etc/rc.d/init.d/jenkins start (code=exited, status=0/SUCCESS)
   CGroup: /system.slice/jenkins.service
           `-510 /etc/alternatives/java -Dcom.sun.akuma.Daemon=daemonized -Djava.awt.headless=true -DJENKINS_HOME=/var/lib/jenkins -jar /usr/l...

Oct 15 11:16:25 VM_0_4_centos systemd[1]: Starting LSB: Jenkins Automation Server...
Oct 15 11:16:26 VM_0_4_centos runuser[491]: pam_unix(runuser:session): session opened for user jenkins by (uid=0)
Oct 15 11:16:26 VM_0_4_centos runuser[491]: pam_unix(runuser:session): session closed for user jenkins
Oct 15 11:16:26 VM_0_4_centos jenkins[489]: Starting Jenkins [  OK  ]
Oct 15 11:16:26 VM_0_4_centos systemd[1]: Started LSB: Jenkins Automation Server.
Finally enable the Jenkins service to start on system boot.
sudo systemctl enable jenkins
output
# sudo systemctl enable jenkins
jenkins.service is not a native service, redirecting to /sbin/chkconfig.
Executing /sbin/chkconfig jenkins on
Adjust the Firewall If you are installing Jenkins on a remote CentOS server that is protected by a firewall you need to port 8080.
Use the following commands to open the necessary port:
sudo firewall-cmd --permanent --zone=public --add-port=8080/tcp
sudo firewall-cmd --reload
Setting Up Jenkins To set up your new Jenkins installation, open your browser and type your domain or IP address followed by port 8080:
http://your_ip_or_domain:8080
You will see the website itemized below: 
Select the left option and install the plugin later: 
Automatic install process: 
Configure username/password: 
Visit Website: 
Jenkins is ready: 