Table of Contents
Introduction
This document outlines the steps to deploy Radio Edge Cloud (REC). REC was designed from the ground up to be a highly available, flexible, and cost-efficient system for the use and support of Cloud RAN and 5G networks. The production deployment of Radio Edge Cloud SDN-Enabled Broadband Access (SEBA) for Telco Appliance. With the exception of the installation of the SEBA application components (VOLTHA, NEM, ONOS), the installation process follows that of REC (REC Installation Guide). The production deployment of SEBA is intended to be done using the Akraino Regional Controller which has been significantly enhanced during the Akraino Release 1 timeframe, but for evaluation purposes, it is possible to deploy REC without the Regional Controller.
In a Regional Controller based deployment, the Regional Controller API will be used to upload the REC Blueprint YAML (available from the REC repository) which informs the Regional Controller of where to obtain the REC ISO images, the REC workflows (executable code for creating, modifying and deleting REC sites) and the REC remote installer component (a container image which will be instantiated by the create workflow and which will then invoke the REC Deployer (which is located in the ISO DVD disc image file) which conducts the rest of the installation.
The instructions below skip most of this and directly invoke the REC Deployer from the BMC, iLO or iDRAC of a physical server. The basic workflow of the REC deployer is to copy a base image to the first controller in the cluster and then read the contents of a configuration file (typically called user_config.yaml) to deploy the base OS and all additional software to the rest of the nodes in the cluster.
| Note |
|---|
Although the purpose of the Radio Edge Cloud is to run the RAN Intelligent Controller (RIC), the Akraino Release 1 predates the RIC release 1. The manual installation procedure described below does not result in the installation of the RIC. In the REC Continuous Deployment system, as of the Akraino Release 1 timeframe, a Jenkins job deploys a "Release Zero" snapshot of the RIC and runs a small set of tests. These steps may be manually executed and this procedure is described in the last section of this WIKI document. Fully automated installation of the RIC as part of the REC will not be complete until sometime after Akraino Release 1. If you are interested in actually interfacing a REC appliance with eNodeB/gNode B and radio infrastructure you should really join the Radio Edge Cloud Project Meetings on a weekly basis and let the REC team know of your interest. We will be happy to coordinate with you and welcome any testing that you can do. |
Pre-Installation Requirements for REC Cluster
Hardware Requirements:
REC is a fully integrated stack from the hardware up to and including the application, so for best results, it is necessary to use one of the tested hardware configurations. Although REC is intended to run on a variety of different hardware platforms, it includes a hardware detector component that customizes each installation based on the hardware present and will need (possibly minor) changes to run on additional hardware configurations. Preliminary support is present in Akraino Release 1 of REC for HP DL380 generation 9 and 10, Dell R740xd and Nokia Open Edge servers, but the primary focus of Release 1 testing is the Nokia Open Edge servers, so some issues may be encountered with other server types.
- Minimum of 3 nodes.
- Total Physical Compute Cores: 60 (120 vCPUs)
- Total Physical Compute Memory: 192GB minimum per node
- Total SSD-based OS Storage: 2.8 TB (6 x 480GB SSDs)
- Total Application-based Raw Storage: 5.7 TB (6 x 960GB SSD0
- Networking Per Server: Apps - 2 x 25GbE (per Server) and DCIM - 2 x 10GbE + 1 1Gbt (shared)
The specific recommended configuration as of the Release 1 timeframe is the Open Edge configuration documented in the Radio Edge Cloud Validation Lab
BIOS Requirements:
- BIOS set to Legacy (Not UEFI)
- CPU Configuration/Turbo Mode Disabled
- Virtualization Enabled
- IPMI Enabled
- Boot Order set with Hard Disk listed as first in the list.
As of Release 1, Radio Edge Cloud does not yet include automatic configuration for a pre-boot environment. The following versions were manually loaded on the Open Edge servers in the Radio Edge Cloud Validation Lab using the incomplete but functional script available here. In the future, automatic configuration of the pre-boot environment is expected to be a function of the Regional Controller under the direction of the REC pod create workflow script.
- BIOS1: 3B06
- BMC1: 3.13.00
- BMC2: 3.08.00
- CPLD: 0x01
Network Requirements:
The REC cluster requires the following segmented (VLAN), routed networks accessible by all nodes in the cluster:
- External Operations, Administration and Management (OAM) Network
- Out Of Band (OOB) (iLO/iDRAC) network(s)
- Storage/Ceph network(s)
- Internal network for Kubernetes connectivity
- NTP and DNS accessibility
The REC installer will configure NTP and DNS using the parameters entered in the user_config.yaml. However, the network
must be configured for the REC cluster to be able to access the NTP and DNS servers prior to the install.
About user_config.yaml
The user_config.yaml file contains details for your REC cluster such as required network CIDRs, usernames, passwords,
DNS and NTP server ip addresses, etc. The REC configuration is flexible, but there are dependencies: e.g., using DPDK
requires a networking profile with ovs-dpdk type, a performance profile with CPU pinning & hugepages and performance
profile links on the compute node(s).
The following link points to the latest user_config template with descriptions and examples for every available parameter:
, but this release focuses on deploying SEBA without the Regional Controller. Instructions on how to deploy the SEBA blueprint using the Regional Controller will be covered in a future release.
The instructions below directly invoke the SEBA Deployer from the BMC, iLO or iDRAC of a physical server. The basic workflow of the SEBA deployer is to copy a base image to the first controller in the cluster and then read the contents of a configuration file (typically called user_config.yaml) to deploy the base OS and all additional software to the rest of the nodes in the cluster.
An overview and diagram of the network connectivity is available on the Radio Edge Cloud Validation Lab page.
Pre-Installation Requirements for SEBA Cluster
Hardware Requirements:
SEBA is a fully integrated stack from the hardware up to and including the application, so for best results it is necessary to use one of the tested hardware configurations. Although SEBA is intended to run on a variety of different hardware platforms, it includes a hardware detector component that customizes each installation based on the hardware present and will need (possibly minor) changes to run on additional hardware configurations. The primary focus of Akraino Release 2 self-certification testing for the SEBA blueprint is the Nokia Open Edge servers, so some issues may be encountered with other server types.
- Minimum of 3 nodes.
- Total Physical Compute Cores: 60 (120 vCPUs)
- Total Physical Compute Memory: 192GB minimum per node
- Total SSD-based OS Storage: 2.8 TB (6 x 480GB SSDs)
- Total Application-based Raw Storage: 5.7 TB (6 x 960GB SSDs)
- Networking Per Server: Apps - 2 x 25GbE (per Server) and DCIM - 2 x 10GbE + 1 1Gbt (shared)
The specific recommended configuration as of the Release 2 time frame is the Open Edge configuration for a single cluster documented in the Radio Edge Cloud Validation Lab, with only three server blades populated (instead of five server blades for REC).
BIOS Requirements:
- BIOS set to Legacy (Not UEFI)
- CPU Configuration/Turbo Mode Disabled
- Virtualization Enabled
- IPMI Enabled
- Boot Order set with Hard Disk listed as first in the list.
As of Akraino Release 2, the Telco Appliance blueprint family does not yet include automatic configuration for a pre-boot environment. The following versions were manually loaded on the Open Edge servers in the SEBA Blueprint Validation Lab (note: this may be facilitated with the same script utilized by REC for Akraino Release 1). In the future, automatic configuration of the pre-boot environment is expected to be a function of the Regional Controller under the direction of the SEBA pod create workflow script.
- BIOS1: 3B06
- BMC1: 3.13.00
- BMC2: 3.08.00
- CPLD: 0x01
Network Requirements:
The SEBA cluster requires the following segmented (VLAN), routed networks accessible by all nodes in the cluster:
- External Operations, Administration and Management (OAM) Network
- Out Of Band (OOB) (iLO/iDRAC) network(s)
- Storage/Ceph network(s)
- Internal network for Kubernetes connectivity
- NTP and DNS accessibility
The SEBA installer will configure NTP and DNS using the parameters entered in the user_config.yaml. However, the network must be configured for the SEBA cluster to be able to access the NTP and DNS servers prior to the install.
About user_config.yaml
The user_config.yaml file contains details for your SEBA cluster such as required network CIDRs, usernames, passwords, DNS and NTP server ip addresses, etc. The SEBA configuration is flexible, but there are dependencies: e.g., using DPDK requires a networking profile with ovs-dpdk type, a performance profile with CPU pinning & hugepages and performance profile links on the compute node(s). All values in the user_config.yaml should be updated to match the environment for your deployment.
| Note |
|---|
The following link points to the latest user_config template with descriptions and examples for every available parameter: user_config.yaml template |
| Note |
|---|
Note: the version number listed in the user_config.yaml needs to follow closely the version from the template. There is a strict version checking during deployment for the first two part of the version number. The following rules apply to the yaml's version parameter: ### Version numbering:
### X.0 |
| Note |
Note: the version number listed in the user_config.yaml needs to follow closely the version from the template. There is a strict version checking during deployment for the first two part of the version number. The following rules apply to the yaml's version parameter: ### Version numbering:
### X.0.0
### - Major structural changes compared to the previous version.
### - Requires all users to update their user configuration to
### the new template
### a.X.0
### - Significant changes in the template within current structure
### (e.g. new mandatory attributes)
### - Requires all users to update their user configuration according
### to the new template (e.g. add new mandatory attributes)
### a.b.X
### - Minor changes in template (e.g. new optional attributes or
### changes in possible values, value ranges or default values)
### - Backwards compatible |
Example user_config.yaml
| Code Block | ||||||||||
|---|---|---|---|---|---|---|---|---|---|---|
| ||||||||||
--- version: 2.0.0 name: recseba-samplefoundry description: RECSEBA Deployment on Nokia OpenEdge Server time: ntp_servers: [216.239.35.4, 216.239.35.5] zone: America/New_York users: admin_user_name: cloudadmin admin_user_password: "$9$bl0ck=959000$V07qrQ4tKMbDTWTj$wl9cTTqThWTEWm33THH29SZeIGU66K2FHffF$1wIvh9CACKJ/HvZFGdbedw79ag2.2AqtDRoTTTCWK8Eq0kQn$6$XXXXXXX$C3fvJHW8o1383ZTb.vQ86wfjK7VxI7N7KwE0PxQrPdDRpotJMY8wcB2XHUQCheuHf44KGrg.AMGoI3d37IHua/" initial_user_name: myadmin initial_user_password: FY625czv5RXXXXXXXX admin_password: ycjPSE4mAXXXXXXXX networking: dns: [ 8.8.8.8, 8.8.4.4 ] mtu: 9000 infra_external: mtu: 1500 network_domains: rack-1: cidr: 19210.16865.101.0/24 vlangateway: 14110.65.1.1 gatewayvlan: 192.168.10.1751 ip_range_start: 19210.16865.101.21050 ip_range_end: 19210.16865.101.213 60 infra_storage_cluster: network_domains: #routes: rack-1: # - cidr{to: 19210.16999.1099.0/24 , via: 10.65.1.250} infra_storage_cluster: network_domains: rack-1: cidr: 192.168.11.0/24 ip_range_start: 192.169168.1011.21151 ip_range_end: 192.169168.1011.21360 vlan: 1423911 infra_internal: network_domains: rack-1: cidr: 192.167168.1012.0/24 ip_range_start: 192.167168.1012.21151 ip_range_end: 192.167168.1012.25060 vlan: 1443912 caas: providerdocker_size_networksquota: 2G helm_operation_timeout: 900 providerInternal:docker0_cidr: 172.17.0.1/16 instantiation_timeout: 60 helm_parameters: { vlan_ranges"registry_url": "2002:2003" providerExternal:registry.kube-system.svc.nokia.net" } vlan_rangesencrypted_ca: "2004:2005" providerSriov: vlan_ranges: "2006:2008" caas: docker_size_quota: 2G helm_operation_timeout: 900 docker0_cidr: 172.17.0.1/16 instantiation_timeout: 60 encrypted_ca: ["U2FsdGVkX1+iaWyYk3W01IFpfVdughR5aDKo2NpcBw2UStYnepHlr5IJD3euo1lS\n7agR5K2My8zYdWFTYYqZncVfYZt7Tc8zB2yzATEIHEV8PQuZRHqPdR+/OrwqjwA6\ni/R["U2FsdGVkX1+iaWyYk3W01IFpfVdughR5aDKo2NpcBw2UStYnepHlr5IJD3euo1lS\n7agR5K2My8zYdWFTYYqZncVfYZt7Tc8zB2yzATEIHEV8PQuZRHqPdR+/OrwqjwA6\ni/R+4Ec3Kko6eS0VWvwDfdhhK/nwczNNVFOtWXCwz/w7AnI9egiXnlHOq2P/tsO6\np3e9J6ly5ZLp9WbDk2ddAXChnJyC6PlF7ou/UpFOvTEXRgWrWZV6SUAgdxg5Evam\ndmmwqjRubAcxSo7Y8djHtspsB2HqYs90BCBtINHrEj5WnRDNMR/kWryw1+S7zL1G\nwrpDykBRbq/5jRQjqO/Ct98yNDdGSWZ+kqMDfLriH4pQoOzMcicT4KRplQNX2q9O\nT/7CXKmmB3uBxM7a9k2LS22Ljszyd2vxth4jA+SLNOB5IT8FmfDY3PvNnvKaDGQ4\nuWPASyjpPjms3LwsKeu+T8RcKcJJPoZMNZGLm/5jVqm3RXbMvtI0oEaHWsVaSuwX\nnMgGQHNHop+LK+5a0InYn4ZJo9sbvrHp9Vz4Vo+AzqTVXwA4NEHfqMvpphG+aRCb\ncPJggJqnF6s5CAPDRvwXzqjjVQy2P1/AhJugW7HZw3dtux4xe3RZ+AMS2YW+fSi1\nIxAGlsLL28KJMc5ACxX5cuSB/nO19afpf6zyOPIk0ZVh8+bxmB4YBRzGLTSnFNr3\ndauT9/gCU85ThE93rIfPW6PRyp9juEBLjgTpqDQPn5APoJIIW1ZQWr6tvSlT04Hc\nw0HZ7EcAC7EmmaQYTyL6iifHiZHop9g2clXA0MU9USQggMOKxFrxEyF4iWdsCCXP\nfTA3bgzvlvqfk9p2Cu9DOmRHGLby2YSj+oghsFDCfhfM1v2Ip2YGPdJM6y7kNX19\nkBpV4Rfcw0NCg2hhXbHZ7LtejlQ1ht8HnmY5/AnJ/HRdnPb+fcdgS9ZFcGsAH2ze\nSe7hb+MNp80JsuX4A+jOjBacjwL+KbX5RDJp//5dEmqJDkbfMctL1KukBaDrbpci\np/TeVmLhwlQogeVuF/Y5vCokq6M5+f28jFJ+R+P2oBY3fAvBhmd+ZmGbUWXxmMF+\nV3mpFkYqXWS+mtVh8Fs0nhrCkqRLTmBj5UNhsMcZ4vGfiu+dPMQi62wa6GoGVjus\nIj/Upal9RYwthSykUKcWu0KEB929/e4Sz0Y6s3Pzy1+xdmKDPtaBUH9UT3LjMVvY\nordeL0UjKYqWcvpb7Vfma3UD0tz6n/CyHNDVhA/FioadEy6iJvL316Kf3to69cN+\nvKWav/IeazxdhBSbatPKN3qwESkzr3el2yrdZL4qehflRMp0rFuzZfRB69UFPbgq\nkTQlJHb0OaJTt6er/XfjtMZoctW7xtYf58CqMJ06QxK5kLKc5Yib73cVyzhmmIz4\nEtUs10QCA5AihHgVES8ZrgZKWDhR+pmFPG3eVitJoUeDNEe9vVEEX8TiWu+H1OHG\n8UyCKFyyPCj5OwVbwGSgQg=="] encrypted_ca_key: ["U2FsdGVkX1+WlNST+WkysFUHYAPfViWe01tCCQsXPsWsUskB4oNNC78bXdEv33+3\ncDlubc9F0ZiHxkng70LKCFV5KQneHfg6c3lPaM4zwaJ34UCf80riIoYVozxqnK/S\nTAs0i0rJmzRz4hkTre4xV0I2ZucW3gquP4/s1yUK3IJF84SDfEi26uPsBOrUpU9Q\nIBxY2rldK+yZUZUFehQb82dvin0CSiXDY63cYLJMYEwWBfJEeY+RGMuZuuGp3qgy\nyVfByZ5/kwF9qa6+ToYw2zXiokGFfBqiAFnXU7Q6Wcu2qndMQoiy3jFU2DjEQi6N\nVgZHzrPUUUrmQGALyA5blVvNHVQyq4rmMmsTEI02xclz8m7Yzd/HEFo/C5z5x+My\n2SOIBIRCy6bTSpzU7iixl5U6r5/XfrfQoJ+OwRq1/P2QmJ2swqzcLOUpDlquDeuP\nd46ceWMO8nlimRps4cX5nQRI1SLaypH1rRiQpnIP7q+jrHEco6wStc458rzX1WxW\nhPMjnnlVhH4sJNqh5c5/1BvzSBdnx0qIBcFA6fR8XfL//DmRFsAfRaxVVWadpusc\nXfh4LNNqR9HmoNH6yfBpd66yBYsjFbWip0WKMwdhNBqN1a94OFvRS4+iUfskjC2w\n4w4YjPluRBxI5t9eT4wX8D328ikgP4ZQrPdUZoDpLThhRZ62pTOknOeVj+C7799O\nEbopqGg+6BIXZHakmzB6I/fyjthoLBbxpyqNvKlGGamMNI3d7wq1vwTHch5QLO+w\n5fuRqoIRUtGscSQXp8EOb4kiaxhXXJLkVJw7auOdqxqxQbIf+dt2ViwdyFNjdHz8\ngPFcAom0GO+T7xHMF1H6xqUXkB4QzTK934pMVoIwu5MezBlz8bxj5+EeF7Ptkdnj\nq4rwihGY7aEhPrXVoq19tsbMYwDGZQvbTKtWDOxrD6ruTDTwZxVZcEOAX5KCF0Oq\nqRcrCBcLNERm4FSAgUK90v71TNQoMpVea3/01Ec8GbHJfozvrmAVqBpbF0ajlM1/\nZvGrnmVrJEk/PelCEu+Ni9zrn7DxGZqJ7lbcDU7Nq/18KNvOQah4Ryh9aDKVSD4r\nvgZKzIHPRgKoHTxTZ2uP1LBgK2Ux1RjhlAcZFAmWYxg/qluxnHKCimZ04rIjI0if\nN0wSI7uh8TsyidZv+iKpG+JqW5oe7R8xLlU3ceFllkghAGVRn/UyirGXYPzxXbfB\naphYFBuj6FbtdisM7euX2A9F2OUM2reditR/z6q1Ety1xX9aNudQJ1YcL6yr7pGI\nIX3NANlp2Ra9Fr95ne9aEnwdMmGsQ5DjxHczEc3EcDEbFuH6C/XDzYqtOGyFe/pI\nZgPSiys157GB/GzSfOsErvA+EVWKmU8PiLl461s/OV25m0thG5+03yXKRsymX371\nXAg+hHqe2x5PRjwuUDmruEM/P3LHQeMb4YdhI3DfFyUExtJ/Q/38GgB1XNAuDu0R\n3EyV01Umm6IrYDQWpngjGGmiimOdpLFHkQbxDNiRr8QX5eshAbVlI19DINCiRl/u\njh4TqRZMl6YI4oQZDYqCrBrqZLljm/DBhgvr2jnq9ed3dIKlHbrkw3sjBuwINZjw\naduL3U+WTUvUCY/VtlxJZdU1kVLwSnkDh+8HK/eZ7AuHWjQjD9JzArCo5CCMMFJL\noY0IKxzhhP+4BmaMabwcuooxMjWR3fu3T0sgcTEZtG61wcSUDW0gw6c5QAxmq7It\nqzP2b1eNPp05oMJ6ALIe+8MQMM94HigbSiLB3/rFS8KkhZcdJliBc+Ig6TBFx9QW\nS0Jh4WgJn0B5laiI7DRp0E9bUUnLLEFTdA9P9T1DcIwngPuv6IYNQdzYluaX6cvy\nNhCH+XdbaFkA9KOsp69uZWqzweoejAo24Cj71J9H4yMzBDWi7/fL4YQqjS6zC9JY\ny3zhk8VGi9SYtMB1bPdmxBlCyLElZ6qf/cyjsWN89oTTITCYbSuIrB4piJH35t17\nd7eFZ7QXMampJzCQyAcKsxTDVdeKhHjVxsnSWuvmlR31Hmrxw3yQQH2pbGLcHBWJ\ngz+/xpgxh5x0dGzqOKqgfGOtBOSpzHFMuuoXToYbcAIwMVRcTPnVR7B1kOm2OiLG\nhuOxX29DypSM9HjsmoeffJaUoZ2wvBK4QZNpe5Jb80An/aO+8/oKmtaZgJqectsM\nfrVSLZtdPnH62lPy1i5CnoFI6JkX7oficJw8YQqswRp2z5HL9cSEAiR3MOr/Yco+\njJu5IidT3u5+hUlIdZtEtA=="] storage: backends: lvm: enabled: false ceph: osd_pool_default_size: 2 enabled: true network_profiles: controller_network: linux_bonding_options: "mode=lacp" ovs_bonding_options: "mode=lacp" bonding_interfaces: bond0: [enp94s0f0,enp94s0f1] bond1: [enp135s0f0,enp135s0f1ens11f0,ens11f1] interface_net_mapping: bond0: [infra_internal, infra_external, infra_storage_cluster] performance_profiles: provider_network_interfacescaas_cpu_profile: bond1caas_cpu_pools: typeexclusive_pool_percentage: ovs25 provider_networks: [ providerInternal, providerExternal ] shared_pool_percentage: 75 storage_profiles: compute_networkcaas_worker_docker_profile: linuxlvm_instance_bondingstorage_optionspartitions: ["mode=lacp1"] ovsmount_bonding_options: "mode=lacp" dir: /var/lib/docker bondingmount_interfaces:options: noatime,nodiratime,logbufs=8,pquota bond0backend: [ens94s0f0,ens94s0f1]bare_lvm bond1: [enp135s0f0,enp135s0f1]lv_name: docker interface_net_mappingceph_backend_profile: bond0backend: [ infra_internal ] ceph provider_network_interfaces:nr_of_ceph_osd_disks: 2 ceph_pg_openstack_caas_share_ratio: "0:1" hosts: bond1controller-1: service_profiles: [ caas_master, storage type: ovs] network_profiles: [ controller_network ] provider_networks: [ providerInternal, providerExternal ] performancestorage_profiles: [ caasceph_cpubackend_profile: ] performance_profiles: [ caas_cpu_pools: profile ] network_domain: rack-1 exclusive_pool_percentage: 34hwmgmt: shared_pool_percentageaddress: 66 storage_profiles: 10.65.3.57 caas_worker_docker_profile: lvm_instance_storage_partitions: ["1"] user: admin mount_dir: /var/lib/dockerpassword: XXXXXXXX controller-2: mountservice_options: noatime,nodiratime,logbufs=8,pquotaprofiles: [ caas_master, storage ] backend: bare_lvmnetwork_profiles: [ controller_network ] lvstorage_nameprofiles: docker [ ceph_backend_profile: ] backend: cephperformance_profiles: [ caas_cpu_profile ] nr_of_ceph_osd_disks: 2network_domain: rack-1 ceph_pg_openstack_caas_share_ratio: "0:1" hostshwmgmt: controller-1: service_profilesaddress: 10.65.3.56 [ caas_master, storage ] user: network_profiles: admin [ controller_network ] storage_profilespassword: XXXXXXXX [controller-3: service_profiles: [ caas_master, storage ] network_profiles: [ controller_network ] storage_profiles: [ ceph_backend_profile ] performance_profiles: [ caas_cpu_profile ] network_domain: rack-1 hwmgmt: address: 19210.16665.103.21155 user: rootadmin password: c5zgUQ6fXXXXXXXX controller-2host_os: service_profiles: [ caas_master, storage ]lockout_time: 300 network_profiles: [ controller_network ] storage_profiles: [ ceph_backend_profile ] performance_profiles: [ caas_cpu_profile ] network_domain: rack-1 hwmgmt: address: 192.166.10.212 user: root failed_login_attempts: 5 ... |
YAML Requirements
- The YAML files need to edited/created using Linux editors or in Windows Notepad++
- YAML files do not support TABS. You must space over to the location for the text.
Note: You have a better chance at creating a working YAML by editing an existing file or using the template rather than starting from scratch.
Installing SEBA
Obtaining the ISO Image
Recent builds can be obtained from the Akraino Nexus server. Choose either "latest" or a specific build number from the release images directory and download the file install.iso. Build number 185 is the Akraino Release 1 image from the 4th of October, 2019 and was used for the initial validation of the SEBA blueprint. Options for booting the ISO on your target hardware include NFS, HTTP, or USB memory stick. You must place the ISO in a suitable location (e.g., NFS server, HTTP(S) server or USB memory stick) before starting the boot process. The file bootcd.iso, which is also in the same directory, is used only when deploying via the Akraino Regional Controller using the Telco Appliance Remote Installer. You can ignore bootcd.iso when following the manual procedure below.
Accessing REC.ISO
| Section | ||||||||||
|---|---|---|---|---|---|---|---|---|---|---|
| ||||||||||
|
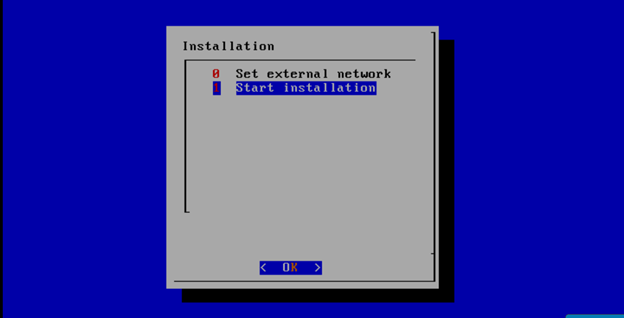
After rebooting, the installation will bring up the Akraino Edge Stack screen.

The first step is to clean all the drives discovered before installing the ISO image.
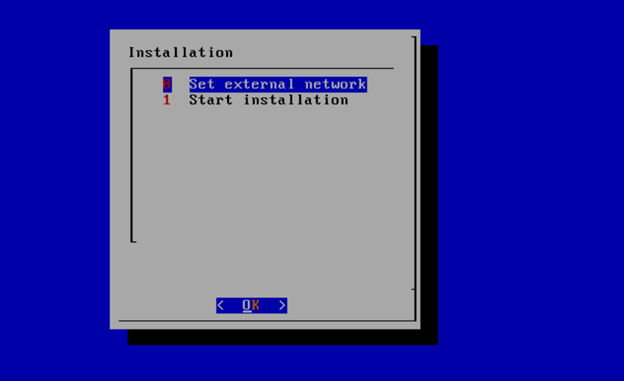
Select, 0 Set external network at the Installation window, press OK.
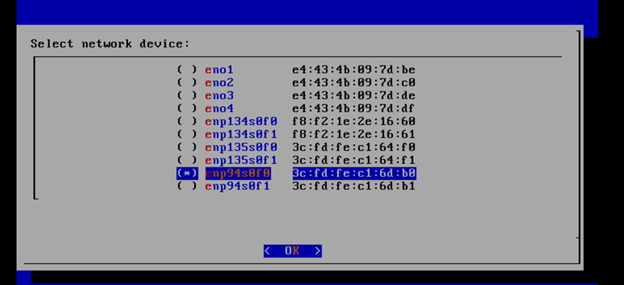
Arrow down to and press the spacebar to select the network interface to be used for the external network.
If using bonded nics, select the first interface in the bond.
Enter the external ip address with CIDR for controller-1: 172.28.15.211/24
Enter the gateway ip address for the external ip address just entered: 172.28.15.1
Enter the VLAN number: 141
The installation will check the link and connectivity of the IP addresses entered.
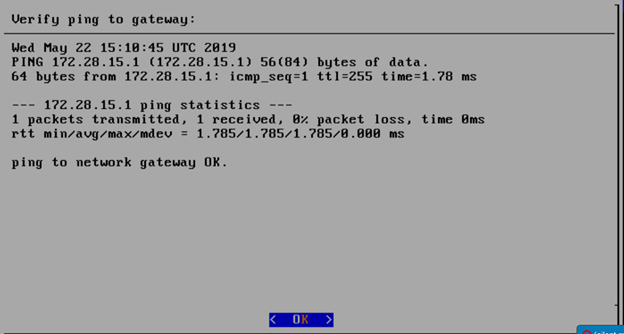
If the connectivity test passed, then Installation window will return.
Uploading user_config.yaml
Go to your RC or jump server and scp (or sftp) your user_config.yaml to controller-1’s /etc/userconfig directory.
initial credentials: root/root.
scp user_config.yaml root@<controller-1 ip address>/etc/userconfig/
Select, 1 Start installation and OK.
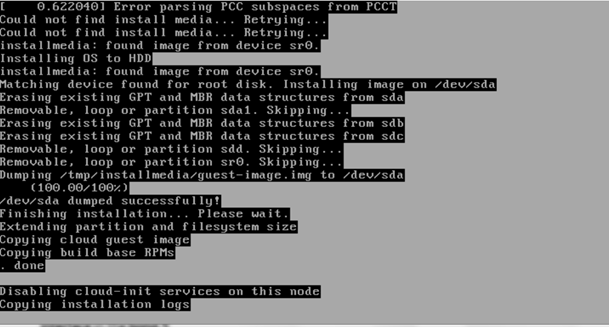
After selecting Start Installation, the installation should start automatically, and the content of /srv/deployment/log/bootstrap.log should be displayed on the remote console.
Monitoring Deployment Progress/Status
You can monitor the SEBA deployment by checking the remote console screen or by tailing the logs on controller-1 node's /srv/deployment/log/ directory.
There are two log files:
bootstrap.log: deployment status log
cm.log: ansible execution log
tail -f /srv/deployment/log/cm.log
tail -f /srv/deployment/log/bootstrap.log
Note: When the deployment to all the nodes has completed, “controller-1” will reboot automatically.
Verifying Deployment
A post-installation verification is required to ensure that all nodes and services were properly deployed.
You need to establish an ssh connection to the controller’s VIP address and login with administrative rights.
tail /srv/deployment/log/bootstrap.log
You should see: Installation complete, Installation Succeeded.
Go to SEBA Blueprint Test Document and follow the steps outlined there to ensure that all nodes and services were properly deployed.
Deployment Failures
Sometimes failures happen, usually due to misconfigurations or incorrect addresses.
To re-launch a failed deployment
There are two options for redeploying. (Execute as root)
- /opt/cmframework/scripts/bootstrap.sh /etc/userconfig/user_config.yaml --install &
- openvt -s -w /opt/start-menu/start_menu.sh &
Note: In some cases modifications to the user_config.yaml may be necessary to resolve a failure.
If re-deployment is not possible, then the deployment will need to be started from booting to the REC.iso,
SEBA Installation onto REC cluster
| Note |
|---|
Kubernetes 1.14 deprecates several legacy APIs and Kubernetes 1.16 disables them by default. For deployment of SEBA, it is necessary to manually enable these legacy Kubernetes APIs since they are not supported by Telco Appliance. The deprecated APIs will be removed in Kubernetes 1.18. |
The following commands will install the SEBA software on the cluster.
Enable legacy APIs by adding --runtime-config option to the command section of /etc/kubernetes/manifests/apiserver.yml on each node in the cluster. Connect to each node using ssh and edit the file to match the example below.
Code Block ssh cloudadmin@10.65.1.51 sudo vi /etc/kubernetes/manifests/apiserver.ymlCode Block title /etc/kubernetes/manifests/apiserver.yml collapse true --- apiVersion: v1 kind: Pod metadata: name: kube-apiserver namespace: kube-system spec: hostNetwork: true containers: - name: kube-apiserver image: registry.kube-system.svc.rec.io:5555/caas/hyperkube:1.16.0-5 securityContext: runAsUser: 144 command: - "/kube-apiserver" - --admission-control=DefaultStorageClass,LimitRanger,MutatingAdmissionWebhook,NamespaceExists,NamespaceLifecycle,NodeRestriction,PodSecurityPolicy,ResourceQuota,ServiceAccount,ValidatingAdmissionWebhook - --advertise-address=192.168.12.51 - --allow-privileged=true - --anonymous-auth=false - --apiserver-count=3 - --audit-policy-file=/var/lib/caas/policies/audit-policy.yaml - --audit-log-format=json - --audit-log-maxsize=100 - --audit-log-maxbackup=88 - --audit-log-path=/var/log/audit/kube_apiserver/kube-apiserver-audit.log - --authorization-mode=Node,RBAC - --bind-address=192.168.12.51 - --client-ca-file=/etc/openssl/ca.pem - --enable-bootstrap-token-auth=true - --etcd-cafile=/etc/etcd/ssl/ca.pem - --etcd-certfile=/etc/etcd/ssl/etcd1.pem - --etcd-keyfile=/etc/etcd/ssl/etcd1-key.pem - --etcd-servers=https://192.168.12.51:4111,https://192.168.12.52:4111,https://192.168.12.53:4111 - --experimental-encryption-provider-config=/etc/kubernetes/ssl/secrets.conf - --feature-gates=SCTPSupport=True,CPUManager=False,TokenRequest=True,DevicePlugins=True - --insecure-port=0 - --kubelet-certificate-authority=/etc/openssl/ca.pem - --kubelet-client-certificate=/etc/kubernetes/ssl/kubelet-server.pem - --kubelet-client-key=/etc/kubernetes/ssl/kubelet-server-key.pem - --kubelet-https=true - --max-requests-inflight=1000 - --proxy-client-cert-file=/etc/kubernetes/ssl/metrics.crt - --proxy-client-key-file=/etc/kubernetes/ssl/metrics.key - --requestheader-client-ca-file=/etc/openssl/ca.pem - --requestheader-extra-headers-prefix=X-Remote-Extra- - --requestheader-group-headers=X-Remote-Group - --requestheader-username-headers=X-Remote-User - --secure-port=6443 - --service-account-key-file=/etc/kubernetes/ssl/service-account.pem - --service-account-lookup=true - --service-cluster-ip-range=10.254.0.0/16 - --tls-cert-file=/etc/kubernetes/ssl/tls-cert.pem - --tls-private-key-file=/etc/kubernetes/ssl/apiserver1-key.pem - --token-auth-file=/etc/kubernetes/ssl/tokens.csv - --runtime-config=apps/v1beta1=true,apps/v1beta2=true,extensions/v1beta1/daemonsets=true,extensions/v1beta1/deployments=true,extensions/v1beta1/replicasets=true,extensions/v1beta1/networkpolicies=true,extensions/v1beta1/podsecuritypolicies=true resources: requests: cpu: "50m" volumeMounts: - name: time-mount mountPath: /etc/localtime readOnly: true - name: secret-kubernetes mountPath: /etc/kubernetes/ssl readOnly: true - name: secret-root-ca mountPath: /etc/openssl/ca.pem readOnly: true - name: secret-etcd mountPath: /etc/etcd/ssl readOnly: true - name: audit-kube-apiserver mountPath: /var/log/audit/kube_apiserver/ readOnly: false - name: audit-policy-dir mountPath: /var/lib/caas/policies readOnly: true volumes: - name: time-mount hostPath: path: /etc/localtime - name: secret-kubernetes hostPath: path: /etc/kubernetes/ssl - name: secret-root-ca hostPath: path: /etc/openssl/ca.pem - name: secret-etcd hostPath: path: /etc/etcd/ssl - name: audit-kube-apiserver hostPath: path: /var/log/audit/kube_apiserver/ - name: audit-policy-dir hostPath: path: /var/lib/caas/policiesConnect to the first controller in the cluster to run the remaining commands.
Code Block ssh cloudadmin@10.65.1.51Delete the kube-apiserver pods and wait for the pods to be recreated.
Code Block kubectl delete pod -n kube-system kube-apiserver-192.168.12.51 kubectl delete pod -n kube-system kube-apiserver-192.168.12.52 kubectl delete pod -n kube-system kube-apiserver-192.168.12.53Add cluster-admin rights to to the tiller service account.
Code Block kubectl create clusterrolebinding tiller-cluster-admin --clusterrole=cluster-admin --serviceaccount=kube-system:tillerAdd the CORD repository and updated indexes.
Code Block helm repo add cord https://charts.opencord.org helm repo updateInstall the CORD platform.
Code Block helm install -n cord-platform --version 6.1.0 cord/cord-platformWait until all 3 etcd CRDs are present in Kubernetes
Code Block kubectl get crd | grep -i etcd | wc -lInstall the SEBA profile.
Code Block helm install -n seba --version 1.0.0 cord/sebaInstall the AT&T workflow
Code Block helm install -n att-workflow --version 1.0.2 cord/att-workflowWait for all pods to reach Completed or Running status.
Code Block kubectl get podsCode Block title Example output collapse true NAME READY STATUS RESTARTS AGE IP NODE NOMINATED NODE READINESS GATES att-workflow-att-workflow-driver-6487d77db-rdwgk 1/1 Running 0 2m1s 10.244.0.27 192.168.12.52 <none> <none> att-workflow-tosca-loader-7btvq 0/1 Completed 4 2m1s 10.244.1.37 192.168.12.51 <none> <none> cord-platform-etcd-operator-etcd-backup-operator-84dfbc689vqsj9 1/1 Running 0 4m9s 10.244.2.13 192.168.12.53 <none> <none> cord-platform-etcd-operator-etcd-operator-8b6c64548-nnj2r 1/1 Running 0 4m9s 10.244.2.14 192.168.12.53 <none> <none> cord-platform-etcd-operator-etcd-restore-operator-7f5f5b95sdxw5 1/1 Running 0 4m9s 10.244.0.13 192.168.12.52 <none> <none> cord-platform-grafana-74c589b6db-jqnpv 2/2 Running 0 4m9s 10.244.1.24 192.168.12.51 <none> <none> cord-platform-kafka-0 1/1 Running 1 4m9s 10.244.1.25 192.168.12.51 <none> <none> cord-platform-kafka-1 1/1 Running 0 2m31s 10.244.0.26 192.168.12.52 <none> <none> cord-platform-kafka-2 1/1 Running 0 96s 10.244.2.29 192.168.12.53 <none> <none> cord-platform-kibana-7459967f55-z7sk8 1/1 Running 0 4m9s 10.244.2.18 192.168.12.53 <none> <none> cord-platform-logstash-0 1/1 Running 0 4m9s 10.244.0.15 192.168.12.52 <none> <none> cord-platform-onos-5b95b8f489-9s56b 2/2 Running 0 4m8s 10.244.0.19 192.168.12.52 <none> <none> cord-platform-prometheus-alertmanager-7df4f44f4d-tbfcl 2/2 Running 0 4m9s 10.244.2.15 192.168.12.53 <none> <none> cord-platform-prometheus-kube-state-metrics-76c8565f87-wslpw 1/1 Running 0 4m9s 10.244.0.14 192.168.12.52 <none> <none> cord-platform-prometheus-pushgateway-849c597464-pxhrf 1/1 Running 0 4m9s 10.244.1.26 192.168.12.51 <none> <none> cord-platform-prometheus-server-555b77dcd9-brtfk 2/2 Running 0 4m9s 10.244.2.17 192.168.12.53 <none> <none> cord-platform-zookeeper-0
...
...
...
...
...
...
...
...
...
1/1
...
Running
...
...
0
...
...
4m9s
...
...
10.244.0.16 192.168.12.52
...
<none>
...
 <none>
cord-platform-zookeeper-1
...
...
...
...
1/1
...
Running 0
...
...
...
YAML Requirements
- The YAML files need to edited/created using Linux editors or in Windows Notepad++
- YAML files do not support TABS. You must space over to the location for the text.
Note: You have a better chance at creating a working YAML by editing an existing file or using the template rather than starting from scratch.
Installing REC
Obtaining the ISO Image
Recent builds can be obtained from the Akraino Nexus server. Choose either "latest" or a specific build number from the release images directory and download the file install.iso. Build number 9 is the Akraino Release 1 image from the 30th of May, 2019. Note that build number 9 is known to NOT work on Dell servers or any of the ARM options listed below. If attempting to install on Dell servers, it is suggested to use builds from no earlier than June 10th. Options for booting the ISO on your target hardware include NFS, HTTP, or USB memory stick. You must place the ISO in a suitable location (e.g., NFS server, HTTP(S) server or USB memory stick before starting the boot process. The file bootcd.iso, which is also in the same directory, is used only when deploying via the Akraino Regional Controller using the Telco Appliance Remote Installer. You can ignore bootcd.iso when following the manual procedure below.
Accessing REC.ISO
...
| border | true |
|---|
| Column |
|---|
Nokia OpenEdge ServersLogin to the controller-1 BMC ip using a web browser (https://xxx.xxx.xxx.xxx). Go to Settings/Media Redirection/General Settings. Select the Remote Media Support. Select the Mount CD/DVD. Type the NFS server IP address. Type the NFS share path. Select the nfs in Share Type for CD/DVD. Click Save. Click OK to restart the VMedia Service. Go to Settings/Media Redirection/Remote Images. Select the image for the first CD/DVD device from the drop-down list. Click the play button to map the image with the server’s CD/DVD devices. The Redirection Status changes to Started when the image redirection succeeds. Go to Control & Maintain/Remote Control to open the Remote Console. Reset the server. Press F11 to boot menu and select boot from CD/DVD device. |
| Column |
|---|
HP ServersLogin to iLo for Controller 1 for the installation Go to Remote Console & Media Scroll to HTML 5 Console
http://XXX.XXX.XXX.XX:XXXX/REC_RC1/install.iso -> Virtual Media URL →
< IP to connect for NFS file system>/<file path>/install.iso Check “Boot on Next Reset” -> Insert Media Reset System |
| Column |
|---|
Dell ServersGo to Configuration/Virtual Media Scroll down to Remote File Share and enter the url for ISO into the Image File Path field.
http://XXX.XXX.XXX.XX:XXXX/REC_RC1/install.iso
< IP to connect for NFS file system>/<file path>/install.iso> Select Connect. Open Virtual Console, and go to Boot Set Boot Action to Virtual CD/DVS/ISO Then Power/Reset System |
| Column |
|---|
Ampere Servers |
| Column |
|---|
Marvell Servers@ Carl Yang <carlyang@marvell.com> |
After rebooting, the installation will bring up the Akraino Edge Stack screen.
The first step is to clean all the drives discovered before installing the ISO image.
Select, 0 Set external network at the Installation window, press OK.
Arrow down to and press the spacebar to select the network interface to be used for the external network.
If using bonded nics, select the first interface in the bond.
Enter the external ip address with CIDR for controller-1: 172.28.15.211/24
Enter the gateway ip address for the external ip address just entered: 172.28.15.1
Enter the VLAN number: 141
The installation will check the link and connectivity of the IP addresses entered.
If the connectivity test passed, then Installation window will return.
Uploading user_config.yaml
Go to your RC or jump server and scp (or sftp) your user_config.yaml to controller-1’s /etc/userconfig directory.
initial credentials: root/root.
scp user_config.yaml root@<controller-1 ip address>/etc/userconfig/
Select, 1 Start installation and OK.
After selecting Start Installation, the installation should start automatically, and the content of /srv/deployment/log/bootstrap.log should be displayed on the remote console.
Monitoring Deployment Progress/Status
You can monitor the REC deployment by checking the remote console screen or by tailing the logs on controller-1 node's /srv/deployment/log/ directory.
There are two log files:
bootstrap.log: deployment status log
cm.log: ansible execution log
tail -f /srv/deployment/log/cm.log
tail -f /srv/deployment/log/bootstrap.log
Note: When the deployment to all the nodes has completed, “controller-1” will reboot automatically.
Verifying Deployment
A post-installation verification is required to ensure that all nodes and services were properly deployed.
You need to establish an ssh connection to the controller’s VIP address and login with administrative rights.
tail /srv/deployment/log/bootstrap.log
You should see: Installation complete, Installation Succeeded.
Go to REC Test Document and follow the steps outlined there to ensure that all nodes and services were properly deployed.
Deployment Failures
Sometimes failures happen, usually due to misconfigurations or incorrect addresses entered.
To re-launch a failed deployment
There are two options for redeploying. (Execute as root)
- /opt/cmframework/scripts/bootstrap.sh /etc/userconfig/user_config.yaml --install &
- openvt -s -w /opt/start-menu/start_menu.sh &
Note: In some cases modifications to the user_config.yaml may be necessary to resolve a failure.
If re-deployment is not possible, then the deployment will need to be started from booting to the REC.iso,
| HTML |
|---|
<script type="text/javascript" src="https://jira.akraino.org/s/c11c0bd6cdfdc04cacdf44e3072f7af4-T/ah7phx/78002/b6b48b2829824b869586ac216d119363/2.0.26/_/download/batch/com.atlassian.jira.collector.plugin.jira-issue-collector-plugin:issuecollector/com.atlassian.jira.collector.plugin.jira-issue-collector-plugin:issuecollector.js?locale=en-US&collectorId=3ad5091c"></script>

    <script type="text/javascript">window.ATL_JQ_PAGE_PROPS =  {
	"triggerFunction": function(showCollectorDialog) {
		//Requires that jQuery is available!
		jQuery("#myCustomTrigger").click(function(e) {
			e.preventDefault();
			showCollectorDialog();
		});
	}};</script>

<div style=" z-index:1000; position:fixed; top:38px; right:-50px; width:190px; height:190px; clip-path: inset(0px); display:block;">
  <div style=" z-index:1000; background-color:#a00; position:fixed; top:65px; right:-90px; display:block; transform:rotate(45deg); overflow:hidden; white-space:nowrap; box-shadow:0 0 10px #888;" >
    <a href="#" id="myCustomTrigger" style=" border: 1px solid #faa; color: #fff; display: block; font: bold 125% 'Helvetica Neue', Helvetica, Arial, sans-serif; margin: 1px 0; padding: 10px 80px; text-align: center; text-decoration: none; text-shadow: 0 0 5px #444; transition: 0.5s;" >Report a bug</a>
  </div>
</div>
|
RIC R0 Installation onto REC
REC Release R1 includes the ability to run the R0 version of the RIC.
This R0 is limited functionality of the RIC plaform, but demonstrates the basic RIC platform components of appmgr, rtmgmr, redis, e2term, etmgr.
Additionally it is possible to load robot test suites to verify functionality, but not all test cases will work in this version of RIC.
As more functionality becomes available, more test cases will work and more tests will be added.
Onboarding RIC R0 is a manual step at present, in future it will be included in the REC build process.
RIC R0 includes scripts to bring up the RIC onto a generic kubernetes platform.
To bring it up on the REC, follow the steps below.
Step 1:
Login to the controller 1 as cloudadmin and clone the scripts used to bring up the RIC on a REC cluster.
git clone https://gerrit.akraino.org/r/rec.git
Step 2:
Copy the scripts to your home directory
cp rec/workflows/ric_automation.sh rec/workflows/robot_test_ric.sh rec/workflows/nanobot.sh ./
Step 3:
Run the ric_automation.sh script.
bash ric_automation.sh
Once the script completes, verify the output below indicating successful deployment of the RIC helm charts.
+ helm install localric/ric --namespace ricplatform --name ric-full --set appmgr.appmgr.service.appmgr.extport=30099 --set e2mgr.e2mgr.service.http.extport=30199
| Code Block |
|---|
LAST DEPLOYED: Fri Jun 28 17:42:53 2019
NAMESPACE: ricplatform
STATUS: DEPLOYED

RESOURCES:
==> v1/ConfigMap
NAME DATA AGE
ric-full-appmgr-appconfig 1 0s
ric-full-appmgr-appenv 1 0s
ric-full-e2mgr-router-configmap 1 0s
ric-full-e2term-router-configmap 1 0s

==> v1/Deployment
NAME READY UP-TO-DATE AVAILABLE AGE
ric-full-appmgr 0/1 1 0 0s
ric-full-dbaas 0/1 1 0 0s
ric-full-e2mgr 0/1 1 0 0s
ric-full-e2term 0/1 1 0 0s
ric-full-rtmgr 0/1 1 0 0s

==> v1/Pod(related)
NAME READY STATUS RESTARTS AGE
ric-full-appmgr-74b4f68459-rhwf6 0/1 ContainerCreating 0 0s
ric-full-dbaas-877f5788d-rpg87 0/1 ContainerCreating 0 0s
ric-full-e2mgr-f6956b9f8-kxc6q 0/1 ContainerCreating 0 0s
ric-full-e2term-f6556544c-pzxgv 0/1 ContainerCreating 0 0s
ric-full-rtmgr-95f7cb5cc-bfhdx 0/1 ContainerCreating 0 0s

==> v1/Service
NAME TYPE CLUSTER-IP EXTERNAL-IP PORT(S) AGE
ric-full-appmgr ClusterIP 10.254.254.49 <none> 8080/TCP 0s
ric-full-dbaas ClusterIP 10.254.188.227 <none> 6379/TCP 0s
ric-full-e2mgr ClusterIP 10.254.93.207 <none> 3800/TCP,3801/TCP 0s
ric-full-e2term ClusterIP 10.254.208.204 <none> 38000/TCP 0s
ric-full-rtmgr ClusterIP 10.254.70.83 <none> 5656/TCP 0s
|
...
kubectl get pods -n ricplatform
| Code Block |
|---|
NAME READY STATUS RESTARTS AGE
ric-full-appmgr-74b4f68459-rhwf6 1/1 Running 0 2m5s
ric-full-dbaas-877f5788d-rpg87 1/1 Running 0 2m5s
ric-full-e2mgr-f6956b9f8-kxc6q 1/1 Running 0 2m5s
ric-full-e2term-f6556544c-pzxgv 1/1 Running 0 2m5s
ric-full-rtmgr-95f7cb5cc-bfhdx 1/1 Running 0 2m5s |
Note: It may take a little time so repeat the command at some intervals. If they do not come up as Running, you should use standard kubernetes command such as kubectl describe, kubectl logs to troubleshoot and resolve the issue.
...
 3m35s   10.244.1.31   192.168.12.51   <none>           <none>
cord-platform-zookeeper-2                                         1/1     Running     0          2m47s   10.244.2.27   192.168.12.53   <none>           <none>
etcd-cluster-4btz528zxt                                           1/1     Running     0          2m38s   10.244.0.25   192.168.12.52   <none>           <none>
etcd-cluster-qpjdpn9wdl                                           1/1     Running     0          3m2s    10.244.1.35   192.168.12.51   <none>           <none>
etcd-cluster-vg7v7rcdtn                                           1/1     Running     0          2m22s   10.244.2.28   192.168.12.53   <none>           <none>
kpi-exporter-9b9f87bd5-7xfcw                                      1/1     Running     3          4m8s    10.244.2.16   192.168.12.53   <none>           <none>
kpi-exporter-9b9f87bd5-gbzpm                                      1/1     Running     2          4m8s    10.244.0.17   192.168.12.52   <none>           <none>
sadis-server-6c6f649bb4-bfg4m                                     1/1     Running     1          3m2s    10.244.2.21   192.168.12.53   <none>           <none>
seba-base-kubernetes-tosca-loader-gsdwx                           0/1     Completed   2          3m2s    10.244.2.22   192.168.12.53   <none>           <none>
seba-fabric-6879cd6dc9-dd2xt                                      1/1     Running     0          3m2s    10.244.2.19   192.168.12.53   <none>           <none>
seba-fabric-crossconnect-c684c6df5-wvpjp                          1/1     Running     0          3m2s    10.244.0.21   192.168.12.52   <none>           <none>
seba-kubernetes-bb4fcd749-z4nr8                                   1/1     Running     0          3m2s    10.244.1.32   192.168.12.51   <none>           <none>
seba-onos-service-86697c97bf-sd2gz                                1/1     Running     0          3m2s    10.244.0.22   192.168.12.52   <none>           <none>
seba-rcord-6975778bf6-brxvb                                       1/1     Running     0          3m2s    10.244.2.20   192.168.12.53   <none>           <none>
seba-seba-services-tosca-loader-ddnkz                             0/1     Completed   4          3m2s    10.244.1.34   192.168.12.51   <none>           <none>
seba-volt-f6549c677-qqfcg                                         1/1     Running     0          3m2s    10.244.1.33   192.168.12.51   <none>           <none>
xos-chameleon-645f89cb68-5hvld                                    1/1     Running     0          4m7s    10.244.1.29   192.168.12.51   <none>           <none>
xos-core-868868885d-x9tjx                                         1/1     Running     0          4m7s    10.244.1.30   192.168.12.51   <none>           <none>
xos-db-7445f8dcb7-6867w                                           1/1     Running     0          4m8s    10.244.0.18   192.168.12.52   <none>           <none>
xos-gui-858b98bc9f-pc2b5                                          1/1     Running     0          4m8s    10.244.1.27   192.168.12.51   <none>           <none>
xos-tosca-fdbbc894b-2v264                                         1/1     Running     0          4m7s    10.244.0.20   192.168.12.52   <none>           <none>
xos-ws-6c76444b89-kj8q7                                           1/1     Running     0          4m8s    10.244.1.28   192.168.12.51   <none>           <none>