| Table of Contents |
|---|
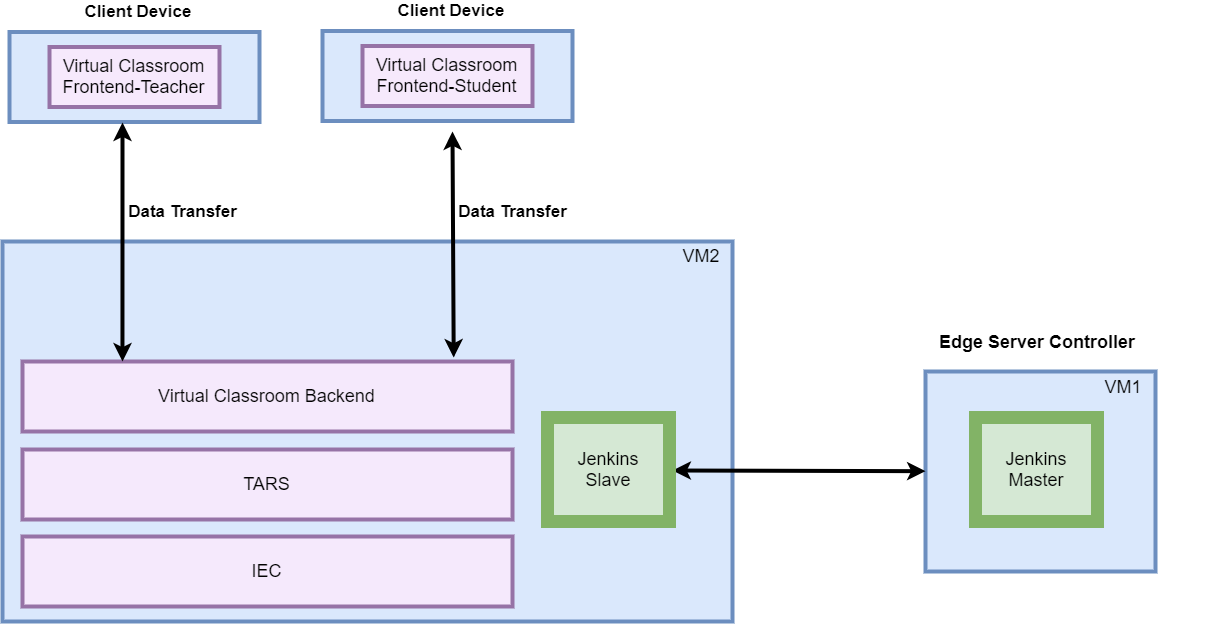
Deploy Architecture
To make the system deploy, the minimum deployment architecture is shown below, which consist of:
...
- Teacher Side: Windows 10 with a Web Browser that supports WebSockets.
- Student Side: Windows 10 with a Web Browser that supports WebSockets.
- Server Side: CentOS 7
- Virtual Classroom
- Tars
- IEC
Installation on the Client PC side(Teacher/Student Client)
Note well: No special software to access the application. The general software is itemized below:
- Install Windows 10
- Install camera driver
- Install Firefox browser
Create two Virtual Machines in the Cloud
For Tencent Cloud, refer to the following link to apply new instance:
https://intl.cloud.tencent.com/document/product/213/9384?lang=en
For AWS A1, apply new instance, refer to the following link to apply new instance:
https://docs.aws.amazon.com/AWSEC2/latest/UserGuide/concepts.html

Installation on VM1(Jenkins Slave)
- Install CentOS 7, refer to https://phoenixnap.com/kb/how-to-install-centos-7
- Install IEC, refer to IEC Type1&2 Installation Guide for R2
- Install Tars, refer to https://github.com/TarsCloud/Tars/blob/master/Install.md
Install Virtual Classroom BackEnd
cd /root
yum install -y npm
yum install -y git
yum install -y docker
yum update -y
systemctl restart docker
sleep 3
npm install http-server -g
rm -rf openvidu-vr
git clone https://github.com/OpenVidu/openvidu-vr.git
cd /root/openvidu-vr/openvidu-vr-room/
sed -i 's/demos.openvidu.io/${Local_IP_Address}/g' app.js
sleep 3
docker run --rm --name openvidu_server -d -p 4443:4443 -e openvidu.secret=MY_SECRET -e openvidu.publicurl=https://${Local_IP_Address}:4443/ openvidu/openvidu-server-kms
sleep 6
- Install Java for Jenkins Slave
For Slave Mode, install Java will be ok.
sudo yum install -y java-1.8.0-openjdk-develInstallation on VM2(Jenkins Master
...
Installation Architecture
Due to the hardware source limitation, Connected Vehicle Blueprint is deployed in three Virtual Machines in Amazon Web Service.
(Visit CI Lab Environment Setup if you want to set up connected vehicle blueprint in CI Lab.)
The following picture depicts the deployment architecture.
Server A : Deploy Jenkins.
Server B : Deploy Tars Master Node.
Server C :Deploy Tars Slave(Node) and the connected vehicle applications.
Installation Hardware
Installation Software
- CentOS 7 centos-7_aarch64 - ami-012355fc520b79a12
- mysql Ver 14.14 Distrib 5.6.26, for Linux (aarch64) using EditLine wrapper
- OpenStack: Rocky
- k8s:1.15.0
Installation Step by Step
...
)
Jenkins is a Java application, so the first step is to install Java. Run the following command to install the OpenJDK 8 package:
sudo yum install -y java-1.8.0-openjdk-devel
The next step is to enable the Jenkins repository. To do that, import the GPG key using the following curl command:
curl --silent --location http://pkg.jenkins-ci.org/redhat-stable/jenkins.repo | sudo tee /etc/yum.repos.d/jenkins.repo
And add the repository to your system with:
sudo rpm --import https://jenkins-ci.org/redhat/jenkins-ci.org.key
Once the repository is enabled, install the latest stable version of Jenkins by typing:
sudo yum install -y jenkins
After the installation process is completed, start the Jenkins service with:
sudo systemctl start jenkins
To check whether it started successfully run:
systemctl status jenkins
You should see something similar to this:
# systemctl status jenkins
* jenkins.service - LSB: Jenkins Automation Server
   Loaded: loaded (/etc/rc.d/init.d/jenkins; bad; vendor preset: disabled)
   Active: active (running) since Tue 2019-10-15 11:16:26 CST; 1min 15s ago
     Docs: man:systemd-sysv-generator(8)
  Process: 489 ExecStart=/etc/rc.d/init.d/jenkins start (code=exited, status=0/SUCCESS)
   CGroup: /system.slice/jenkins.service
           `-510 /etc/alternatives/java -Dcom.sun.akuma.Daemon=daemonized -Djava.awt.headless=true -DJENKINS_HOME=/var/lib/jenkins -jar /usr/l...

Oct 15 11:16:25 VM_0_4_centos systemd[1]: Starting LSB: Jenkins Automation Server...
Oct 15 11:16:26 VM_0_4_centos runuser[491]: pam_unix(runuser:session): session opened for user jenkins by (uid=0)
Oct 15 11:16:26 VM_0_4_centos runuser[491]: pam_unix(runuser:session): session closed for user jenkins
Oct 15 11:16:26 VM_0_4_centos jenkins[489]: Starting Jenkins [  OK  ]
Oct 15 11:16:26 VM_0_4_centos systemd[1]: Started LSB: Jenkins Automation Server.
Finally enable the Jenkins service to start on system boot.
sudo systemctl enable jenkins
output
# sudo systemctl enable jenkins
jenkins.service is not a native service, redirecting to /sbin/chkconfig.
Executing /sbin/chkconfig jenkins on
Adjust the Firewall If you are installing Jenkins on a remote CentOS server that is protected by a firewall you need to port 8080.
Use the following commands to open the necessary port:
sudo firewall-cmd --permanent --zone=public --add-port=8080/tcp
sudo firewall-cmd --reload
Setting Up Jenkins To set up your new Jenkins installation, open your browser and type your domain or IP address followed by port 8080:
http://your_ip_or_domain:8080
You will see the website itemized below: 
Select the left option and install the plugin later: 


I
Deploy Architecture
To make the system deploy, the minimum deployment architecture is shown below, which consist of:
Hardware
- Wearable Glass (Optional)
- Teacher Client-Side — Personal Computer with Camera
- Student Client-Side — Personal Computer with Camera
- Server Side — 8 Core 16G Virtual Machine on ARM or x86 Platform
Software
- Teacher Side: Windows 10 with a Web Browser that supports WebSockets.
- Student Side: Windows 10 with a Web Browser that supports WebSockets.
- Server Side: CentOS 7
- Virtual Classroom
- Tars
- IEC
Installation on the Client PC side(Teacher/Student Client)
Note well: No special software to access the application. The general software is itemized below:
- Install Windows 10
- Install camera driver
- Install Firefox browser
Create two Virtual Machines in the Cloud
For Tencent Cloud, refer to the following link to apply new instance:
https://intl.cloud.tencent.com/document/product/213/9384?lang=en
For AWS A1, apply new instance, refer to the following link to apply new instance:
https://docs.aws.amazon.com/AWSEC2/latest/UserGuide/concepts.html


Step2: Install Jenkins
Refer to the following link for installing Jenkins Mater and connect to Jenkins Slave.
Installation on VM1(Jenkins Slave)
- Install CentOS 7, refer to https://
...


Step3: Install Tarsframework
Refer to the following link for installing Tarsframework.
...
- kb/how-to-install-centos-7
- Install IEC, refer to IEC Type1&2 Installation Guide for R2
- Install Tars, refer to
...
...
The following is the picture for Tars Framework website.


Step4: Tars Node
Refer to the following link for installing Tarsnode and connect Tarsnode to Tarsframework.
https://github.com/qiuxin/Tars/blob/arm/Install.md
Step5: Launch CI jobs
Create CI jobs and launch CI jobs in the following way.
The detail of the Jenkins script is depicted in the Test Document.

Install Virtual Classroom BackEnd
cd /root
yum install -y npm
yum install -y git
yum install -y docker
yum update -y
systemctl restart docker
sleep 3
npm install http-server -g
rm -rf openvidu-vr
git clone https://github.com/OpenVidu/openvidu-vr.git
cd /root/openvidu-vr/openvidu-vr-room/
sed -i 's/demos.openvidu.io/${Local_IP_Address}/g' app.js
sleep 3
docker run --rm --name openvidu_server -d -p 4443:4443 -e openvidu.secret=MY_SECRET -e openvidu.publicurl=https://${Local_IP_Address}:4443/ openvidu/openvidu-server-kms
sleep 6
- Install Java for Jenkins Slave
For Slave Mode, install Java will be ok.
sudo yum install -y java-1.8.0-openjdk-develInstallation on VM2(Jenkins Master)
Jenkins is a Java application, so the first step is to install Java. Run the following command to install the OpenJDK 8 package:
sudo yum install -y java-1.8.0-openjdk-devel
The next step is to enable the Jenkins repository. To do that, import the GPG key using the following curl command:
curl --silent --location http://pkg.jenkins-ci.org/redhat-stable/jenkins.repo | sudo tee /etc/yum.repos.d/jenkins.repo
And add the repository to your system with:
sudo rpm --import https://jenkins-ci.org/redhat/jenkins-ci.org.key
Once the repository is enabled, install the latest stable version of Jenkins by typing:
sudo yum install -y jenkins
After the installation process is completed, start the Jenkins service with:
sudo systemctl start jenkins
To check whether it started successfully run:
systemctl status jenkins
You should see something similar to this:
# systemctl status jenkins
* jenkins.service - LSB: Jenkins Automation Server
   Loaded: loaded (/etc/rc.d/init.d/jenkins; bad; vendor preset: disabled)
   Active: active (running) since Tue 2019-10-15 11:16:26 CST; 1min 15s ago
     Docs: man:systemd-sysv-generator(8)
  Process: 489 ExecStart=/etc/rc.d/init.d/jenkins start (code=exited, status=0/SUCCESS)
   CGroup: /system.slice/jenkins.service
           `-510 /etc/alternatives/java -Dcom.sun.akuma.Daemon=daemonized -Djava.awt.headless=true -DJENKINS_HOME=/var/lib/jenkins -jar /usr/l...

Oct 15 11:16:25 VM_0_4_centos systemd[1]: Starting LSB: Jenkins Automation Server...
Oct 15 11:16:26 VM_0_4_centos runuser[491]: pam_unix(runuser:session): session opened for user jenkins by (uid=0)
Oct 15 11:16:26 VM_0_4_centos runuser[491]: pam_unix(runuser:session): session closed for user jenkins
Oct 15 11:16:26 VM_0_4_centos jenkins[489]: Starting Jenkins [  OK  ]
Oct 15 11:16:26 VM_0_4_centos systemd[1]: Started LSB: Jenkins Automation Server.
Finally enable the Jenkins service to start on system boot.
sudo systemctl enable jenkins
output
# sudo systemctl enable jenkins
jenkins.service is not a native service, redirecting to /sbin/chkconfig.
Executing /sbin/chkconfig jenkins on
Adjust the Firewall If you are installing Jenkins on a remote CentOS server that is protected by a firewall you need to port 8080.
Use the following commands to open the necessary port:
sudo firewall-cmd --permanent --zone=public --add-port=8080/tcp
sudo firewall-cmd --reload
Setting Up Jenkins To set up your new Jenkins installation, open your browser and type your domain or IP address followed by port 8080:
http://your_ip_or_domain:8080
You will see the website itemized below:
Select the left option and install the plugin later:
I
...