...
Username & Password: root/Akraino2021
CPU Name | Role | IP | Workload |
|---|---|---|---|
Kubeedge-akraino-0001 | Cloud | 159.138.149.190 | K8S, docker, cloudcore |
Kubeedge-akraino-0002 | Edge Node | 119.8.35.111 | docker, edgecore, edgemesh |
Kubeedge-akraino-0003 | Edge Node | 182.160.10.130 | docker, edgecore, edgemesh |
Deployment Manual
Deploy cloud nodes (kubeEdge-cloud)
...
--ignore-preflight-errors=Swap
Deploy Cloudcore
Prerequisites: install golang
[root@kudeEdge-cloud ~]# git clone https://github.com/kubeedge/kubeedge $GOPATH/src/github.com/kubeedge/kubeedge
[root@kudeEdge-cloud ~]# cd $GOPATH/src/github.com/kubeedge/kubeedge
[root@kudeEdge-cloud ~]# make all WHAT=keadm
[root@kudeEdge-cloud ~]# keadm init --advertise-address="192.168.0.238"
Deploy edge nodes (edgemesh version is release1.7)
- Install docker same as before
- Obtain the token on the cloud node
[root@kudeEdge-cloud ~]# keadm gettoken
- Install edgecore and mqtt
[root@kudeEdge-cloud ~]# keadm join --cloudcore-ipport=192.168.1.66:10000 --token=“上一步骤获取的token”
--token="token obtained in the previous step"
- Modify the edgecore configuration
[root@kudeEdge-cloud ~]# vim /etc/kubeedge/config/edgecore.yaml
modules:
..
edgeMesh:
enable: false
metaManager:
metaServer:
enable: true
..
- Restart edgecore
[root@kudeEdge-cloud ~]# systemctl restart edgecore
- Modify cloudcore configuration and restart cloudcore
[root@kudeEdge-cloud ~]# vim /etc/kubeedge/config/cloudcore.yaml
modules:
..
dynamicController:
enable: true
..
- Pull EdgeMesh code and build EdgeMesh image
[root@kudeEdge-cloud ~]# docker build -t edgemesh:0.1 -f build/Dockerfile .
- Deploy EdgeMesh
Modify the following configuration file, modify service-cluster-ip-range.
[root@kudeEdge-cloud ~]# kubectl apply -f build/kubernetes/edgemesh/03-configmap.yaml
[root@kudeEdge-cloud ~]# kubectl apply -f build/kubernetes/edgemesh/04-daemonset.yaml

Deploy ROS application
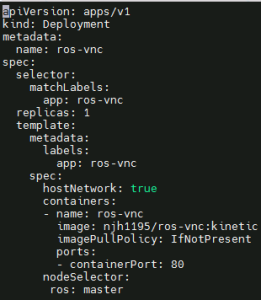
Create ros-deployment-master.yaml and deploy
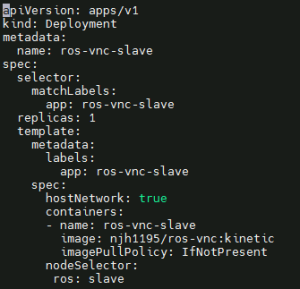
Create ros-deployment-slave.yaml and deploy
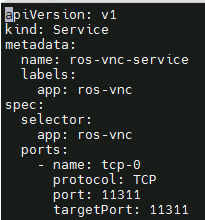
Create ros-master-service.yaml and deploy
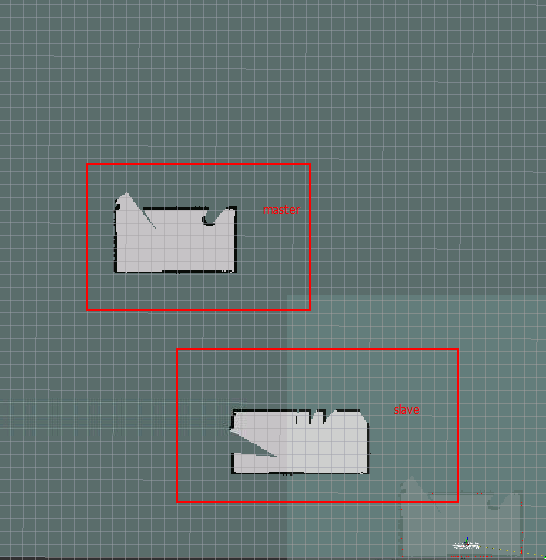
ros application master node operation
Open the master node page, http://182.160.10.130:80
Refer to the operation of https://hub.docker.com/r/njh1195/ros-vnc:
- Open the terminal page and execute "roscore" to start roscore
- Open the second terminal page and execute "roslaunch turtlebot3_gazebo multi_turtlebot3.launch”
- multi_turtlebot3.launch" to start three simulation robots
- Open the third terminal page and execute "ROS_NAMESPACE=tb3_0 roslaunch
- turtlebot3_slam turtlebot3_gmapping.launch set_base_frame:=tb3_0/base_footprint set_odom_frame:=tb3_0/odom set_map_frame:=tb3_0/map”, set_map_frame:=tb3_0/map" to start the first robot scan on the master node.
Open the fourth terminal page and execute "roslaunch turtlebot3_gazebo
multi_map_merge.launch" to open the merge program.
Generate a point source map and execute "rosrun rviz rviz -d `rospack find
- turtlebot3_gazebo`/rviz/multi_turtlebot3_slam.rviz”
ros application master node operation
Open the slave node page, http://159.138.49.1:80
Refer to the operation of https://hub.docker.com/r/njh1195/ros-vnc:
- Open the terminal page and configure ros-master's access service. The file is in /root/.bashrc.
Add the following configuration at the end of the file to configure the master access address and slave address:
![]()
- Open the second terminal page and execute "ROS_NAMESPACE=tb3_1 roslaunch
- turtlebot3_slam turtlebot3_gmapping.launch
set_base_frame:=tb3_1/base_footprint set_odom_frame:=tb3_1/odom
set_map_frame:=tb3_1/map", open the graphic scan of another room.
- Check whether the point source graph is Merged in the master node.