- Introduction
- License
- How to use this document
- Deployment Architecture
- Pre-Installation Requirements
- Installation High-Level Overview
- Verifying the Setup
- Developer Guide and Troubleshooting
- Uninstall Guide
- Troubleshooting
- Maintenance
- Frequently Asked Questions
- License
- References
- Definitions, acronyms and abbreviations
Introduction
Connected Vehicle Blueprint can be flexibly deployed in physical machines, virtual machines, containers and other environments.
TARS framework is an important open source component of Connected Vehicle Blueprint, which can efficiently complete the massive deployment and governance of micro-services.
License
Apache License v2.0
How to use this document
The document includes details of prerequisites /pre-installation, installation and uninstalls steps.
The prerequisites and pre-installation software and hardware should be ready before executing the installation steps.
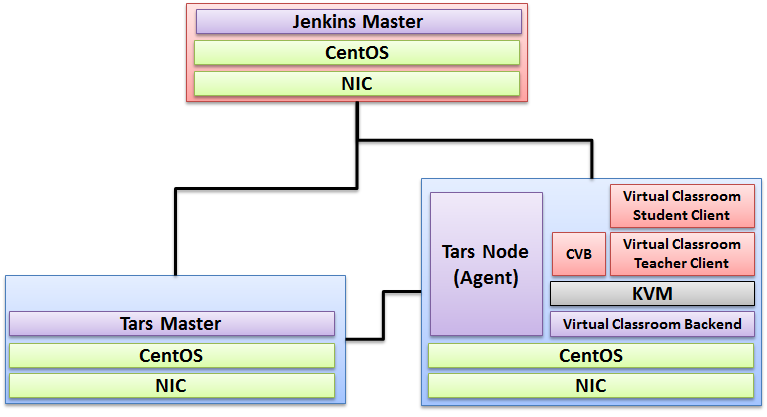
Deployment Architecture
Due to the hardware source limitation, Connected Vehicle Blueprint is deployed in three Virtual Machines in Amazon Web Service.
(Visit CI Lab Environment Setup if you want to set up connected vehicle blueprint in CI Lab.)
The following picture depicts the deployment architecture.
Node-0: Deploy Jenkins Master.
Node-1: Deploy Tars Master Node.
Node-2: Deploy Tars Slave(Node) and the connected vehicle applications.

Pre-Installation Requirements
Hardware Requirements
Minimum Hardware Requirements
Hostname | Core | RAM | HDD | NIC | Role |
Node-0 | 8 | 16GB | 50GB | 1GB | Jenkins Master |
Node-1 | 8 | 16GB | 50GB | 1GB | Tars Framework 2.4.13 |
Node-2 | 8 | 16GB | 100GB | 1GB | Tars Node (CVB + Type4 Application + Virtual Classroom Teacher Client + Virtual Classroom Student Client) |
Recommended Hardware Requirements
- Blueprint overview/Introduction
- Overall Architecture
- Platform Architecture
- Software Platform Architecture
- Main Progresses for Release 3
- Hardware and Software Management
- Licensing
Blueprint overview/Introduction
Connected Vehicle Blueprint(CVB) is an Akraino approved blueprint and part of Akraino Edge Stack. The project is completely focused on Connected Vehicle Application run on Edge Computing.
Use Case
The use cases for the Connected Vehicle Blueprint are itemized below. For R4, we release the Microservice Platform Tars, which supports the multiple connected vehicle application deployment/management/orchestration/monitor.
...
Use Cases
...
value proposition
...
Accurate Location
...
The accuracy of location improved by over 10 times than today's system. Today’s GPS system is around 5-10meters away from your reallocation, <1 meter is possible with the help of edge computing.
...
Smarter Navigation
...
Real-time traffic information update, reduces the latency from minutes to seconds, figure out the most efficient way for drivers.
...
Figure out the potential risks which can NOT be seen by the driver. See below.
...
Reduce traffic violation
...
Overall Architecture
The following picture depicts the architecture of the Connect Vehicle Blueprint, which consists of the following key components:
- Commodity Hardware, Arm/X86 Physical Server.
- IaaS Software, like Openstack, IaaS and so on
- Tars Microservice Platform
- Connected Vehicle Applications
The combination of Commodity Hardware and IaaS Software provides flexible deployments, like Bare Metal, Virtual Machine as well as Container.
Tars is a microservice framework that can manage/monitor/deploy the connected vehicle applications in the edge and data center. Tars can be flexibly deployed in Bare Metal, Virtual Machine as well as Container.
Connected Vehicle Applications are some different applications that fulfill Accurate Location, Smarter Navigation, Safe Drive Improvement and Reduce traffic violations.
Platform Architecture
Software Platform Architecture
The following is the general architecture of Tars, which is a major component in R3.
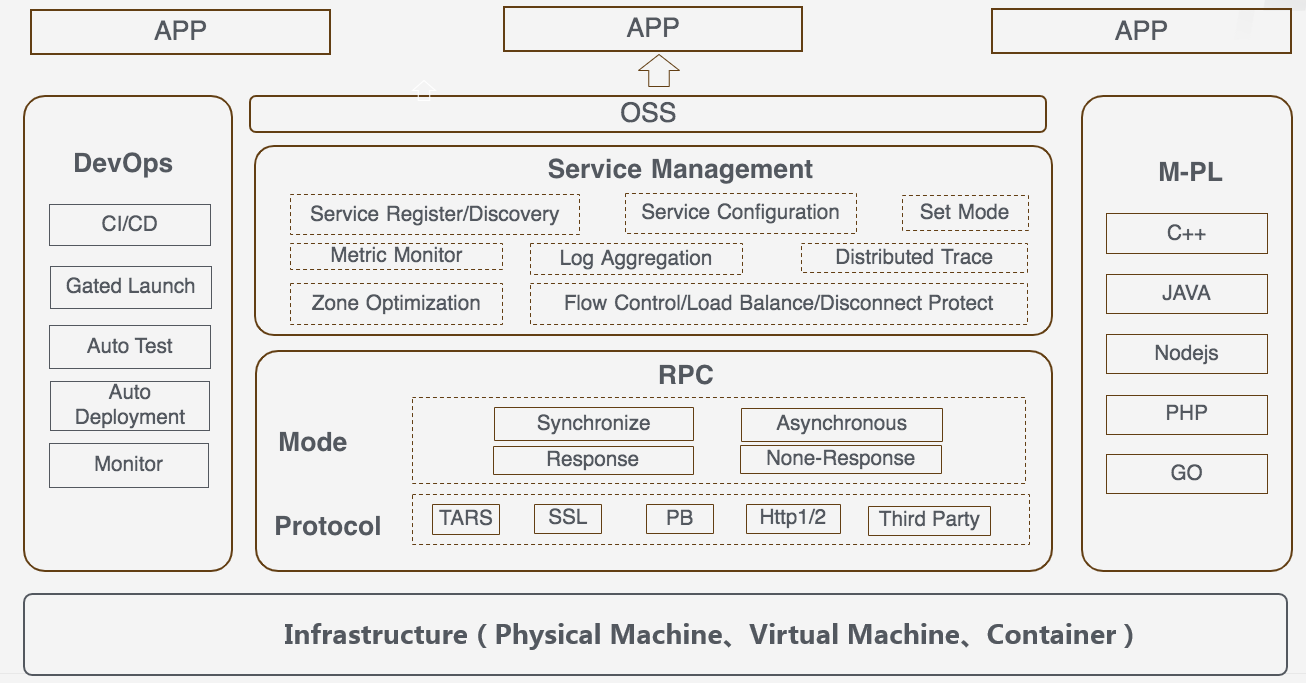
Refer to the enclosed PDF document for the detail Tars introduction.
Main Progresses for Release 4
Release 3 is the second release for Connected Vehicle Blueprint.
Build Of Materials (BOM) / Hardware requirements
Connected Vehicle Blueprint can be flexibly deployed in Bare Metal, Virtual Machine as well as the container.
For R4, we deploy it in UNH Akraino Intel POD1 LAB for Release. The detailed hardware is itemized below:
Hostname | Core | RAM | HDD | NIC | Role |
Node-0 | 8 | 40GB32GB | 3TB2TB | 10GB | Jenkins Master |
Node-1 | 8 | 96GB48GB | 3TB2TB | 10GB | Tars Framework 2.4.13 |
Node-2 | 8 | 96GB48GB | 3TB2TB | 10GB | Tars Node (CVB + Type4 Application + Virtual Classroom Teacher Client + Virtual Classroom Student Client) |
...
Hardware and Software Management
Licensing
Software Prerequisites
- CentOS 7.8
- MySQL Ver 14.14 Distrib 5.6.26
- OpenStack: Rocky
- k8s:1.15.0
Database Prerequisites
N/A
Other Installation Requirements
N/A
Installation High-Level Overview
Upstream Deployment Guide
Installation Step by Step
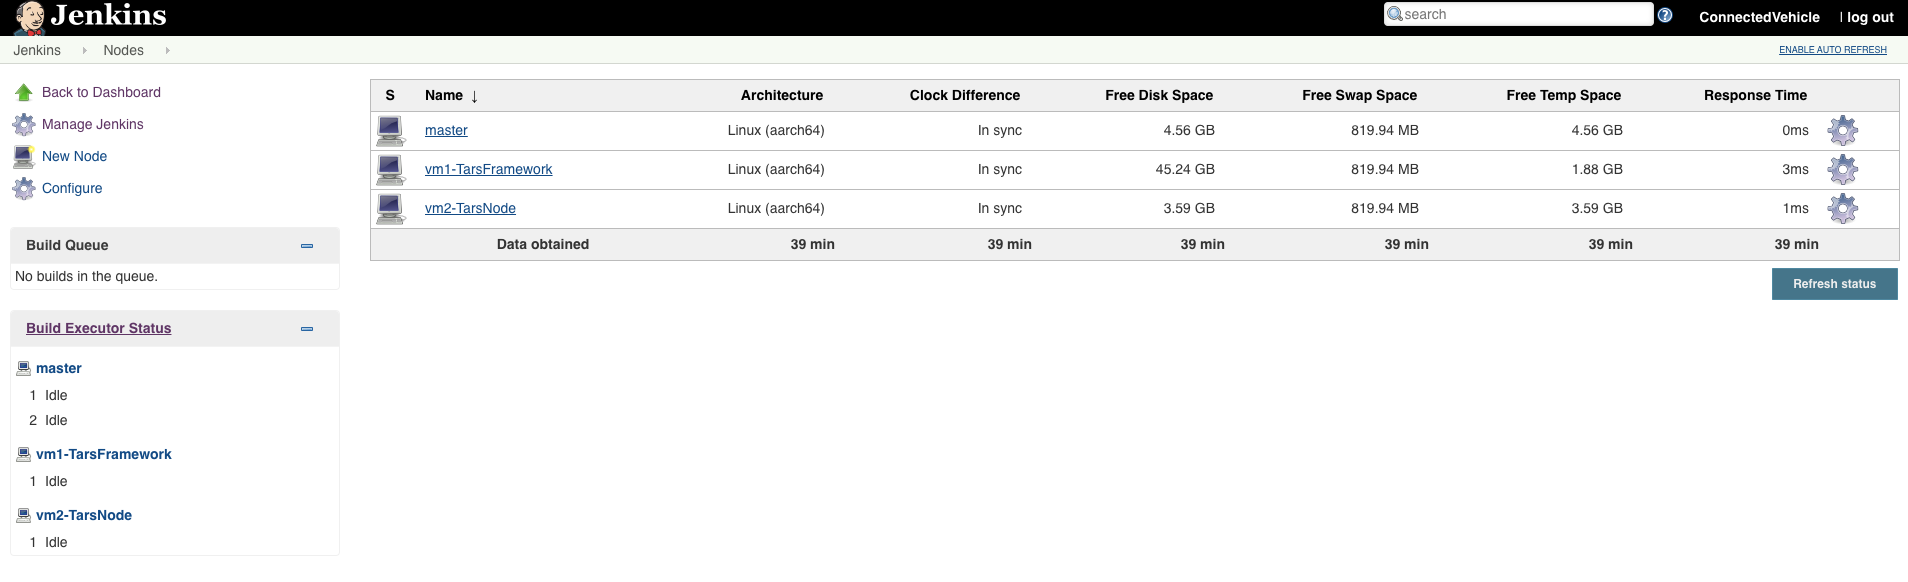
Step1: Install Jenkins
Refer to the following link for installing Jenkins Mater and connect to Jenkins Slave.
https://github.com/qiuxin/Connected-Vechicle/blob/master/Doc/CI_Environment_Setup.md

Step2: Install Tarsframework
Refer to the following link for installing Tarsframework.
https://tarscloud.github.io/TarsDocs_en/installation/source.html
1. Dependency install
yum install -y glibc-devel gcc gcc-c++ bison flex make cmake psmisc ncurses-devel zlib-devel openssl openssl-devel
## install mysql
wget -i -c http://dev.mysql.com/get/mysql57-community-release-el7-10.noarch.rpm
yum -y install mysql57-community-release-el7-10.noarch.rpm
yum -y install mysql-community-server
yum -y install mysql-devel
If you have problems to install mysql with the above step, add the new mysql repository to local server with this yum command and then re-run the previous commands.
sudo yum localinstall https://dev.mysql.com/get/mysql57-community-release-el7-10.noarch.rpm
yum install mariadb-server -y
## Configure mysql
systemctl start mariadb.service
systemctl enable mariadb.service
systemctl status mariadb.service
mysql -u root -p
grep "password" /var/log/mariadb/mariadb.log
ALTER USER 'root'@'localhost' IDENTIFIED BY '${your passwd}';
flush privileges;
2. Install develop environment for Tars
yum install -y npm
npm i -g pm2
wget -qO- https://raw.githubusercontent.com/creationix/nvm/v0.33.11/install.sh | bash
source ~/.bashrc
nvm install v8.11.3
npm install -g pm2 --registry=https://registry.npm.taobao.org
...
Components
...
Link
...
Akraino Release target
...
mkdir Tars
cd Tars
git clone
https://github.com/TarsCloud/TarsFramework.git --recursive
cd TarsFramework/build
chmod u+x build.sh
./build.sh prepare
./build.sh all
###Recompile if needed.###
./build.sh cleanall
./build.sh all
Change to user root and create the installation directory.
cd /usr/local
mkdir tars
mkdir app
chown ${normal user}:${normal user} ./tars/
chown ${normal user}:${normal user} ./app/
cd
cd Tars
...
/TarsFramework/build/
./build.sh install or make install
The default install path is /usr/local/tars/cpp。
If you want to install on different path:
**modify tarscpp/CMakeLists.txt**
**modify TARS_PATH in tarscpp/servant/makefile/makefile.tars**
**modify DEMO_PATH in tarscpp/servant/script/create_tars_server.sh**
3.Tars framework Installation
3.0 Firewall setup
firewall-cmd --zone=public --permanent --add-service=http
firewall-cmd --add-port 3000/tcp
firewall-cmd --add-port 3001/tcp
firewall-cmd --add-port 3306/tcp
3.1. Add user
mysql -u root -p
grant all on *.* to 'tarsAdmin'@'%' identified by 'Tars@2019' with grant option;
grant all on *.* to 'tarsAdmin'@'172.22.195.10' identified by 'Tars@2019' with grant option;
grant all on *.* to 'tarsAdmin'@'Node-1' identified by 'Tars@2019' with grant option;
flush privileges;
3.2 setup mysql privileges
mysql -u root -p
>use mysql
>select Host from user where User='root';
if shown as “localhost”,we can update as follwing command:
>update user set host = '%' where user ='root';
>FLUSH PRIVILEGES;
'%'update to the host IP,and then use mysql -u root -p --host '%ip' change back'%'
cd /Tars
git clone https://github.com/TarsCloud/TarsWeb.git
mv TarsWeb web
cp -rf web /usr/local/tars/cpp/deploy/
cd /usr/local/tars/cpp/deploy
chmod a+x linux-install.sh
./linux-install.sh MYSQL_HOST MYSQL_ROOT_PASSWORD INET REBUILD(false[default]/true) SLAVE(false[default]/true)
./linux-install.sh 192.168.1.10 our_PW eno1 false false admin 3306
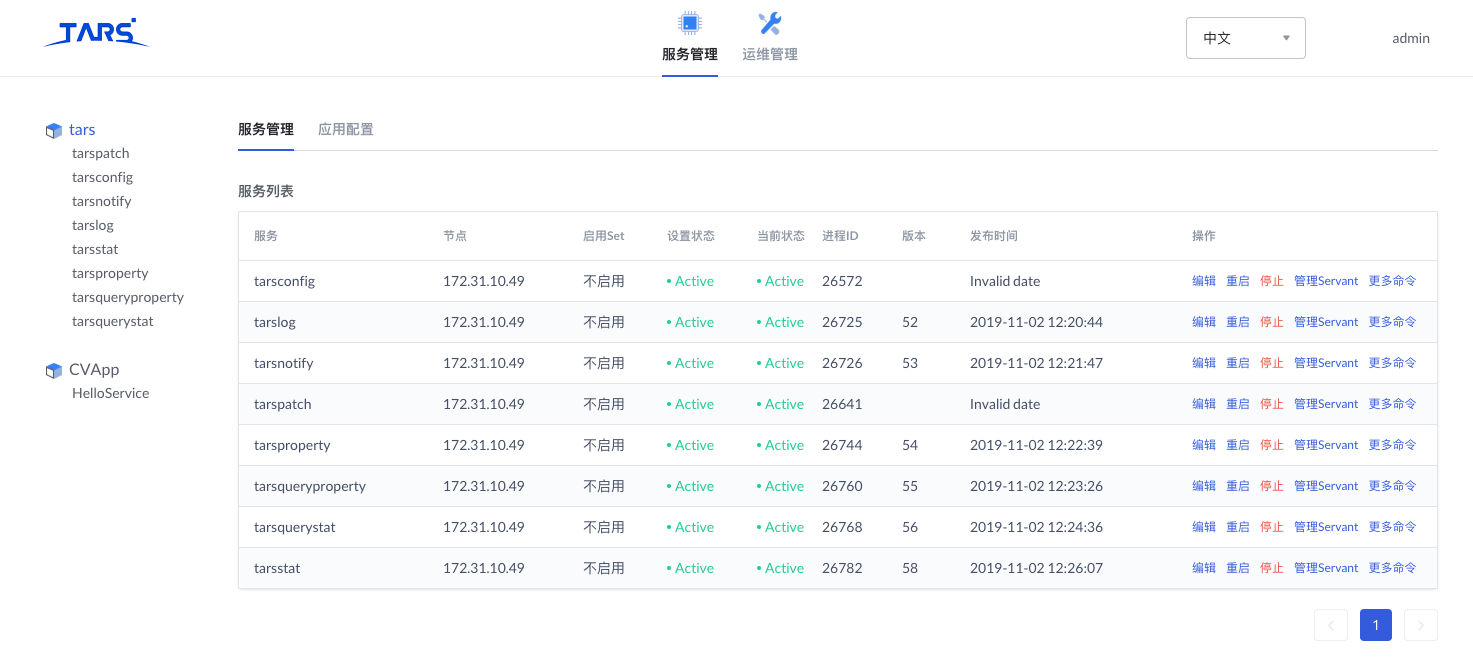
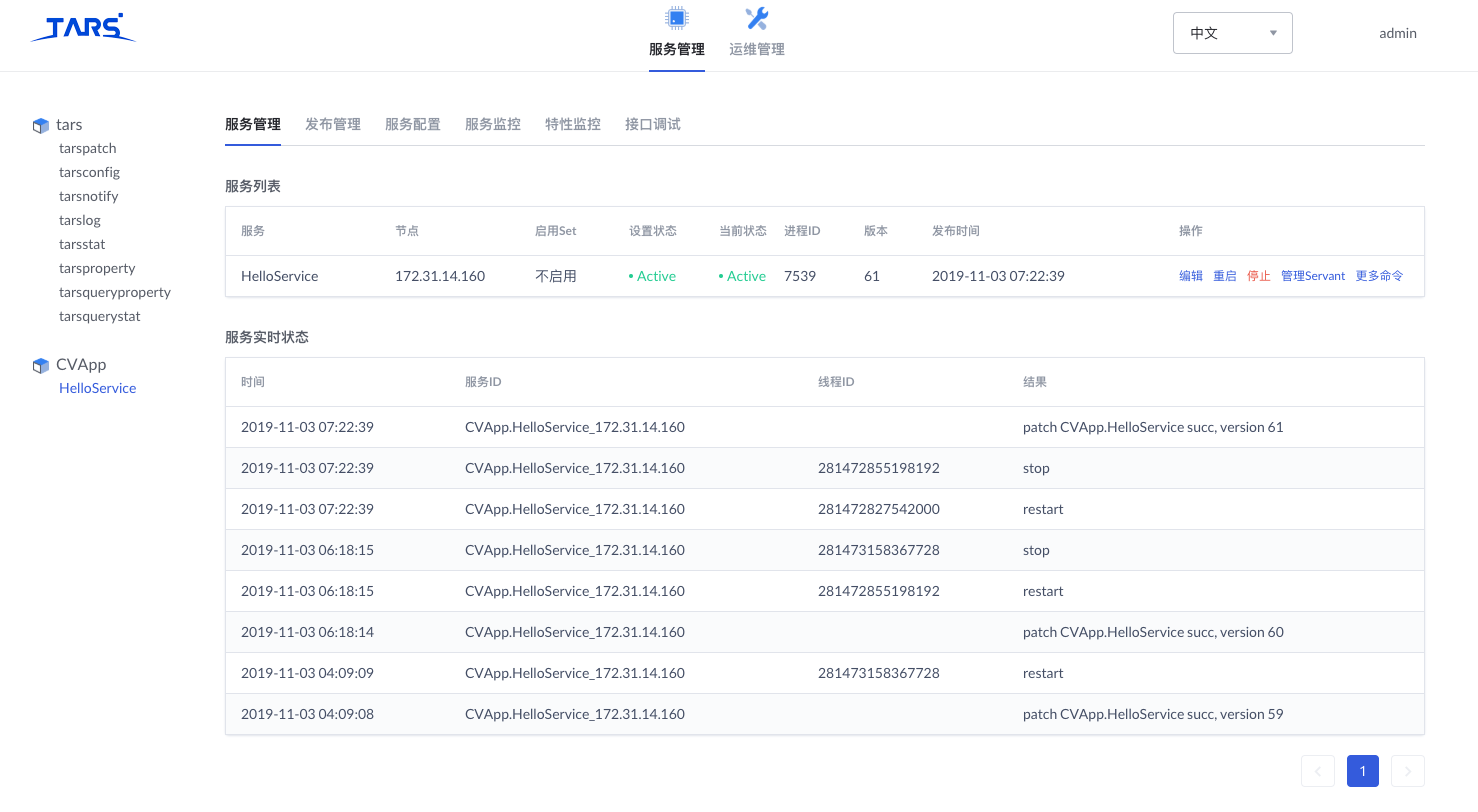
The following is the picture for Tars Framework website.
Step3: Tars Node
Refer to the following link for installing Tarsnode and connect Tarsnode to Tarsframework.
https://tarscloud.github.io/TarsDocs_en/installation/source.html
Step4: Launch CI jobs
Create CI jobs and launch CI jobs in the following way.
The detail of the Jenkins script is depicted in the Test Document.
Verifying the Setup
N/A
Developer Guide and Troubleshooting
Uninstall Guide
- Stop all tars processes
/usr/local/app/tars/tars-stop.sh
2. Delete files
rm -rf /usr/local/app/tars
rm -rf /usr/local/app/patchs
rm -rf /usr/local/app/web
rm -rf /usr/local/tars
3. Delete crontab
crontab -e
**Delete this line " * * * * * /usr/local/app/tars/tarsnode/util/monitor.sh "**
Troubleshooting
1. You can’t deploy service on IP 127.0.0.1 for the following reasons:
a)Each service has at least one obj to serve foreign clients;
b)Each service has a obj for administration, it binds to ip 127.0.0.1 and the same port which servant obj binds to.
2. After executing of tars_start.sh, please execute command ps -ef|grep tars to check that the core service processes of Tars are alive,
i.e., tarsregistry, tarsAdminRegistry, tarsnode, tarsconfig and tarspatch.
3. The paths in which services deployed as below:
a)Log file path: /usr/local/app/tars/app_log/${Application}/${ServiceName}/, such as
/usr/local/app/tars/app_log/Test/HelloServer/
b)Executable file path: /usr/local/app/tars/tarsnode/data/${Application}.${ServiceName}/bin/, such as
/usr/local/app/tars/tarsnode/data/Test.HelloServer/bin/
c)Template config file path: /usr/local/app/tars/tarsnode/data/${Application}.${ServiceName}/conf/, such as
/usr/local/app/tars/tarsnode/data/Test.HelloServer/conf/
d)Cache file path: /usr/local/app/tars/tarsnode/data/${Application}.${ServiceName}/data/, such as
/usr/local/app/tars/tarsnode/data/Test.HelloServer/data/
4. How to check logs
For example, there will be a log file named Test.HelloServer.log in directory
/usr/local/app/tars/app_log/Test/HelloServer/. If something failed, please check it.
5. tarsnode can not run java server: cannot execute java
Please restart tarsnode after install jdk
/usr/local/app/tars/tarsnode/util/start.sh
Maintenance
Blueprint Package Maintenance
Frequently Asked Questions
N/A
License
Any software developed by the "Akraino Enterprise Applications on CVB is licensed under the
Apache License, Version 2.0 (the "License");
you may not use the content of this software bundle except in compliance with the License.
You may obtain a copy of the License at <https://www.apache.org/licenses/LICENSE-2.0>
Unless required by applicable law or agreed to in writing, software
distributed under the License is distributed on an "AS IS" BASIS,
WITHOUT WARRANTIES OR CONDITIONS OF ANY KIND, either express or implied.
See the License for the specific language governing permissions and
limitations under the License.
References
N/A
Definitions, acronyms and abbreviations
N/A
...