Pre-Installation Requirements for REC Cluster
Minimum of 3 nodes.
Total Physical Compute Cores: 60 (120 vCPUs)
Total Physical Compute Memory: 192GB minimum per node
Total SSD-based OS Storage: 4.8TB (10 x 480GB SSDs)
Total Application-based Raw Storage: 9.60TB (10 x 960GB SSD)
Networking per Server: Apps - 2 x 25GbE (per Server)
DCIM - 2 x 10GbE + 1 x 1GbT (shared)
BIOS Requirements:
- BIOS set to Legacy (Not UEFI)
- CPU Configuration/Turbo Mode Disabled
- Virtualization Enabled
- IPMI Enabled
- Boot Order set with Hard Disk listed as first in list.
Network Requirements.
The REC cluster requires the following segmented (VLAN), routed networks accessible by all nodes in the cluster:
- External (OAM) Network
- OOB (iLO/iDRAC) network(s)
- Storage/Ceph network(s)
- Internal network for Kubernetes connectivity
- NTP and DNS accessibility
The REC installer will configure NTP and DNS using the parameters entered in the user_config.yaml. However, the network must be configured for the REC cluster to be able to access the NTP and DNS servers prior to the install.
Required Yamls:
REC configuration is flexible, but there are dependencies: e.g. using dpdk requires networking profile with ovs-dpdk type, performance profile with cpu pinning & hugepages and performance profile link on compute node. Please keep that in mind when creating your user_config.yaml
Two yamls containing your desired REC cluster configuration are required:
- The yaml files need to edited/created using Linux editors or in Windows Notepad++
- Yaml files do not support TABS. You must space over to the location for the text.
Note: You have better chance at creating a working yaml by editing an existing file rather the starting from scratch.
- lab.yaml
This file contains details regarding your cluster size, hardware (including rack layout), server names and ip addresses.
- user_config.yaml
This file contains more granular details for your REC cluster such as required network cidrs, usernames, passwords, DNS and NTP server ip addresses, etc.
*Note: the version number listed in the user_config.yaml needs to be 2.0.0.
<link to user_config.yaml>
Installing REC:
Accessing REC.ISO
HP Servers
Login to iLo for Controller 1 for the installation
Go to Remote Console & Media
Scroll to HTML 5 Console
- URL
http://XXX.XXX.XXX.XX:XXXX/REC_RC1/rec.iso -> Virtual Media URL →
- NFS
< IP to connect for NFS file system>/<file path>/rec.iso
Check “Boot on Next Reset” -> Insert Media
Reset System
Dell Servers
Go to Configuration/Virtual Media
Scroll down to Remote File Share and enter the url for ISO into the Image File Path field.
URL:
http://204.127.189.10:8090/dell_support/rec.iso
or NFS
< IP to connect for NFS file system>/<file path>/rec.iso>
Select Connect.
Open Virtual Console, and go to Boot
Set Boot Action to Virtual CD/DVS/ISO
Then Power/Reset System
Nokia OpenEdge Servers
<NOKIA INSTRUCTIONS NEEDED FOR NFS/URL>
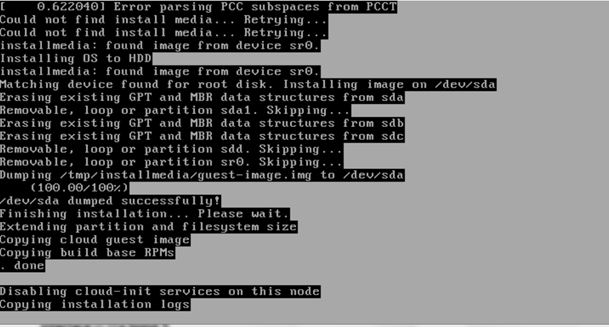
After rebooting, the installation will bring up the Akraino Edge Stack screen.
The first step is to clean all the drives discovered before installing the ISO image.
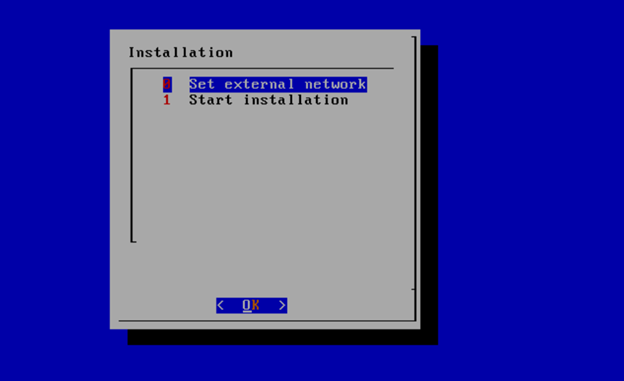
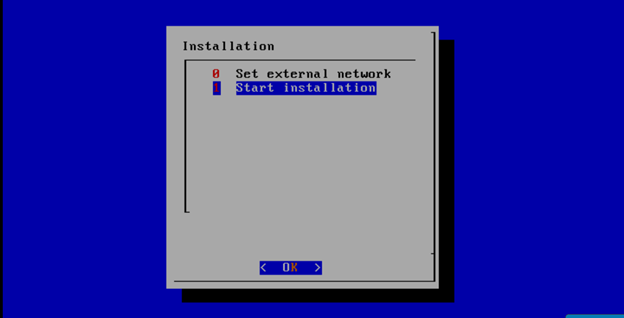
Select, 0 Set external network at the Installation window, press OK.
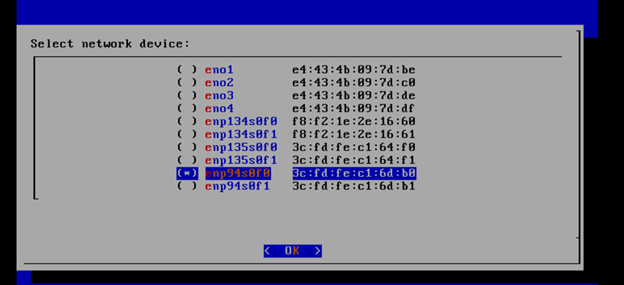
Arrow down to and press the spacebar to select the network interface to be used for the external network.
If using bonded nics, select the first interface in the bond.
Enter the external ip address with CIDR for controller-1: 172.28.15.211/24
Enter the gateway ip address for the external ip address just entered: 172.28.15.1
Enter the VLAN number: 141
The installation will check the link and connectivity of the IP addresses entered.
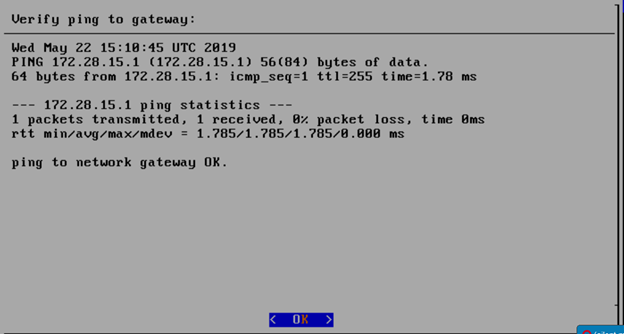
If connectivity test passed, then Installation window will return.
Select, 1 Start installation and OK.
After selecting Start Installation, you will arrive at a CentOS login screen.
Uploading user_config.yaml
Go to your RC or jump server and scp (or sftp) your user_config.yaml to controller-1’s /etc/userconfig directory using credentials: root/root.
scp user_config.yaml root@<controller-1 ip address>/etc/userconfig/
Start Deployment:
Log into controller-1 (root/root), go to /opt/start-menu
Run ./start_menu_service.sh
Monitoring Deployment Progress/Status
You may monitor the CaaS deployment by tailing the logs in /srv/deployment/log/.
There are two log files:
bootstrap.log
cm.log
tail -f /srv/deployment/log/cm.log
tail -f /srv/deployment/logbootstrap.log
When the deployment to all the nodes has completed, “controller-1” will reboot automatically.
Verifying Deployment
A post installation verification is required to ensure that all nodes and services were properly deployed.
You need to establish an ssh connection to the controller’s VIP address and log in with administrative user rights.
Example Needed
- Verify Deployment Success.
Enter the following command:
tail /srv/deployment/log/bootstrap.log
You should see: Installation complete, Installation Succeeded.
- Confirm active state of required services
Enter the following commands:
systemctl status --no-pager docker.servicesystemctl status --no-pager kubelet.service
Example
systemctl status --no-pager docker.service* docker.service - Docker Application Container Engine Loaded: loaded (/usr/lib/systemd/system/docker.service; enabled; vendor preset: enabled) Active: active (running) Docs: https://docs.docker.com
- Verify node functionality
Enter the following commands:
kubectl get no --no-headers | grep -v Ready
The command output shows nothing.
kubectl get no --no-headers | wc -l
The command output shows the number of CaaS nodes.
- Verify Components
Enter the following command:
kubectl get po --no-headers --namespace=kube-system --field-selector status.phase!=Running
The command output shows nothing.
- Confirm Package Manager Status (Helm)
- Docker registry is running, and images can be downloaded:
image=$(docker images -f 'reference=*/rec/hypercube' --format="{{.Repository}}:{{.Tag}}"); docker rmi $image; docker pull $image
The command output is Status: Downloaded newer image for …
- Chart repository is up and running:
curl -sS -XGET --cacert /etc/chart-repo/ssl/ca.pem --cert /etc/chart-repo/ssl/chart-repo?.pem --key /etc/chart-repo/ssl/chart-repo?-key.pem https://chart-repo.kubesystem.svc.rec.io:8088/charts/index.yaml
The command output is a yaml file.
- Helm is able to run a sample application:
helm list
The command output is rec-infra.
Deployment Failures
Sometimes failures happen, usually do to misconfigurations or incorrect addresses entered.
To re-launch a failed deployment
There are two options for redeploying.
- /opt/nokia/cmframework/scripts/bootstrap.sh /opt/nokia/installer-ui/user_config/user_config.yaml (the user_config.yaml file is loaded from installer GUI)
- Openvt -s -w /opt/start-menu/start_menu.sh &/
Note: In some cases, modifications to the user_config.yaml may be necessary to resolve a failure. If re-deployment is not possible, then the deployment will need to be started from booting to the REC.iso, see Accessing REC.ISO