This is a draft and work in progress
Introduction
BluVal is a diagnostic toolset framework to validate different layers in the Akraino infrastructure developed and used in Akraino edge stack. BluVal integrates different test cases, its development employs a declarative approach that is version controlled in LF Gerrit. They are integrated in CI/CD tool chain where peer Jenkins jobs can run the test cases and the results are reported in LF Repo (Nexus). The test cases cover all blueprint layers in the cluster.
Requirements
- Support Kubernetes
- Integrate with LF Gerrit
- Run well in an Akraino validation lab
- Store test results in a database
Technical guidelines
To support python3
To be fully covered by unit tests
To provide docker containers and manifest for both architectures supported: amd64 and arm64
To publish the documentation online
Test cases bundle for different layers

BluVal implementation Overview
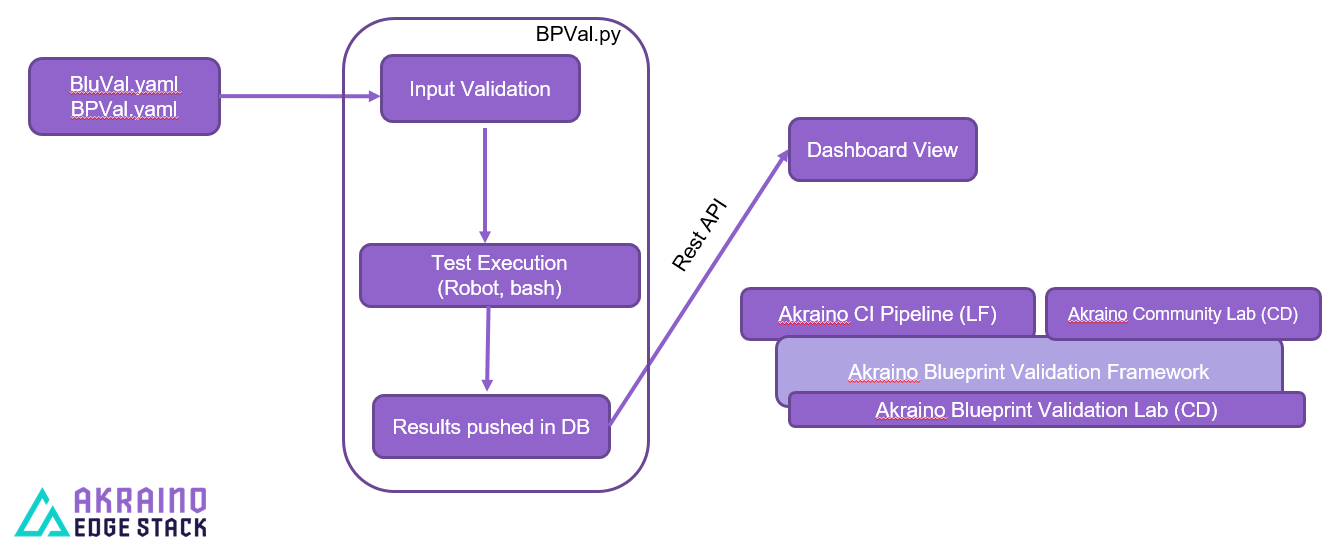
bluval.py runs the tool-set to test the REC Akraino validation framework. It performs the following actions:
1. Input validation
2. Test execution
3. Results pushed in DB
4. Dashboard view
BluVal installation and execution
bluval.py toolset project is from Akraino gerrit (Linux Foundation credentials required). It is to be cloned into /opt/akraino on the designated Regional controller or test host.
For cloning 'git clone' command can be used as shown in the below procedure:
This is how you can validate the bluval engine setup, if you have proper connectivity it should show some testcases in PASS status.
ns156u@aknode82:~$ git clone https://gerrit.akraino.org/r/validation.git
ns156u@aknode82:~$ cd validation
ns156u@aknode82:~/validation$ python -m venv .py35 # First time only
ns156u@aknode82:~/validation$ source .py35/bin/activate
(.py35) ns156u@aknode82:~/validation$ pip install -r bluval/requirements.txt # First time only
(.py35) ns156u@aknode82:~/validation$ python bluval/bluval.py -l hardware dummy # this will run hardware test cases of dummy blue print
(.py35) ns156u@aknode82:~/validation$ deactivate
Akraino Blueprint Validation UI
Introduction
This project is based on the ONAP portal SDK, version 2.4.0. It should be noted that the copyright of all the files of the aforementioned project that were left intact, has not been changed.
This UI consists of the front-end and back-end parts.
The front-end part is based on HTML, CSS, and AngularJS technologies. The back-end part is based on Spring MVC and Apache Tomcat technologies.
Based on these instructions, a user can provide the prerequisites, compile the source code and deploy the UI.
Scope
The blueprint validation UI aims to be hosted by LF servers and will be exposed using public IP and domain names.
It provides a user-friendly way for displaying blueprints validation test results. Based on these results, the status of a blueprint can be determined (mature, incubation state, etc.).
In specific, the purpose of the UI is twofold:
1) Support full control loop of producing results. In this mode, the UI must be connected with a Jenkins instance capable of running blueprint validation tests.
It will enable the user to define a blueprint for validation using its name, version, layer, desired lab and desired timeslot. This data constitutes a submission. It should be noted that the blueprint family is derived from the blueprint name. Also, the UI will have the ability to track the lifecycle of a submission. A submission state can be one of the following: submitted, waiting, running and completed. The implementation vehicle for this action is the REST API of Jenkins. Moreover, the UI must be connected with a mariadb instance and the Nexus server where the results are stored. Then, it will be able to trigger the appropriate job in Jenkins and receive the corresponding results from Nexus.
Note that it makes no difference whether the Jenkins instance is the community one or a private one.
2) Partial control of producing results. In this mode, the UI must be connected with a mariadb instance and the Nexus server where the results are stored.
Every blueprint owner is responsible of executing tests and storing results in Nexus using his/her own Jenkins instance. The UI only retrieves results from Nexus and displays them.
Currently, the partial control loop is not supported.
In both modes, user authentication, authorization and accounting (AAA) will be supported in order to control access to resources, enforce policies on these resources and audit their usage.
Prerequisites
In order for the blueprint validation UI to be functional, the following items are taken for granted:
- An appropriate mariadb instance is up and running (look at the Database subsection).
This prerequisite concerns both of the UI modes.
- The available labs and their silos (i.e. which silo is used by a lab in order to store results in Nexus) for blueprint validation execution are stored in mariadb (look at the Database subsection). It is the lab owner's responsibility to update them using the UI.
This prerequisite concerns both the partial and the full control loop modes.
- The available timeslots for blueprint validation execution of every lab are stored in the mariadb (look at the Database subsection). It is the lab owner's responsibility to update them using the UI.
This prerequisite concerns only the full control loop mode.
- The data of available blueprints (i.e. blueprint name) is stored in the mariadb database (look at the Database subsection). This data is automatically updated by the UI using info from Nexus. If a blueprint owner's is not satisfied with this info, he/her must update it using the UI.
This prerequisite concerns only the full control loop mode.
- The data of an available blueprint instance for validation (i.e. version and layer) is stored in the mariadb database (look at the Database subsection). This data is automatically updated by the UI using info from Nexus. If a blueprint owner's is not satisfied with this info, he/her must update it using the UI.
This prerequisite concerns only the full control loop mode.
- A Jenkins instance exists capable of executing blueprint validation tests on the specified lab and storing the results to Nexus server (look at the Jenkins configuration subsection).
This prerequisite concerns only the full control loop mode.
- A Nexus server exists where all the blueprint validation results are stored (look at the Nexus subsection).
This prerequisite concerns both of the UI modes.
- The whole installation and deployment of a blueprint and its corresponding blueprint family components (i.e. the appropriate edge cloud stack with its combination of infrastructure hardware components, OS, K8s, software, etc) are already performed in the appropriate lab.
Recall that multiple labs can be used for a specific blueprint validation. Also, it is the responsibility of the blueprint submitter to ensure that the edge validation and community CI labs can support comprehensive validation of the blueprint and cover all use case characteristics.
This prerequisite concerns both of the UI modes.
Developer's guide
Download the project
~$ git clone "https://gerrit.akraino.org/r/validation"
Prerequisites
Tools
In order to setup the development environment, the following tools are needed:
- JDK 1.8
- Maven
- docker
- MySQL client
Execute the commands below in order to install these tools (note that the PROXY_IP and PROXY_PORT variables must be substituted with the ones that are used by the hosting operating system)
If the host is behind a proxy, define this proxy using the following commands:
~$ sudo touch etc/apt/apt.conf.d/proxy.conf
~$ sudo sh -c 'echo "Acquire::http::proxy \"http://<PROXY_IP>:<PROXY_PORT>/\";" >> /etc/apt/apt.conf.d/proxy.conf'
~$ sudo sh -c 'echo "Acquire::https::proxy \"https://<PROXY_IP>:<PROXY_PORT>/\";" >> /etc/apt/apt.conf.d/proxy.conf'
~$ sudo sh -c 'echo "Acquire::ftp::proxy \"ftp://<PROXY_IP>:<PROXY_PORT>/\";" >> /etc/apt/apt.conf.d/proxy.conf'
~$ sudo apt-get update
~$ export http_proxy=http://<PROXY_IP>:<PROXY_PORT>
~$ export https_proxy=http://<PROXY_IP>:<PROXY_PORT>
Install jdk and maven using the following commands:
~$ sudo apt install default-jdk
~$ sudo apt install maven
If the host is behind a proxy, configure this proxy for maven:
~$ nano ~/.m2/settings.xml
<Paste the following lines>
<settings xmlns="http://maven.apache.org/SETTINGS/1.0.0" xmlns:xsi="http://www.w3.org/2001/XMLSchema-instance" xsi:schemaLocation="http://maven.apache.org/SETTINGS/1.0.0 http://maven.apache.org/xsd/settings-1.0.0.xsd">
<proxies>
<proxy>
<active>true</active>
<protocol>http</protocol>
<host><PROXY_IP></host>
<port><PROXY_PORT></port>
<nonProxyHosts>127.0.0.1|localhost</nonProxyHosts>
</proxy>
<proxy>
<id>https</id>
<active>true</active>
<protocol>https</protocol>
<host><PROXY_IP></host>
<port><PROXY_PORT></port>
<nonProxyHosts>127.0.0.1|localhost</nonProxyHosts>
</proxy>
</proxies>
</settings><Save and exit from nano>
Install docker using the following commands:
~$ sudo apt install docker.io
~$ sudo groupadd docker
~$ sudo gpasswd -a $USER docker
~$ newgrp docker
If the host is behind a proxy, configure docker to use this proxy:
~$ mkdir /etc/systemd/system/docker.service.d
~$ sudo nano /etc/systemd/system/docker.service.d/http-proxy.conf

<Paste the following lines>
[Service]
Environment="HTTP_PROXY=http://<PROXY_IP>:<PROXY_PORT>/"<Save and exit from nano>
~$ sudo systemctl daemon-reload
~$ sudo systemctl restart docker
Install mySQL client:
~$ sudo apt install mysql-client
Database
A mariadb database instance is needed for both modes of the UI with the appropriate databases and tables in order for the back-end system to store and retrieve data.
The pom.xml file supports the creation of an appropriate docker image for development purposes. The initialization scripts reside under the db-scripts directory.
Also, a script has been developed, namely validation/docker/mariadb/deploy.sh which easily deploys the container. This script accepts the following items as input parameters:
CONTAINER_NAME, name of the container, default value is akraino-validation-mariadb
MARIADB_ROOT_PASSWORD, the desired mariadb root user password, this variable is required
MARIADB_AKRAINO_PASSWORD, the desired mariadb akraino user password, this variable is required
UI_ADMIN_PASSWORD, the desired Blueprint Validation UI password for the admin user, this variable is required
UI_AKRAINO_PASSWORD, the desired Blueprint Validation UI password for the akraino user, this variable is required
REGISTRY, registry of the mariadb image, default value is akraino
NAME, name of the mariadb image, default value is validation
TAG_PRE, first part of the image version, default value is mariadb
TAG_VER, last part of the image version, default value is latest
MARIADB_HOST_PORT, port on which mariadb is exposed on host, default value is 3307
Currently, two users are supported by the UI, namely admin (full privileges) and akraino (limited privileges). Their passwords must be defined in the database.
In order to build and deploy the image using only the required parameters, the below instructions should be followed:
The mariadb root password, mariadb akraino user password (currently the UI connects to the database using the akraino user), the UI admin password and the UI akraino password should be configured using the appropriate variables and the following commands should be executed:
~$ cd validation/ui
~$ mvn docker:build -Ddocker.filter=akraino/validation:dev-mariadb-latest
~$ cd ../docker/mariadb
~$ ./deploy.sh TAG_PRE=dev-mariadb MARIADB_ROOT_PASSWORD=<mariadb root user password> MARIADB_AKRAINO_PASSWORD=<mariadb akraino user password> UI_ADMIN_PASSWORD=<UI admin user password> UI_AKRAINO_PASSWORD=<UI akraino user password>
~$ mysql -p<MARIADB_AKRAINO_PASSWORD> -uakraino -h <IP of the mariadb container> < ../../ui/db-scripts/examples/initialize_db_example.sql
In order to retrieve the IP of the mariadb container, the following command should be executed:
~$ docker inspect <name of the mariadb container>
Furthermore, the TAG_PRE variable should be defined because the default value is 'mariadb' (note that the 'dev-mariadb' is used for development purposes - look at pom.xml file).
If the database must be re-deployed (it is assumed that the corresponding mariadb container has been stopped and deleted) while the persistent storage already exists (currently, the 'akraino-validation-mariadb' docker volume is used), a different approach should be used after the image building process.
To this end, another script has been developed, namely validation/docker/mariadb/deploy_with_existing_storage.sh which easily deploys the container. This script accepts the following as input parameters:
CONTAINER_NAME, the name of the container, default value is akraino-validation-mariadb
REGISTRY, the registry of the mariadb image, default value is akraino
NAME, the name of the mariadb image, default value is validation
TAG_PRE, the first part of the image version, default value is mariadb
TAG_VER, the last part of the image version, default value is latest
MARIADB_HOST_PORT, the port on which mariadb is exposed on host, default value is 3307
In order to deploy the image using only the required parameters and the existing persistent storage, the below instructions should be followed:
The mariadb root user password (currently the UI connects to the database using root privileges) should be configured using the appropriate variable and the following commands should be executed:
~$ cd validation/docker/mariadb~$ ./deploy_with_existing_persistent_storage.sh TAG_PRE=dev-mariadb
Finally, if the database must be re-deployed (it is assumed that the corresponding mariadb container has been stopped and deleted) and the old persistent storage must be deleted, the used docker volume should be first deleted (note that all database's data will be lost).
To this end, after the image build process, the following commands should be executed:
~$ docker volume rm akraino-validation-mariadb
~$ cd validation/docker/mariadb
~$ ./deploy.sh TAG_PRE=dev-mariadb MARIADB_ROOT_PASSWORD=<root user password> MARIADB_AKRAINO_PASSWORD=<mariadb akraino user password> UI_ADMIN_PASSWORD=<UI admin user password> UI_AKRAINO_PASSWORD=<UI akraino user password>
~$ mysql -p<MARIADB_AKRAINO_PASSWORD> -uakraino -h <IP of the mariadb container> < ../../ui/db-scripts/examples/initialize_db_example.sql
In the context of the full control loop mode, the following tables must be initialized with appropriate data:
- lab (here every lab owner should store the name of the lab and the silo used for storing results in Nexus)
- timeslot (here every lab owner should register the available timeslots that can be used for blueprint validation test execution)
- blueprint_layer (here all the blueprint layers should be registered. These layers will be referenced by the blueprint instances)
- blueprint (here every blueprint owner should register the name of the blueprint)
- blueprint_instance_for_validation (here every blueprint owner should register the blueprint instances for validation, i.e. version and layer)
- blueprint_instance_blueprint_layer (here the many-to-many relationship between blueprint instances and layers is formulated)
- blueprint_instance_timeslot (here, the many-to-many relationship between blueprint instances and timeslots is formulated)
As it has been already mentioned, a user can perform CRUD operations on these tables using the UI. Also, all these tables except from lab and timeslot are initialized and updated automatically
by the UI by fetching data from Nexus. It is the lab owners responsibility to update them if a modifications is needed (especially the data related to lab and timeslot tables).
An example of data initialization is stored in the following file:
db-scripts/examples/initialize_db_example.sql
Some of this data is illustrated below (refer to 'org.akraino.validation.ui.data' package for more info regarding available values):
Labs:
id:1, lab:'att', silo:'att-blu-val'Timeslots:
id:1 , start date and time: 'now', duration: null, lab: 1Blueprint layers:
id:1, layer: 'hardware';Blueprints:
id: 2 , blueprint_name : 'rec'Blueprint Instances:
id: 2, blueprint_id: 2 (i.e. rec), version: "master"
blueprint_instances_blueprint_layers
blueprint_id: 2 (i.e. rec), layer_id: 1 (i.e. hardware)
blueprint_instances_timeslots
blueprint_instance_id: 2 (i.e. rec), timeslot_id: 1 (i.e. now in att lab)
It should be noted that currently the start date and time and the duration of the timeslot are not taken into account by the UI (see limitation section). Therefore, a user should define 'now' and null respectively for their content.
Based on this data, the UI enables the user to select an appropriate blueprint instance for validation.
In the following lines it is explained how a user can update database using the mysql tool. However, it is advised that UI should be used for this purpose as it supports a more user-friendly way.
For example, if a user wants to define a new lab with the following data:
lab: community, silo : 'community'
the following file should be created:
name: dbscript
content:
SET FOREIGN_KEY_CHECKS=1;
use akraino;
insert into lab (id, lab, silo) values(2, 'community', 'community');
Then, the following command should be executed:
~$ mysql -p<MARIADB_AKRAINO_PASSWORD> -uakraino -h <IP of the mariadb container> < ./dbscript.sql
For example, if a user wants to define a new timeslot with the following data:
start date and time:'now', duration: 0, lab: AT&T
the following file should be created:
name: dbscript
content:
SET FOREIGN_KEY_CHECKS=1;
use akraino;
insert into timeslot values(2, 'now', null, 2);
2 is the id of the community lab.
Then, the following command should be executed:
~$ mysql -p<MARIADB_AKRAINO_PASSWORD> -uakraino -h <IP of the mariadb container> < ./dbscript.sql
Furthermore, if a user wants to define a new blueprint, namely "newBlueprint", and an instance of this blueprint with version "master" and layer "k8s" and assign a timeslot to it, the following file should be created:
name: dbscript
content:
SET FOREIGN_KEY_CHECKS=1;
use akraino;
insert into blueprint (id, blueprint_name) values(3, 'newBlueprint');
insert into blueprint_instance (id, blueprint_id, version) values(3, 3, 'master');
insert into blueprint_layer (id, layer) values(4, 'k8s');
insert into blueprint_instance_blueprint_layer (blueprint_instance_id, blueprint_layer_id) values(3, 4);insert into blueprint_instance_timeslot (blueprint_instance_id, timeslot_id) values(3, 2);
Then, the following command should be executed:
~$ mysql -p<MARIADB_AKRAINO_PASSWORD> -uakraino -h <IP of the mariadb container> < ./dbscript.sql
The UI will automatically retrieve this new data and display it to the user.
Jenkins Configuration
Recall that for full control loop, a Jenkins instance is needed capable of executing blueprint validation tests to the specified lab. The Blueprint validation UI will trigger job executions in that instance.
It should be noted that it is not the UI responsibility to deploy a Jenkins instance.
Furthermore, this instance must have the following option enabled: "Manage Jenkins -> Configure Global Security -> Prevent Cross Site Request Forgery exploits".
Also, currently, the corresponding Jenkins job should accept the following as input parameters: "SUBMISSION_ID", "BLUEPRINT", "VERSION", "LAYER", "OPTIONAL", "LAB" and "UI_IP".
The "SUBMISSION_ID" and "UI_IP" parameters (i.e. IP address of the UI host machine-this is needed by the Jenkins instance in order to send back Job completion notification) are created and provided by the back-end part of the UI.
The "BLUEPRINT", "VERSION", "LAYER" and "LAB" parameters are configured by the UI user. The parameter "OPTIONAL" defines whether the optional test cases should be included or not.
Moreover, as the Jenkins notification plugin (https://wiki.jenkins.io/display/JENKINS/Notification+Plugin) seems to ignore proxy settings, the corresponding Jenkins job must be configured to execute the following commands at the end (Post-build Actions)
TBD
Nexus server
All the blueprint validation results are stored in Nexus server for both modes of the UI.
It should be noted that it is not the UI responsibility to deploy a Nexus server.
These results must be available in the following url:
https://nexus.akraino.org/content/sites/logs/<lab_silo>/bluval_results/<Blueprint name>/<Blueprint version>/<timestamp>/results/<layer>/<name_of_the_test_suite>
where <lab_silo> is the silo used by a lab for storing results in Nexus (for example 'att-blu-val'), <Blueprint name> is the name of the blueprint, <Blueprint version> the the blueprint version, <timestamp> is the timestamp used for producinf the results, <layer> is the blueprint layer and <name_of_the_test_suite> is the name of the corresponding test suite.
Below, an example URL is illustrated
Moreover, the results should be stored in the 'output.xml' file and placed in the aforementioned URL using the following format:
TBD
Compiling
~$ cd validation/ui
~$ mvn clean package
Deploying
The pom.xml file supports the building of an appropriate container image using the produced war file. Also, a script has been developed, namely validation/docker/ui/deploy.sh which easily deploys the container.
This script accepts the following as input parameters:
CONTAINER_NAME, the name of the contaner, default value is akraino-validation-ui
DB_IP_PORT, the IP and port of the maridb instance, this variable is required
MARIADB_AKRAINO_PASSWORD, the mariadb akraino user password, this variable is required
REGISTRY, the registry of the mariadb image, default value is akraino
NAME, the name of the mariadb image, default value is validation
TAG_PRE, the first part of the image version, default value is ui
TAG_VER, the last part of the image version, default value is latest
JENKINS_URL, the URL of the Jenkins instance (http or https must be defined), this variable is required
JENKINS_USERNAME, the Jenkins user name, this variable is required
JENKINS_USER_PASSWORD, the Jenkins user password, this variable is required
JENKINS_JOB_NAME, the name of Jenkins job capable of executing the blueprint validation tests, this variable is required
NEXUS_PROXY, the needed proxy in order for the Nexus server to be reachable, default value is none
JENKINS_PROXY, the needed proxy in order for the Jenkins server to be reachable, default value is none
In order to build the image using only the required parameters, the following data is needed:
- The mariadb akraino user password (look at the Database subsection)
- The IP and port of the mariadb
- The Jenkins url
- The Jenkins username and password
- The name of Jenkins Job
Then, the following commands can be executed in order to build and deploy the UI container:
~$ cd validation/ui
~$ mvn docker:build -Ddocker.filter=akraino/validation:dev-ui-latest
~$ cd ../docker/ui
~$ ./deploy.sh TAG_PRE=dev-ui DB_IP_PORT=<IP and port of the mariadb> MARIADB_AKRAINO_PASSWORD=<mariadb akraino password> JENKINS_URL=<http://jenkinsIP:port> JENKINS_USERNAME=<Jenkins user> JENKINS_USER_PASSWORD=<Jenkins password> JENKINS_JOB_NAME=<Jenkins job name>
The content of the DB_IP_PORT can be for example '172.17.0.3:3306'.
Furthermore, the TAG_PRE variable should be defined as the default value is 'ui' (note that the 'dev-ui' is used for development purposes - look at pom.xml file).
If no proxy exists, the proxy ip and port variables should not be defined.
The UI should be available in the following url:
http://localhost:8080/bluvalui/
Note that the deployment uses the network host mode, so the 8080 must be available on the host.
Limitations
- The UI has been tested using Chrome and Firefox browsers.
- The back-end part of the UI does not take into account the start date and time and duration of the configured timeslot. It immediately triggers the corresponding Jenkins Job.
- Results data manipulation (filtering, graphical representation, indexing in time order, etc) is not supported.