Introduction
This guide provides instructions for installing and configuring the Smart Data Transaction for CPS blueprint, and also includes recommended hardware and software requirements for the blueprint. The guide describes a minimal installation of the blueprint consisting of a single "master" node and two "edge" nodes, with directions on how the number of nodes can be modified as needed.
How to Use This Document
This document assumes the reader is familiar with basic UNIX command line utilities and Kubernetes. Familiarity with Ansible and Docker may also be useful.
Start by reviewing the deployment architecture and requirements in the following sections, then follow the steps in the Installation section to set up the software and start it running. Confirm the services are functioning as expected by following the instructions in the Verifying the Setup section. The later sections in this document describe other tasks that can be performed on a running setup, alternate configuration options, and how to shut down and uninstall the software.
Deployment Architecture
The diagram below shows the major components and relationships in a deployment of this blueprint.
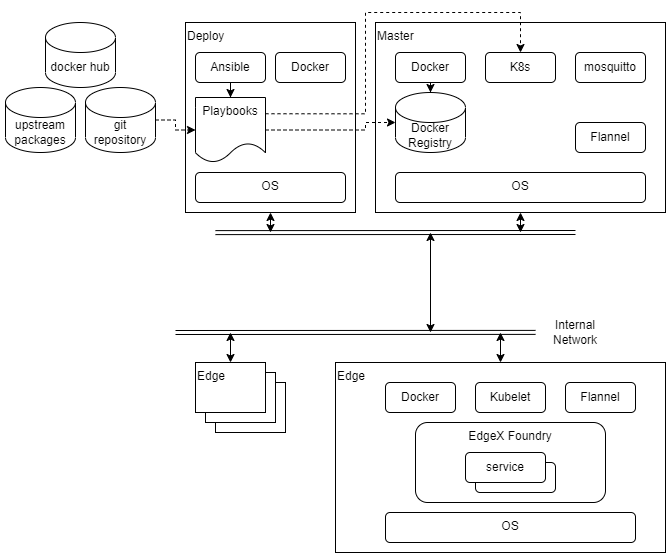
Deployment, as well as other tasks such as starting and stopping the cluster, is coordinated through a set of Ansible playbooks. (Ansible playbooks are a system used by the Ansible tool for describing the desired state of a system. In many ways they are similar to shell scripts. For more details see the Ansible documentation.) The playbooks are run exclusively by the deploy node, and they execute commands on the deploy node, the master node, and in some cases on the edge nodes. Once the nodes are set up, most activity is carried out by Kubernetes. Kubernetes is configured by the playbooks and told to start or stop services on the edge nodes. These services are run in containers, and the images for these containers are stored in a local Docker registry. There are containers for the Kubernetes components themselves, plus Flannel (a component which provides networking inside the Kubernetes cluster), EdgeX Foundry services, and two custom services (sync-app and device-lora) built using the EdgeX SDKs.
Note that the deploy node and the master node can be the same host or virtual machine.
The sensor nodes are not shown in the above diagram as they are not envisioned as being connected to the network, and are not configured by the playbooks from the deploy node. See the Sensor Nodes section of Installation for an example of how sensor nodes may be setup.
Pre-Installation Requirements
Hardware Requirements
The table below shows the recommended minimum specifications for the hardware in the testing installation. It is possible that lower spec hardware could be used for many of the nodes. The sensor node hardware in particular is specific to the testing installation and could be swapped out with any number of other platforms as long as LoRa connectivity was possible using the hardware.
| Master, Deploy | Edge | Sensor | |
|---|---|---|---|
| Platform | VM running on commercial grade PC | NVidia Jetson Nano | Raspberry Pi 3 |
| CPU | x86-64, Intel i5 or similar | ARM 64bit Cortex-A57 | ARM 32bit Cortex A-53 |
| Cores | 2 | 4* 2 cores should be possible | 4* 1 core should be possible |
| RAM | 4 GB | 2 GB | 1 GB |
| Storage | 128 GB Hard Disk space | 32 GB SD Card | 32 GB SD Card |
| Network | 1x Ethernet | 1x Ethernet | 1x Ethernet* *for provisioning |
| LoRa | N/A | LRA-1 USB dongle | LRA-1 USB dongle |
| Sensor | N/A | N/A | DHT-11 GPIO temperature/humidity sensor |
At a minimum one node is required for the master and deploy roles together, and at least one edge node and one sensor node. The testing installation uses two edge and sensor nodes.
Network Requirements
All nodes are expected to have IP connectivity to one another during installation and normal operation, with the exception of the sensor nodes. In the installation described here, all the nodes are connected to a private wired network operating at 100Mbps or better. However, there are no strict bandwidth or latency requirements.
During initial software installation all of the nodes will require access to the internet to download required software packages. Once the required software packages are installed and the docker registry is started, only the deploy node will need further access to the internet (unless, of course, software packages need to be changed or updated). The deploy node will need to access the internet when pulling upstream images to install in the docker registry, and when building docker images for custom services. Of course, if external tools are going to be used to access the collected data through the MQTT broker (Mosquitto), those tools will need network access to the master node.
When the edge node services are started, images will be downloaded from the docker registry on the master node to the edge nodes, so bandwidth may be a consideration if, for example, the edge nodes are accessed over a mobile network.
Software Prerequisites
The list below shows the required software for each node type prior to beginning the installation process.
- Deploy node
- Ubuntu 20.04
- Ansible 2.11.7
- Master node
- Ubuntu 20.04
- Edge node
- Ubuntu 20.04
- Sensor node
- Rasbian 11.1
Note that Ansible 2.9.6 is installed from the regular Ubuntu repository on Ubuntu 20.04, but needs to be upgraded from the Ansible repository to support the kubernetes.core collection used by this blueprint. The setup_cicd.yml playbook can be run with Ansible 2.9.6 and will update Ansible to the required version.
Additional Installed Software Packages
Note that the installation process will install several more software packages through Ansible playbooks. These are listed below for reference. Packages included by default in an install of Ubuntu 20.04 server are not included. The version numbers are those that are available/installed at the time of writing by the Ansible playbooks on Ubuntu 20.04.
- Deploy node
- make 4.2.1, build-essential 12.8, python3-pip 20.0.2
- Ansible collections
community.docker,kubernetes.core,community.crypto - Docker (docker.io) 20.10.7
- Master node
- Docker (docker.io) 20.10.7
- python3-pip 20.0.2
- Python packages
cryptographyandkubernetes - mosquitto 2.0.14, mosquitto-clients 2.0.14
- Kubernetes (kubectl, kubelet, kubeadm) 1.22.6
- Flannel 0.16.3, flannel-cni-plugin 1.0.1 (Note: These are containers installed via Kubernetes through a config file)
- Edge node
- Docker (docker.io) 20.10.7
- Kubernetes (kubelet, kubeadm) 1.22.6 (kubectl may be installed for debugging purposes)
Installation
Setting Up the Deploy Node
The deploy node will coordinate all other installation and operations, so it needs to be set up first. In the test installation, the deploy node is a VM running on a x86 PC, with Ubuntu Linux 20.04 installed. In addition, the Ansible tool must be installed. The Ansible tool provided in the Ubuntu software repository is a slightly older version which needs to be upgraded, but it is sufficient to execute the setup_deploy.yml playbook, which will install the newer version of Ansible and other tools required on the deploy node. But before running that playbook you need to configure a few things described in the section below.
The playbooks for use on the deploy node are stored in the deploy/playbook directory of the source repository. These playbooks refer to other files in the source code, so the entire directory tree should be copied onto the deploy node. The easiest way to do this is by cloning the git repository directly as shown below:
git clone repository-url
Note, using the --depth=1 option can save some disk space if you don't need to modify the source code.
The git command will create a directory in the directory where it is run named after the repository. Inside the new directory will be the deploy/playbook directory. Unless noted otherwise, the commands below should be run in that directory.
Node and Cluster Configuration
Before running the setup_deploy.yml playbook, modify the hosts file in the deploy/playbook directory with the host names and IP addresses of the edge nodes in your cluster. Also update the entry for the master node's host if it is not the same as the deploy node.
all:
hosts: children:
master:
hosts:
localhost:
edge_nodes:
hosts:
edge1:
ip: 192.168.2.21 lora_id: 1
edge2:
ip: 192.168.2.25 lora_id: 4
In the file master.yml in the deploy/playbook/group_vars/all directory, set the master_ip value to the IP address of the master node. Note that this is required even if the master node is the same as the deploy node.
master_ip: 192.168.2.16
Set Up the Deploy Node
The account which runs the deploy playbooks will need to be able to use sudo to execute some commands with super-user permissions. The following command can be used (by root or another user which already has super-user permissions) to enable the use of sudo for a user:
sudo usermod -aG sudo username
After setting IP addresses and node names in the master.yml and hosts files, you can run the setup_deploy.yml playbook using the command below.
ansible-playbook -i ./hosts setup_deploy.yml --ask-become-pass
This will add the node names and addresses to the deploy node's /etc/hosts file as well as upgrade the version of Ansible if necessary. It will also install Ansible collections community.docker, kubernetes.core, and community.crypto, required by the other Ansible playbooks in this blueprint.
Ansible will be installed using root permissions on the deploy node, so supply the sudo password (by default the user's password) when prompted for the "become" password.
Preparing the Master Node
If the master node is not on the same host as the deploy node, the user that runs the deploy playbooks must have an account on the master host under the same name, and that account must have sudo privileges like the account on the deploy node (see above). Also, the account should have password-less SSH login configured. See the description of configuring password-less login for the edge node administrator account in the Preparing Edge Nodes section.
The following command will prepare the master node for use:
ansible-playbook -i ./hosts master_install.yml --ask-become-pass
This playbook requires the password for sudo on the master node (the "become" password).
It will perform the following initialization tasks:
- Make sure there are entries for the master and edge node names in
/etc/hosts - Install required software packages including Docker, Kubernetes, pip, and mosquitto
- Install Python packages used by other playbooks (
kubernetesandcryptography) - Make sure the user can run docker commands
- Prepare basic configuration for Docker and Kubernetes
- Set up a user name and password for the MQTT service
Note, you can customize the MQTT user name and password using the mqtt_user and mqtt_pwd variables in the docker/playbook/group_vars/all/mqtt.yml file. By default the user name is "edge" and the password "edgemqtt". These credentials must be used if you want to, for example, use the mosquitto_sub command to monitor incoming MQTT messages from the edge nodes.
Creating the Docker Registry
This blueprint sets up a private Docker registry on the master node to hold all the images which will be downloaded to the edge nodes. The following command with start the registry. This command also creates and installs a cryptographic key that is used to identify the registry to the edge nodes.
ansible-playbook -i ./hosts start_registry.yml --ask-become-pass
Once this command has been run the registry will run as a service and will automatically restart if the master node reboots for some reason. If you need to stop the registry or clear its contents, see the instructions in the Stopping and Clearing the Docker Registry section of the Uninstall Guide.
Note that if you stop and restart the registry new keys will be generated and you will need to run the edge_install.yml playbook again to copy them to the edge nodes.
Preparing Edge Nodes
Add an administrative account to all the edge nodes. This account will be used by the deploy node when it needs to run commands directly on the edge nodes (e.g. for installing base software, or for joining or leaving the cluster). The following commands run on each edge node will add a user account named "edge" and add it to the group of users with sudo privileges.
sudo adduser edgesudo usermod -aG sudo edge
Note, if you use an administrative account with a different name, change the variable ansible_user in the edge_nodes group in the deploy/playbook/hosts file to match the user name you are using.
The deploy node needs to log in via SSH to the edge nodes using a cryptographic key (rather than a password), so that a password does not need to be provided for every command. Run the following command on the deploy node to create a key called "edge" for the administrative user.
ssh-keygen -t ed25519 -f ~/.ssh/edge
The parameter ~/.ssh/edge is the name and location of the private key file that will be generated. If you use a different name or location, change the ansible_ssh_private_key_file variable for the edge_nodes group in deploy/playbook/hosts to match.
Once the key files have been created, the following command can be run from the deploy node to copy the key to each edge node so a password will not be required for each login. (The administrative user's password will be requested when running this command.)
ssh-copy-id -i ~/.ssh/edge.pub edge@nodename
Starting the Cluster
Adding Edge Nodes to the Cluster
Starting EdgeX
Sensor Nodes
Verifying the Setup
as defined the Akraino validation feature project plus any additional testing specific to the blue print
Developer Guide and Troubleshooting
Changing Configuration
Enabling and Disabling Optional Services
Debugging Failures
Reporting a Bug
Uninstall Guide
Stopping EdgeX
Removing Edge Nodes
Stopping Kubernetes
Stopping and Clearing the Docker Registry
Uninstalling Software Components
Removing Configuration and Temporary Data
Troubleshooting
Confirming Node and Service Status
Accessing Logs
Maintenance
Accessing EdgeX Service Configuration
Stopping and Restarting EdgeX Services
Stopping and Restarting the Kubernetes Cluster
Adding and Removing Edge Nodes
Updating the Software
Rebuilding Custom Services
License
The software provided as part of the Smart Data Transaction for CPS blueprint is licensed under the Apache License, Version 2.0 (the "License");
You may not use the content of this software bundle except in compliance with the License.
You may obtain a copy of the License at <https://www.apache.org/licenses/LICENSE-2.0>
Unless required by applicable law or agreed to in writing, software distributed under the License is distributed on an "AS IS" BASIS, WITHOUT WARRANTIES OR CONDITIONS OF ANY KIND, either express or implied.
See the License for the specific language governing permissions and limitations under the License.
The synchronization application and LoRa device service are linked with other Go packages/components when compiled, which are each covered by their own licenses, listed below. Other components downloaded and installed during the blueprint's installation process are covered by their own licenses.
Synchronization Application
The synchronization application is linked with the following packages when compiled:
LoRa Device Service
The LoRa device service is linked with the following packages when compiled:
References
Definitions, Acronyms and Abbreviations
- CPS: Cyber-Physical System
- MQTT: A lightweight, publish-subscribe network protocol designed for connecting remote devices, especially when there are bandwidth constraints. (MQTT is not an acronym.)