Introduction
This document describes the blueprint test environment for the Smart Data Transaction for CPS blueprint. The test results and logs are posted in the Akraino Nexus at the link below:
Insert link here
Akarino Test Group Information
N/A
Testing has been carried out at Fujitsu Limited labs without any Akraino Test Working Group resources.
Overall Test Architecture
Tests are carried out on the architecture shown in the diagram below.

Test Bed
The test bed consists of a VM running on x86 hardware, performing jump host/deploy and master node roles, two edge nodes on ARM64 (Jetson Nano) hardware, and two sensor nodes on ARM32 (Raspberry Pi) hardware.
| Node Type | Count | Hardware | OS |
|---|---|---|---|
| Jump Host, Deploy/Master | 1 | Intel i5, 2 cores VM | Ubuntu 20.04 |
| Edge | 2 | Jetson Nano, ARM Cortex-A57, 4 cores | Ubuntu 20.04 |
| Sensor | 2 | Raspberry Pi 3, ARM Cortex-A53, 4 cores | Rasbian 11.1 |
A second VM is used to run the BluVal test framework components outside the system under test.
Test Framework
BluVal and additional tests are carried out using Robot Framework.
Traffic Generator
N/A
Test API description
CI/CD Regression Tests: Docker Private Registry
This set of test cases confirms the Docker private registry setup, population, and tear-down procedures.
The Test inputs
The test scripts and data are stored in the source repository's cicd/tests/docker directory.
Test Procedure
The test bed is placed in a state with the deploy and master node setup complete, but with Kubernetes, EdgeX, and the private registry not running.
Execute the test scripts:
robot cicd/tests/docker
Expected output
The test script will start the registry, pull upstream images and populate the registry, clean images left over from the pull process, stop the registry, and remove the registry. The robot command should report success for all test cases.
Test Results
Pass
CI/CD Regression Tests: Node Setup
This set of test cases confirms the scripting to initialize master and edge nodes.
The Test inputs
The test scripts and data are stored in the source repository's cicd/tests/install directory.
Test Procedure
The test bed is place in a state where only the deploy node is initialized. No EdgeX or Kubernetes services are running. For a complete test, the master and edge nodes should not have any software installed that was not installed as part of the OS installation.
Execute the test scripts:
robot cicd/tests/install
Expected output
The test scripts will initialize the master and edge nodes and verify the required software is installed. The robot command should report success for all test cases.
Test Results
Pass
CI/CD Regression Tests: Cluster Setup & Teardown
These test cases verify that the Kubernetes cluster can be initialized, edge nodes added to it and removed, and the cluster torn down.
The Test inputs
The test scripts and data are stored in the source repository's cicd/tests/cluster directory.
Test Procedure
The test bed is placed in a state where all nodes are prepared with required software and the Docker registry is running. The registry must be populated with the Kubernetes and Flannel images from upstream.
Execute the test scripts:
robot cicd/tests/clusterExpected output
The test scripts will start the cluster, add all configured edge nodes, remove the edge nodes, and reset the cluster. The robot command should report success for all test cases.
Test Results
Pass
CI/CD Regression Tests: EdgeX Services
These test cases verify that the EdgeX micro-services can be started and that MQTT messages are passed to the master node from the services.
The Test inputs
The test scripts and data are stored in the source repository's cicd/tests/edgex directory.
Test Procedure
The test bed is placed in a state where the cluster is initialized and all edge nodes have joined. The Docker registry and mosquitto MQTT broker must be running on the master node. The registry must be populated with all upstream images and custom images. Either the device-lora service should be enabled with dht2lra service running on the sensor nodes, or device-virtual should be enabled to provide readings.
Execute the test scripts:
robot cicd/tests/edgexExpected output
The test scripts will start the EdgeX micro-services on all edge nodes, confirm that MQTT messages are being delivered from the edge nodes, and stop the EdgeX micro-services. The robot command should report success for all test cases.
Test Results
Pass
CI/CD Regression Tests: LoRa Device Service
These test cases verify that the LoRa device service can read sensor data over the LoRa communications channel.
The Test inputs
The test steps and data are contained in the scripts in the source repository cicd/tests/lora directory.
Test Procedure
The test bed is initialized to the point of having all EdgeX services running, with device-lora enabled.
The dht2lra service is started on the two sensor nodes.
Execute the test scripts:
robot cicd/tests/lora
Expected output
The test cases will check if MQTT messages containing temperature data gathered from the sensor nodes are arriving at the master node on the topic for each each edge node, validating that the LoRa device support is functioning.
The Robot Framework should report success for all test cases.
Test Results
Pass
Feature Project Tests
N/A
BluVal Tests
BluVal tests for Lynis, Vuls, and Kube-Hunter were executed on the test bed.
The Test inputs
Insert BluVal configuration yaml here
Steps To Implement Security Scan Requirements
Test Procedure
- Deploy a Test VM
- Copy the folder ~/.kube from Kubernetes master node to the Test VM
- Create SSH Key to access Kubernetes master node
Vuls
We use Ubuntu 20.04, so we run Vuls test as follow:
Steps To Implement Security Scan Requirements#Vuls
Create directory
$ mkdir ~/vuls
$ cd ~/vuls
$ mkdir go-cve-dictionary-log goval-dictionary-log gost-log
Fetch NVD
$ docker run --rm -it \
    -v $PWD:/go-cve-dictionary \
    -v $PWD/go-cve-dictionary-log:/var/log/go-cve-dictionary \
    vuls/go-cve-dictionary fetch nvd
Fetch OVAL
$ docker run --rm -it \
     -v $PWD:/goval-dictionary \
     -v $PWD/goval-dictionary-log:/var/log/goval-dictionary \
     vuls/goval-dictionary fetch ubuntu 16 17 18 19 20
Fetch gost
$ docker run --rm -i \
     -v $PWD:/gost \
     -v $PWD/gost-log:/var/log/gost \
     vuls/gost fetch ubuntu
Create config.toml
[servers]

[servers.master]
host = "192.168.51.22"
port = "22"
user = "test-user"
sshConfigPath   = "/root/.ssh/config"
keyPath = "/root/.ssh/id_rsa" # path to ssh private key in docker
Start vuls container to run tests
$ docker run --rm -it \
    -v ~/.ssh:/root/.ssh:ro \
    -v $PWD:/vuls \
    -v $PWD/vuls-log:/var/log/vuls \
    -v /etc/localtime:/etc/localtime:ro \
    -v /etc/timezone:/etc/timezone:ro \
    vuls/vuls scan \
    -config=./config.toml
Get the report
$ docker run --rm -it \
     -v ~/.ssh:/root/.ssh:ro \
     -v $PWD:/vuls \
     -v $PWD/vuls-log:/var/log/vuls \
     -v /etc/localtime:/etc/localtime:ro \
     vuls/vuls report \
     -format-list \
     -config=./config.toml
Lynis/Kuber-Hunter
Create ~/validation/bluval/bluval-sdtfc.yaml to customize the Test
blueprint:
    name: sdtfc
    layers:
        - os
        - k8s

    os: &os
        -
            name: lynis
            what: lynis
            optional: "False"
    k8s: &k8s
        -
            name: kube-hunter
            what: kube-hunter
            optional: "False"
Update ~/validation/bluval/volumes.yaml file
volumes:
    # location of the ssh key to access the cluster
    ssh_key_dir:
        local: '/home/ubuntu/.ssh'
        target: '/root/.ssh'
    # location of the k8s access files (config file, certificates, keys)
    kube_config_dir:
        local: '/home/ubuntu/kube'
        target: '/root/.kube/'
    # location of the customized variables.yaml
    custom_variables_file:
        local: '/home/ubuntu/validation/tests/variables.yaml'
        target: '/opt/akraino/validation/tests/variables.yaml'
    # location of the bluval-<blueprint>.yaml file
    blueprint_dir:
        local: '/home/ubuntu/validation/bluval'
        target: '/opt/akraino/validation/bluval'
    # location on where to store the results on the local jumpserver
    results_dir:
        local: '/home/ubuntu/results'
        target: '/opt/akraino/results'
    # location on where to store openrc file
    openrc:
        local: ''
        target: '/root/openrc'

# parameters that will be passed to the container at each layer
layers:
    # volumes mounted at all layers; volumes specific for a different layer are below
    common:
        - custom_variables_file
        - blueprint_dir
        - results_dir
    hardware:
        - ssh_key_dir
    os:
        - ssh_key_dir
    networking:
        - ssh_key_dir
    docker:
        - ssh_key_dir
    k8s:
        - ssh_key_dir
        - kube_config_dir
    k8s_networking:
        - ssh_key_dir
        - kube_config_dir
    openstack:
        - openrc
    sds:
    sdn:
    vim:
Update ~/validation/tests/variables.yaml file
### Input variables cluster's master host
host: <IP Address>             # cluster's master host address
username: <username>            # login name to connect to cluster
password: <password>         # login password to connect to cluster
ssh_keyfile: /root/.ssh/id_rsa        # Identity file for authentication
Run Blucon
$ bash validation/bluval/blucon.sh sdtfc
Test Results
Insert Results URL
Vuls
There are 17 CVEs with a CVSS score >= 9.0.
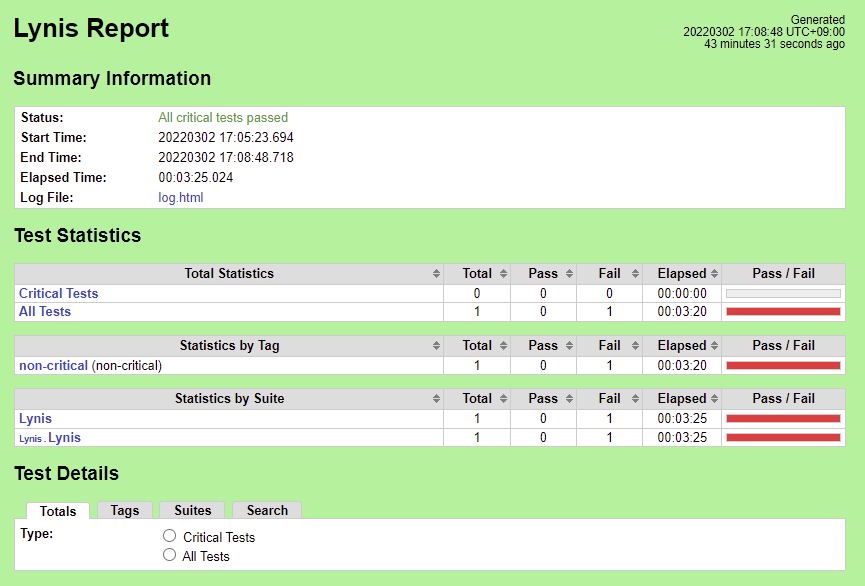
Lynis
Kuber-Hunter
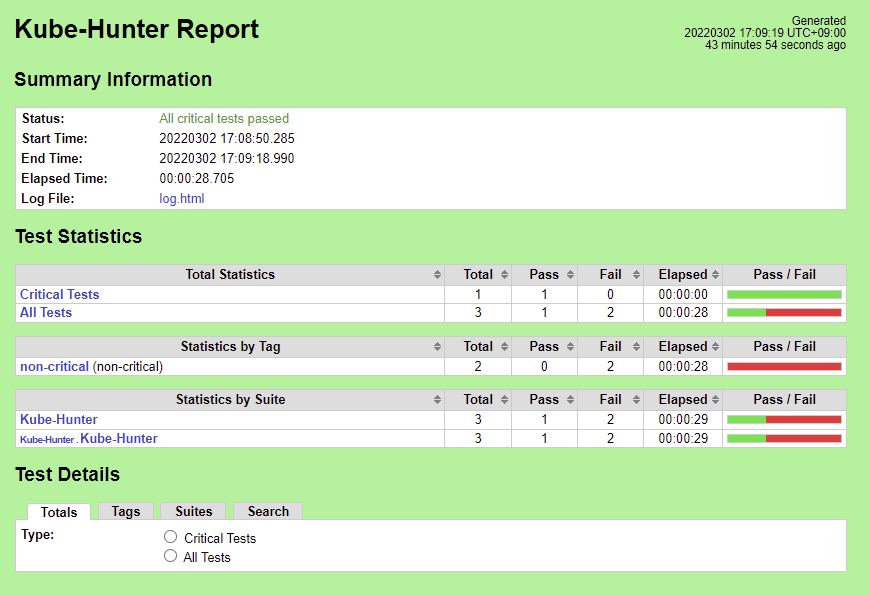
There are 5 Vulnerabilities.
- KHV002
- KHV005
- KHV050
- CAP_NET_RAW Enabled
- Access to pod's secrets
Fix for KHV002
|
Fix for KHV005, KHV050, Access to pod's secrets
|
Test Dashboards
Single pane view of how the test score looks like for the Blue print.
| Total Tests | Test Executed | Pass | Fail | In Progress |
|---|---|---|---|---|